
Setting up contract templates
A contract template is the reusable document that gets sent to your clients for each new booking. Setting it up once means every contract afterwards is prefilled with the right data and routed to the right people.
Before you begin: privacy and GDPR
Section titled “Before you begin: privacy and GDPR”If you want to use Floatist Contracts, two things need to be in place for both you and us to stay GDPR compliant:
- Add the Privacy Policy addition below to your website’s existing privacy policy.
- Add a consent sentence with a checkbox to every contract template, linking to your privacy policy. We’ll add this to the template for you when we set it up.
Privacy Policy addition
Section titled “Privacy Policy addition”Copy the text from Privacy Policy addition for Fleet Operators and add it to your existing website privacy policy.
Consent sentence and checkbox
Section titled “Consent sentence and checkbox”Every contract template needs a consent line the signer ticks. Use this exact wording, replacing
the [LINK ...] placeholder with a link to your privacy policy:
☐ I consent to the collection of my personal data as described in the Terms & Privacy Policy [LINK TO YOUR PRIVACY POLICY]
We’ll add the checkbox and the linked wording to your template when we set it up.
What a template contains
Section titled “What a template contains”Each template is built from a base document (typically a PDF) that has been marked up with placeholder fields. Fields are the interactive parts of the contract — a place for a signature, a customer’s name, a date, a checkbox — that get filled in either automatically from the booking or by the signers themselves.
Field types
Section titled “Field types”We support a range of field types. The ones most useful for charter contracts:
- Signature — where a party draws their signature.
- Initials — a smaller signature-like field, often used on each page or next to key clauses.
- Text — free-form text input. Perfect for prefilled fields like customer name, address, or contact number.
- Date — a date picker.
- Number — numeric input, e.g. security deposit amount.
- Checkbox — a single tickable box, e.g. “I accept the terms” or the GDPR privacy acknowledgement.
- Multi-select — multiple checkboxes where the signer can pick more than one.
- Radio — one of several mutually-exclusive options.
- Select — a dropdown with predefined options.
- File upload — asks the signer to attach a document, e.g. their skipper license.
The file upload field is particularly useful for collecting required paperwork alongside the signed contract — a common example is asking the charterer to upload their skipper license so you have it on file without a separate email exchange.
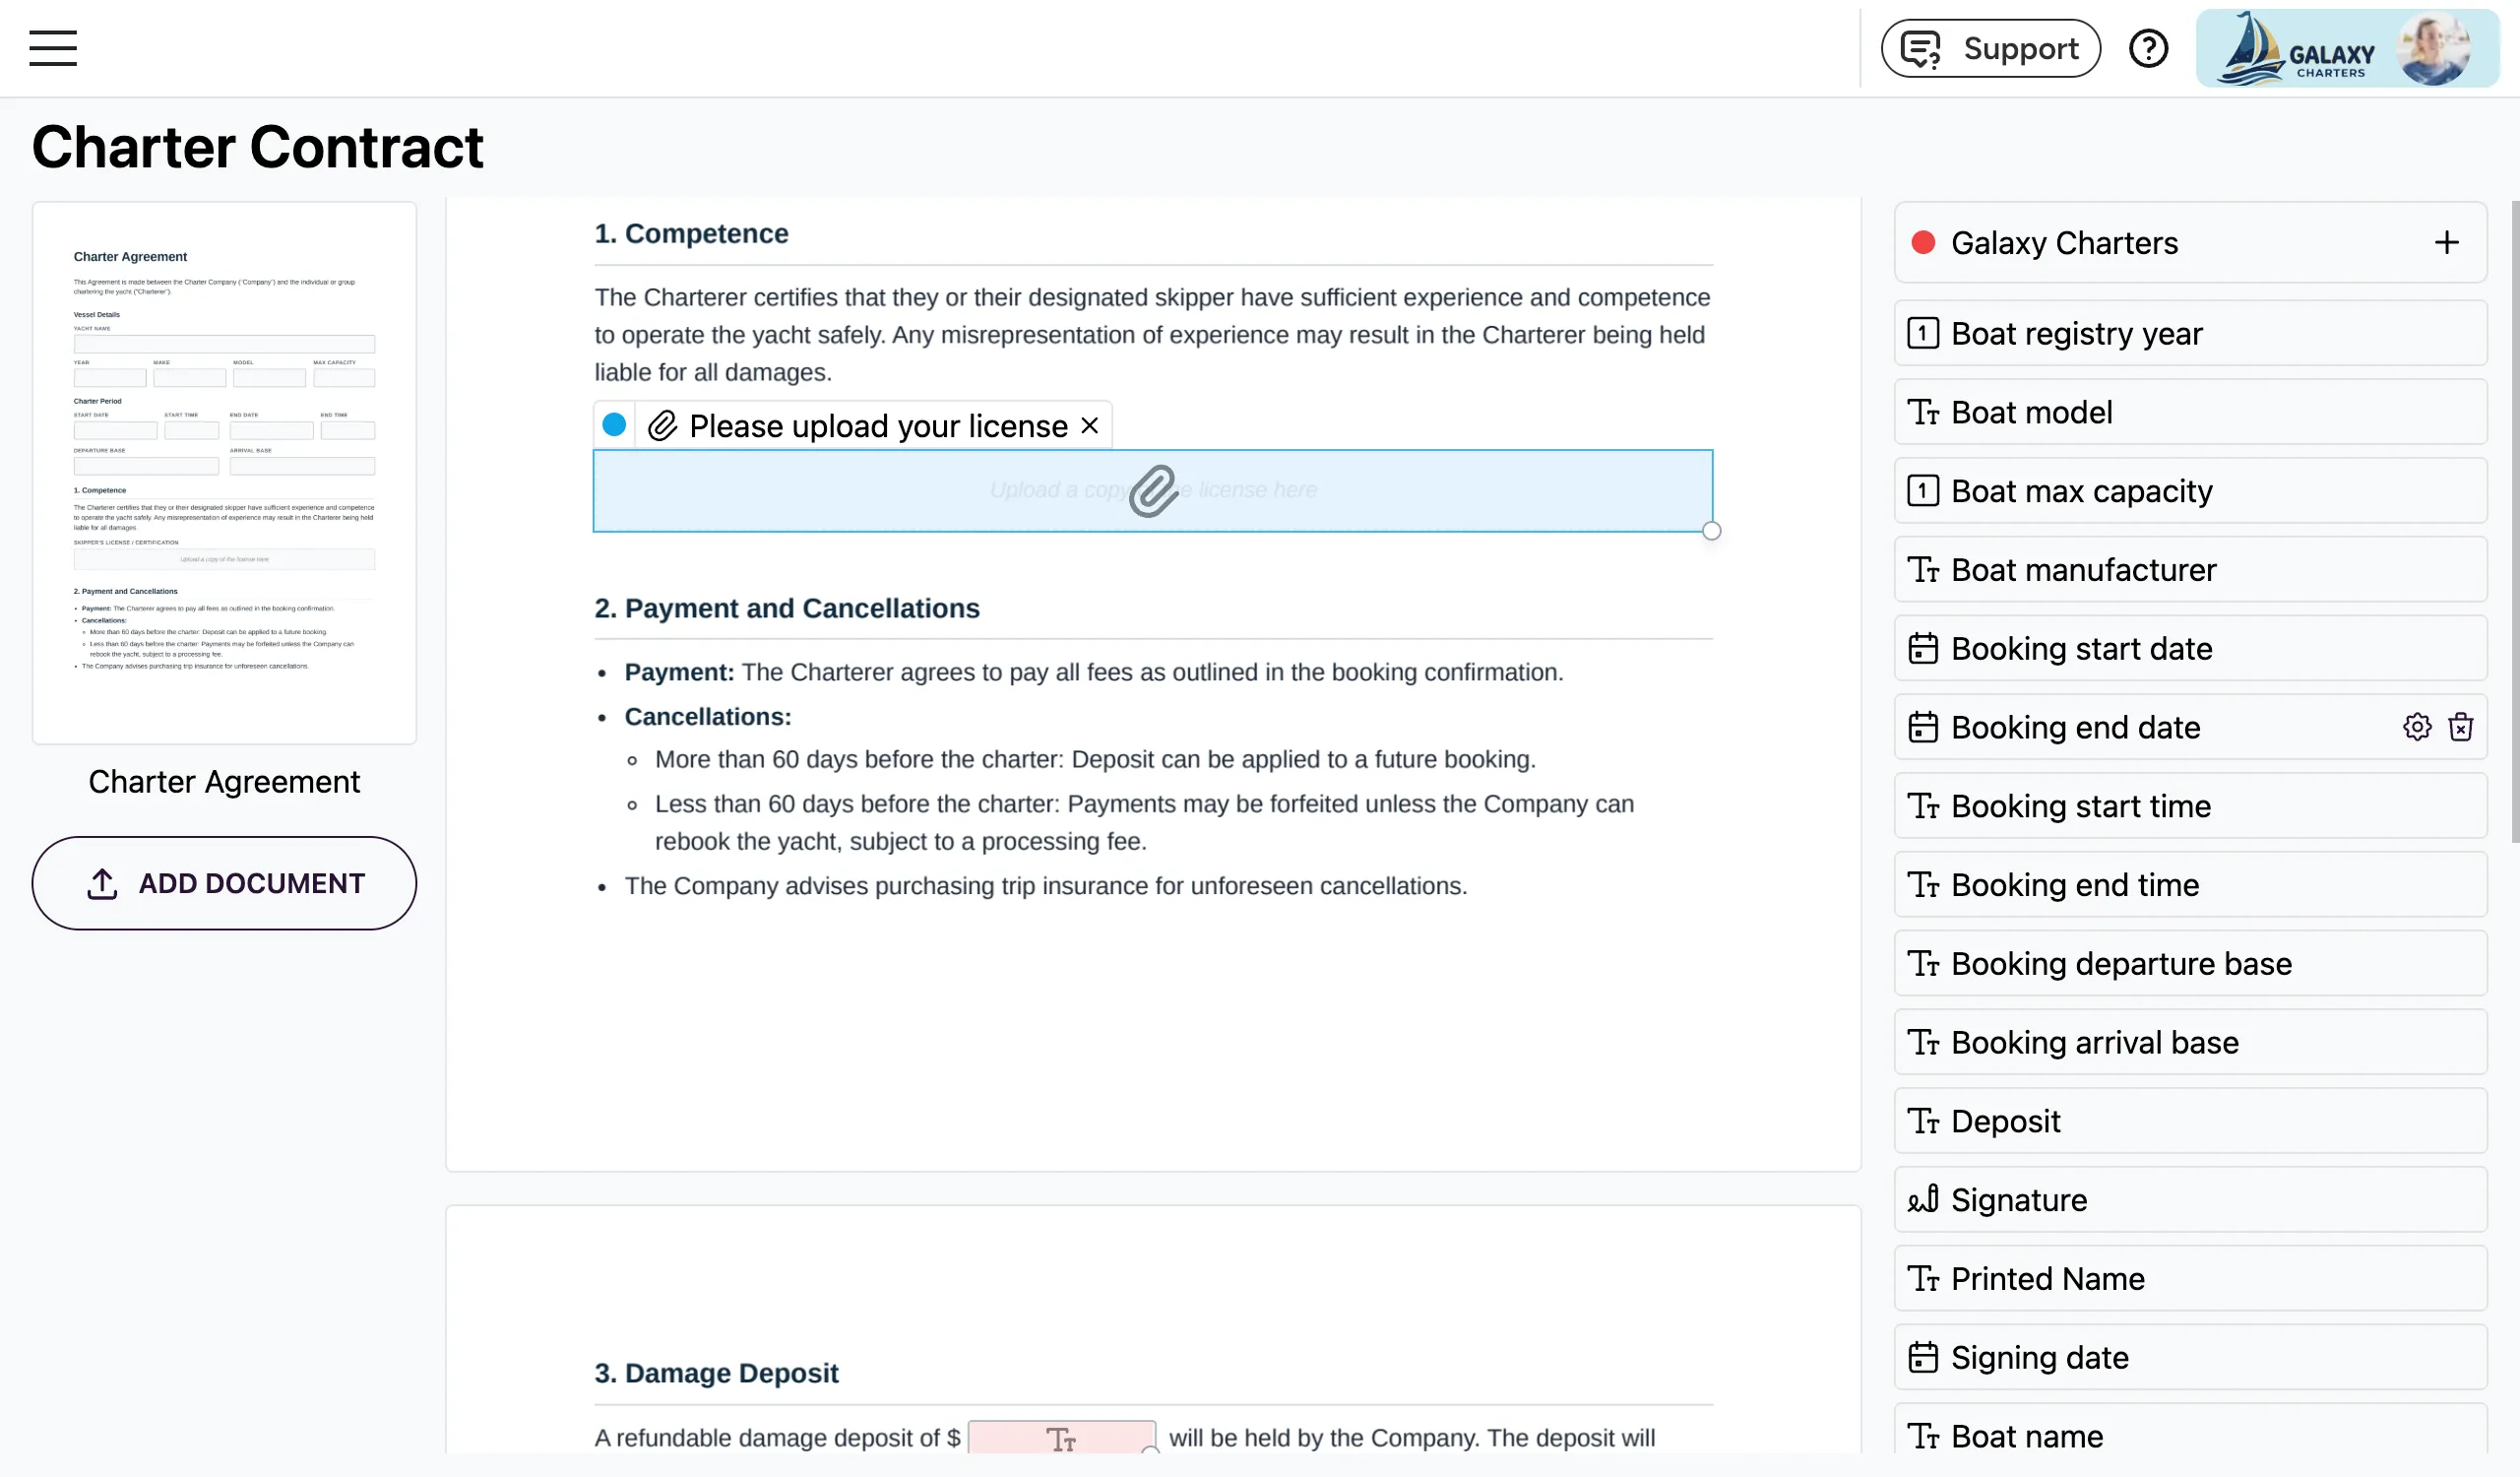
Each field on the template is assigned to exactly one signing party (see below) — for example, the signature at the bottom of page 3 belongs to the charterer, while the initials in the top-right corner are yours to fill in.
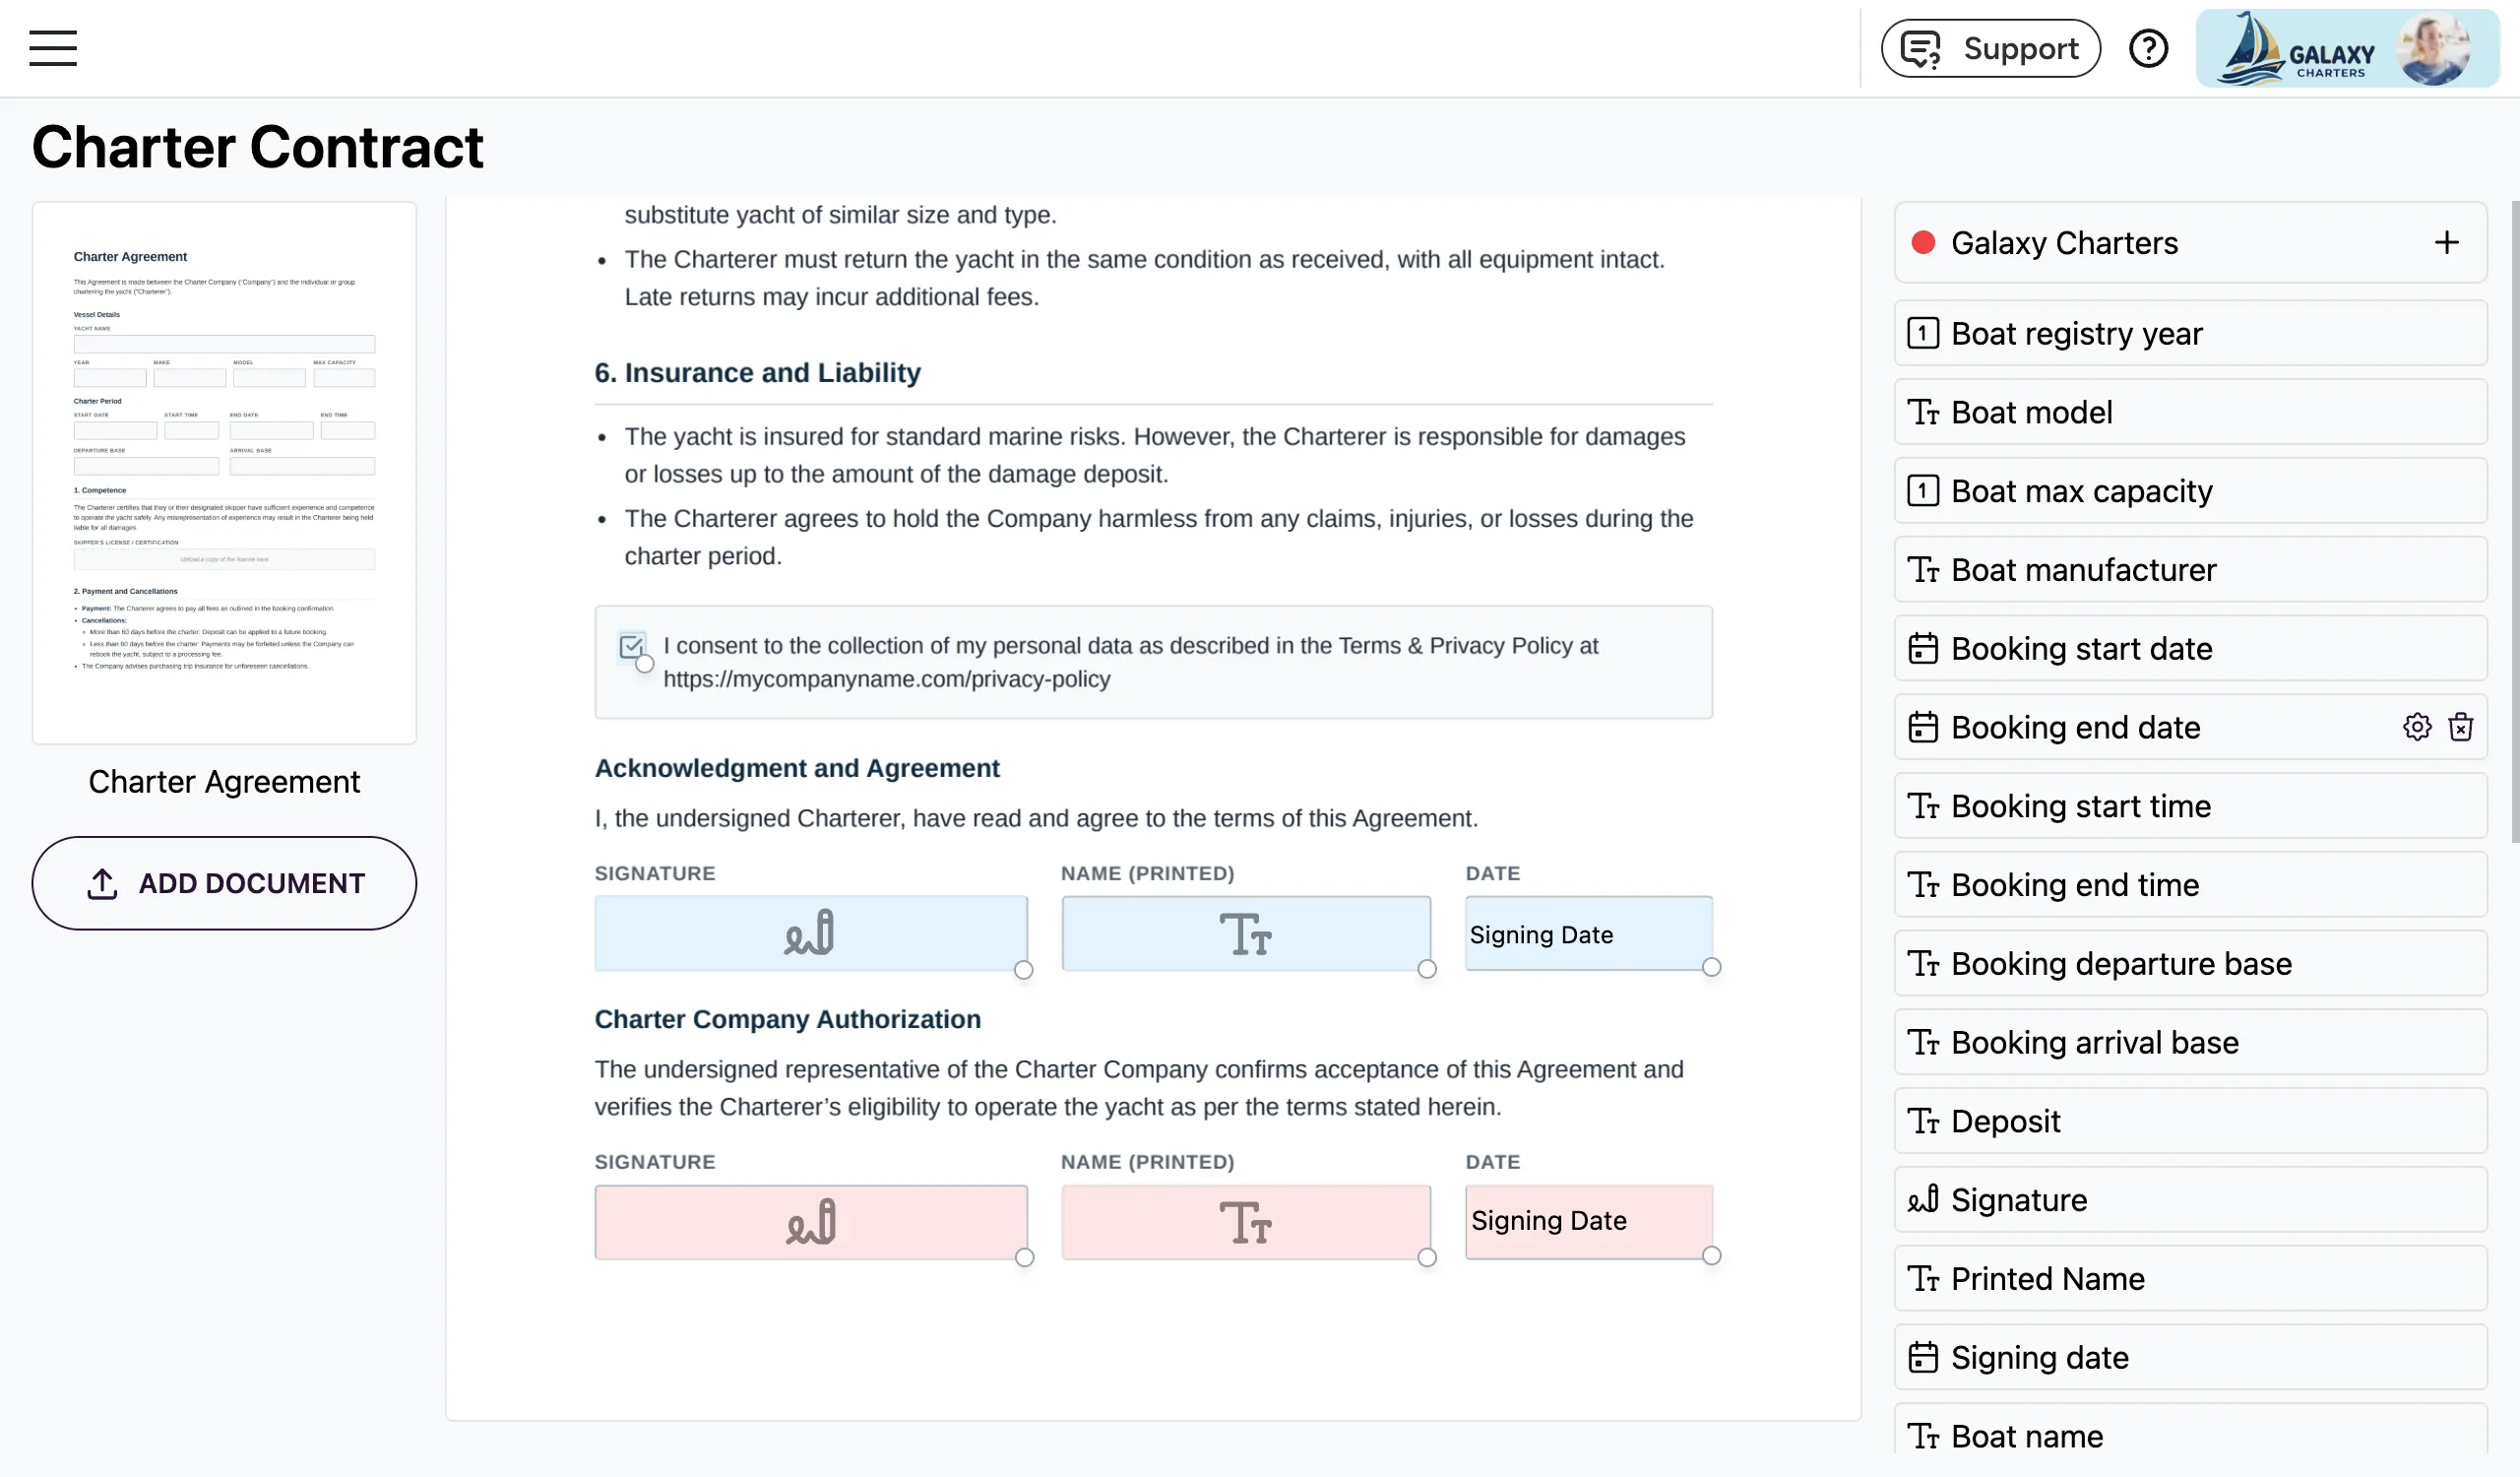
Fields Floatist can auto-populate
Section titled “Fields Floatist can auto-populate”Floatist can pull a lot from the booking automatically so you don’t have to type it on every contract — check-in and check-out dates, the charterer’s name and contact info, plenty of boat details (name, model, registration, and other attributes), and any information imported from MMK or NauSYS for integration-sourced bookings.
Auto-population happens through contract default values — as long as the field’s name on the template matches a variable in the defaults, Floatist fills it in.
Field settings
Section titled “Field settings”Each field on a template has a few settings you can adjust:
-
Required or optional. Required fields must be filled in before the party can sign; optional fields can be left blank. Make a field optional if the information isn’t always available (for example, a passport number that may not apply to every guest).
-
Field size and text scaling. Text automatically scales to fit inside the field’s box. If you don’t want text to end up too small to read, make sure the field boxes are big enough for the values they’ll hold — especially for text fields that get long prefilled values like full addresses or company names.
-
Date format (on Date fields). Dates can be displayed in several formats — for example
DD/MM/YYYY,MM/DD/YYYY,YYYY-MM-DD, or long-form like12 June 2026. Pick the one that matches your local convention or the surrounding contract wording.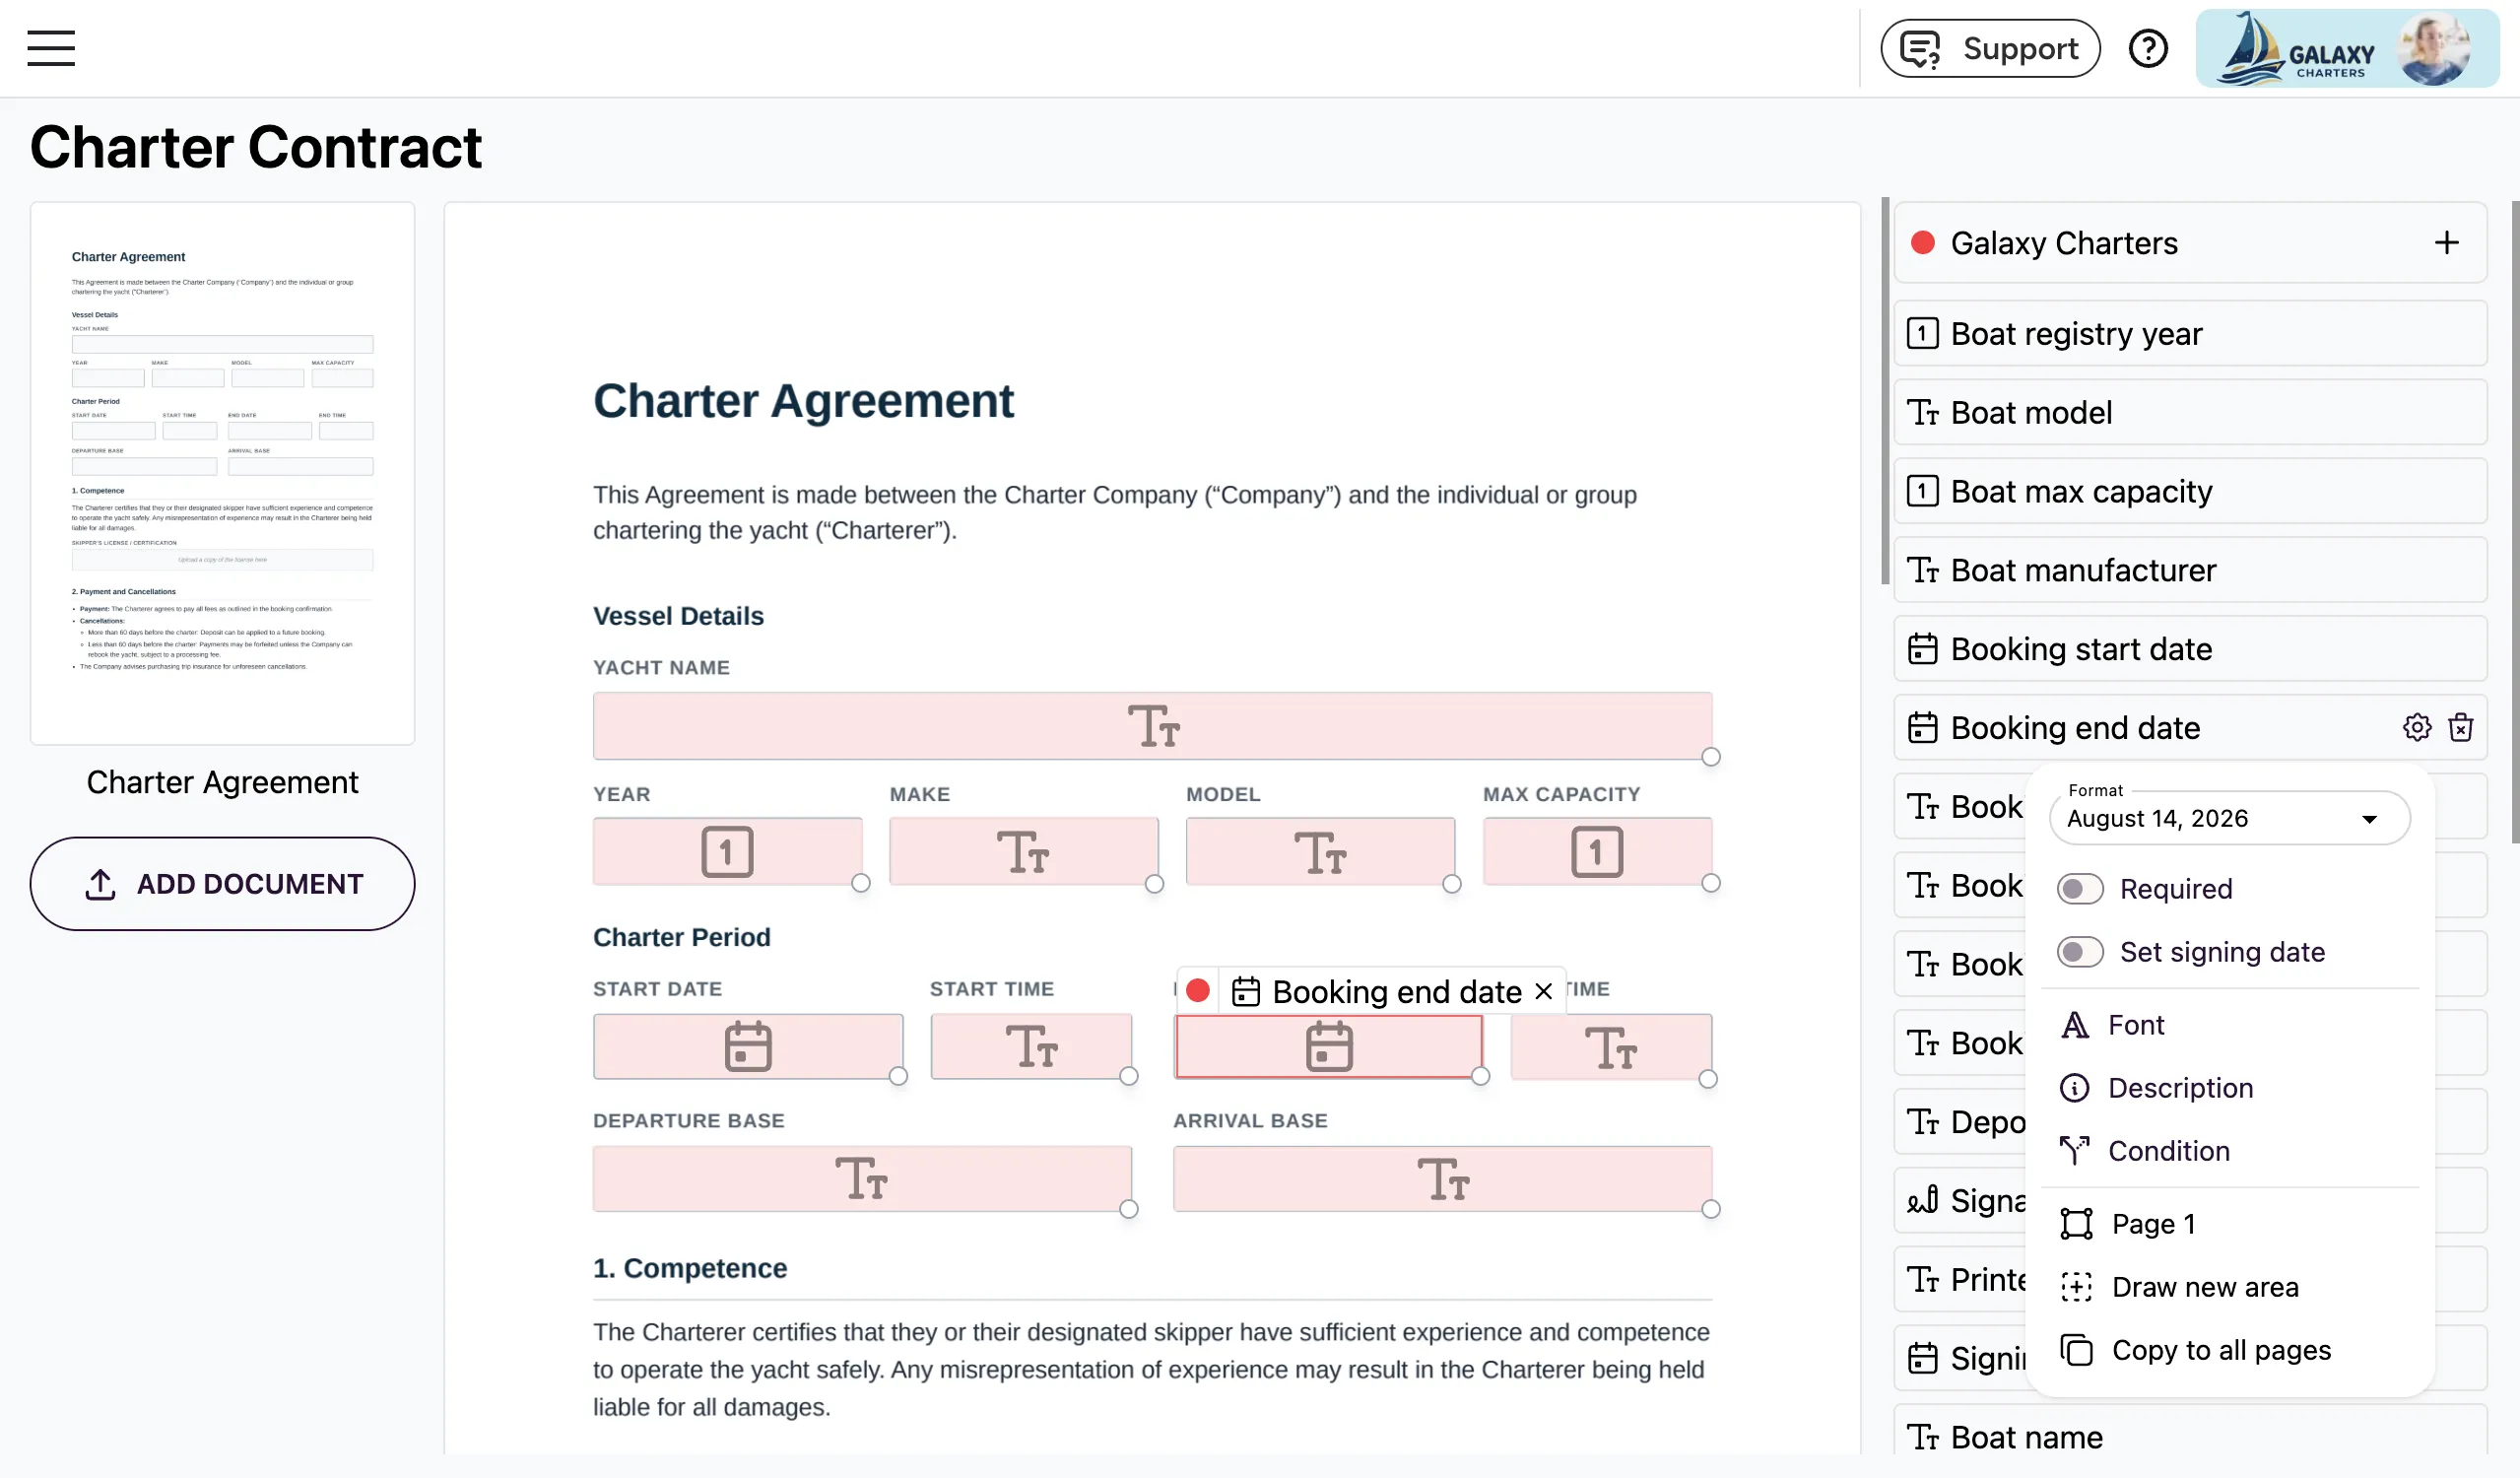
Reordering fields
Section titled “Reordering fields”Fields are presented to signers in the order they were added, not the order they appear on the page. If you add a new field in the middle or at the top of a document that already has fields below it, the signer will jump up and down as they move through the contract — which feels disorienting and easy to skip.
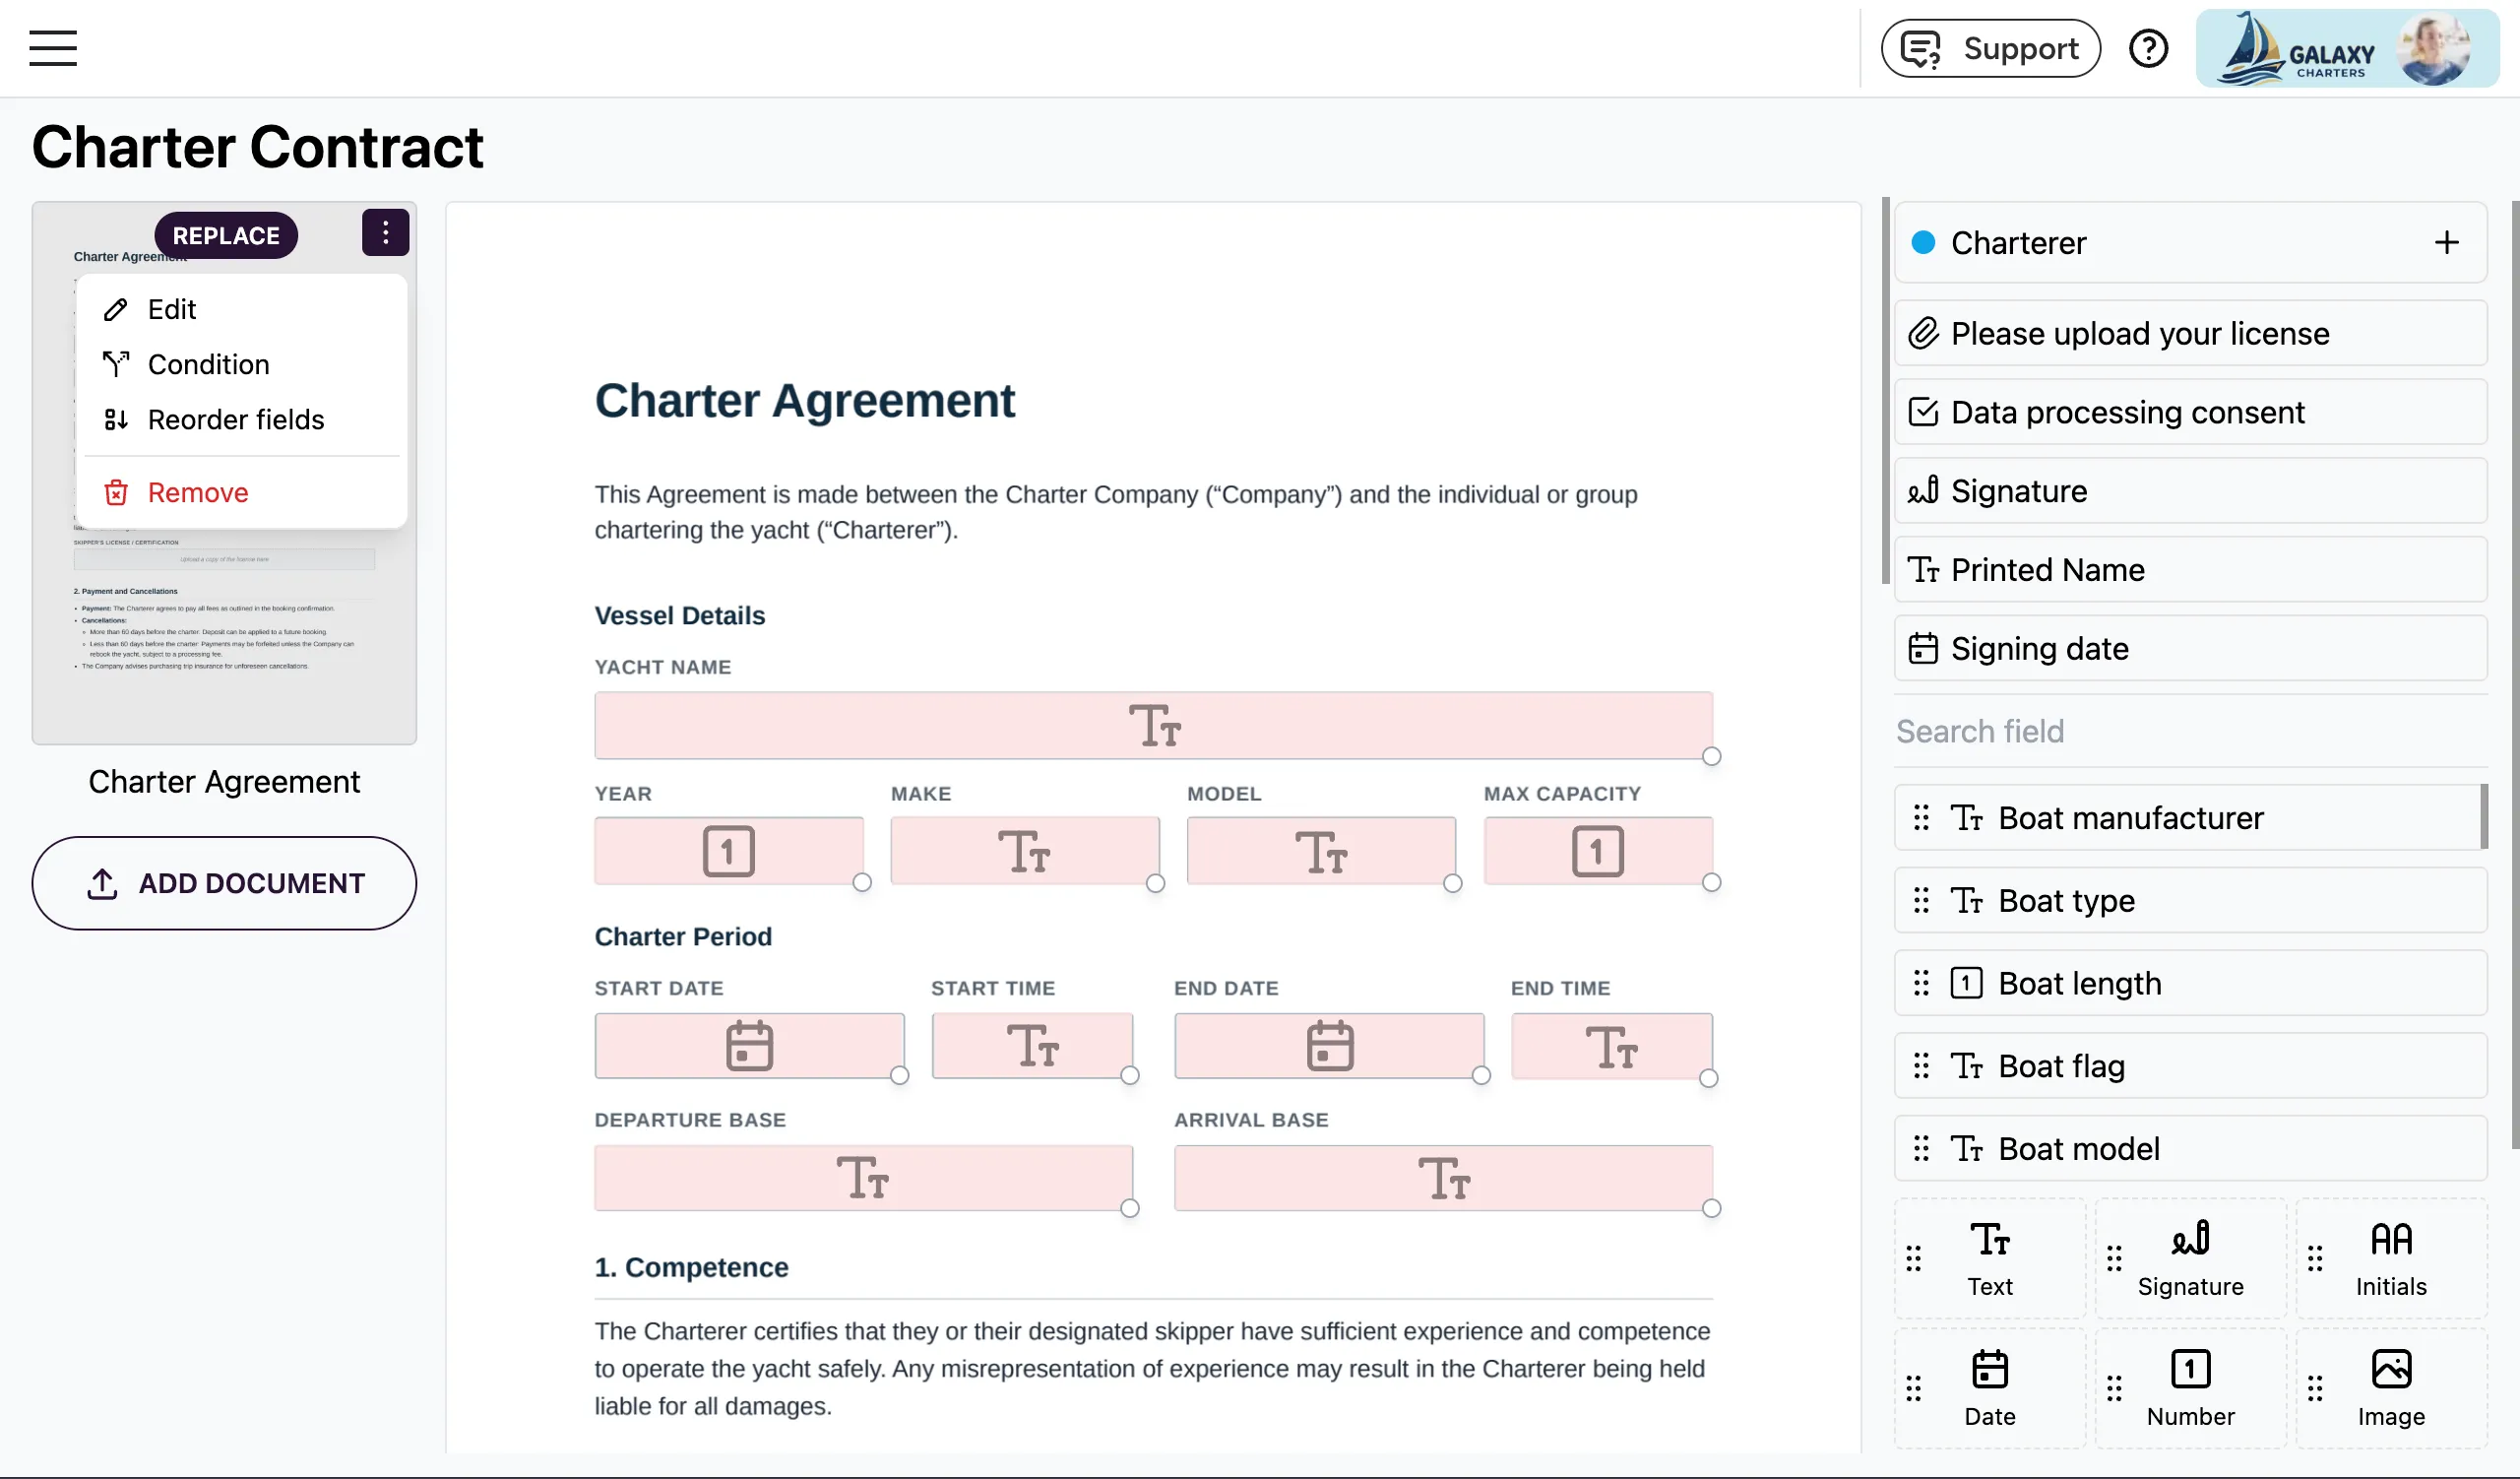
To fix this, reorder the fields so they follow the natural top-to-bottom flow of the document:
- In the template editor, hover over the agreement thumbnail in the top-left of the page.
- Click the three-dot menu in the top-right corner of that thumbnail.
- Select Reorder fields.
Replacing the base PDF
Section titled “Replacing the base PDF”If your contract wording changes — updated terms, new branding, a translated version — you can swap the underlying PDF without rebuilding the template from scratch. When the PDF is replaced:
- The fields you’ve already set up are preserved. Signature boxes, text placeholders, date pickers, party assignments, defaults — none of it needs to be re-created.
- You may need to reposition fields on the new PDF. If the new layout has different page breaks or the paragraphs have shifted, the field boxes might land on the wrong spots and need to be moved to line up with the new text.
- Contracts already created from the old template are unaffected. In-flight and completed contracts keep their original PDF and field values — the template change only affects new contracts created after the update.
This is the fastest way to keep an existing template in sync with an updated contract document.
Signing parties
Section titled “Signing parties”A contract has one or more signing parties — each is a distinct role that receives a copy of the contract and signs it. In Floatist charter contracts, the standard setup is:
- First party — your charter company. You always sign first, typically by a member of your staff directly in the Floatist app.
- Second party — the charterer. The customer who booked the boat. Floatist prefills their name, email, and contact details from the booking.
- Additional parties (optional). Add these only if your template requires their signature:
- Skipper
- Boat owner
- Travel agent
- Other required signatories
The first party is always your charter company — this is a Floatist convention that applies to every template.
Signing order
Section titled “Signing order”Templates can be configured either to send to all parties in parallel or to preserve the signing order so parties sign sequentially:
- Preserve signing order (recommended). The contract is sent only to the first party. Once they’ve signed, it’s automatically forwarded to the second party. Once they’ve signed, it goes to the third party (if any). Each party sees the fully-committed signatures from the previous parties before their own turn.
- Parallel. All parties receive the contract at the same time and can sign in any order.
For most charter operations, preserve signing order is the right choice: you counter-sign first, and the charterer receives an already-signed contract when their turn comes.
Contract default values
Section titled “Contract default values”Default values define how each variable in your contract templates gets filled in. Instead of manually typing the customer’s name into every contract, you can define once that the “Customer name” field pulls from the booking’s client-name field, and the template will populate it automatically on every future contract.
Manage defaults at Settings > Bookings > Contract default values.
How default value sets work
Section titled “How default value sets work”A default value set is a group of variable assignments. Each set can:
- Apply to one or more templates (required — a set must be linked to at least one template).
- Optionally also apply to one or more boats, restricting where the set kicks in.
When Floatist generates a contract, it collects all sets that apply to the booking’s template and boat and merges their values. That means you can layer:
- A general set with company-wide defaults for every template.
- A boat-scoped set with details specific to one boat or one boat owner.
You get the merged result on the final contract without having to duplicate templates per boat.
Fixed vs. dynamic values
Section titled “Fixed vs. dynamic values”You can assign one of two types of values to each variable:
-
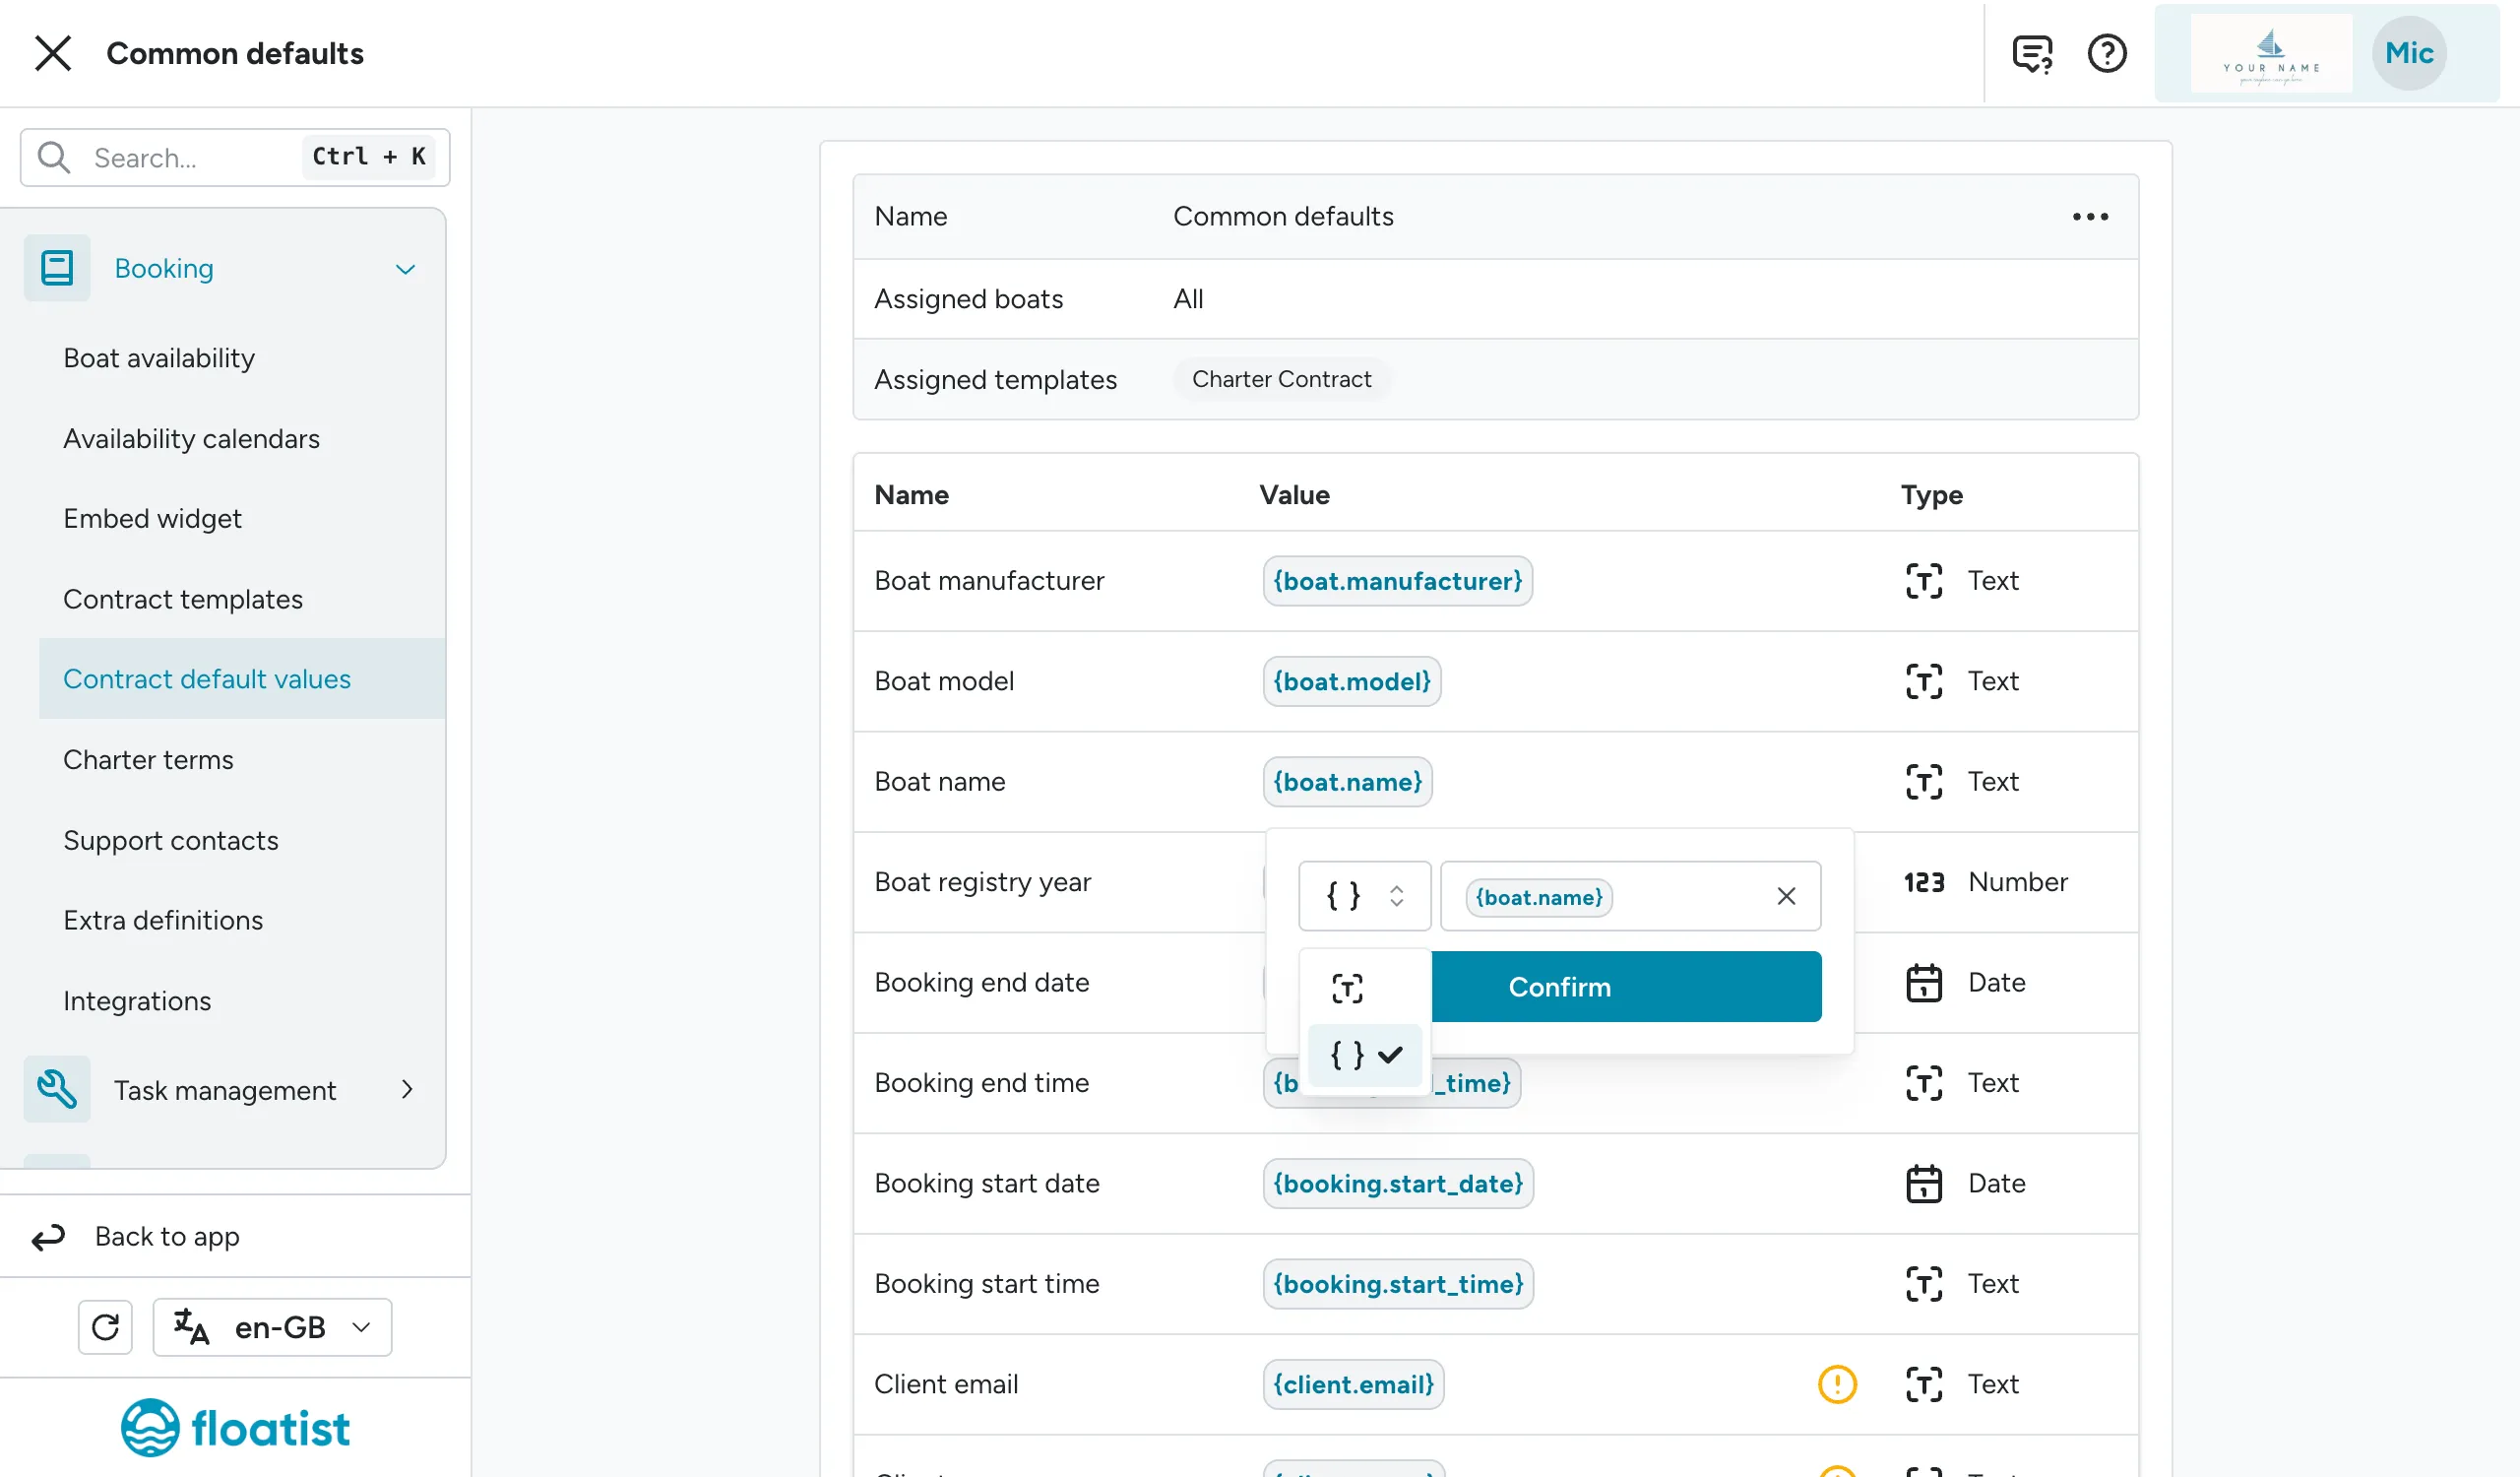
Fixed value (
[T]): a static string entered once. Useful for boilerplate that doesn’t change per booking — company address, VAT number, terms references. -
Dynamic value (
{ }): a booking field that Floatist evaluates for each contract. Dynamic values use a tag syntax like:{boat.name}— the boat’s name.{booking.start_date}— the booking’s check-in date.{booking.end_date}— the booking’s check-out date.{charterer.name}— the charterer’s full name.{charterer.email}— the charterer’s email address.{charterer.phone}— the charterer’s phone number.
Make sure the tag type matches the field type on the template (text, number, date, or image).
To set a fixed value, select the [T] option from the dropdown and enter the value. To use a
dynamic booking field, choose the { } option and pick the field from the list. In the example
below, “Boat name” is assigned to the dynamic boat name field.
Field-name matching
Section titled “Field-name matching”The link between a template field and its default value is the field’s name. If a template
has a field called Charterer name, the default set needs a variable named Charterer name
(exact match) for Floatist to populate it.
If a field isn’t populating on generated contracts, the mismatch is usually a small difference in the name — capitalisation, an extra space, or a slight rewording between the template and the defaults.
Best practices
Section titled “Best practices”- One set per boat owner. Group all defaults for a specific boat owner into a single set scoped to their boats. This keeps ownership details tidy and easy to update when an owner’s information changes.
- Prefer boat-scoped sets over duplicate templates. Instead of maintaining a separate template for every boat, keep one template and layer boat-scoped sets on top. Far less to maintain.
Emails to signers
Section titled “Emails to signers”When a signature is requested, Floatist sends the email on behalf of your charter company — it appears to come from you, not from a third-party e-signing service, so guests recognise the sender and are more likely to open it. The available emails are:
- Signature request — sent to a party when it’s their turn to sign.
- Signed document copy — sent to each party once the whole contract is fully signed.
- Completed notification — confirms the contract is complete.
If you’d like replies to signing emails to reach a specific inbox at your company (rather than the default no-reply address), a Reply-To address can be configured for you. Just mention the address you’d like when you request template setup.
Test the template before going live
Section titled “Test the template before going live”Once we’ve set up your template, run a test contract end-to-end before you start using it with real bookings. This catches configuration issues while there’s still time to fix them without affecting a real charter.
- Open a test booking (or a real upcoming one with dummy contact info).
- From the booking’s Timeline, create a contract using the new template.
- Check that:
- The charterer’s information auto-fills correctly (name, email, phone).
- Dynamic booking fields populate correctly (boat details, dates, base info).
- Fixed default values populate correctly (company address, VAT number, boilerplate).
- Signing order routes the contract to the right parties in the right sequence.
- Complete the signing yourself from each party’s side so you see the full flow — including what the charterer will see when it’s their turn.
When creating the test contract:
- Click Use client info to populate the charterer.
- Leave the Charter company signer blank if you’ll sign it directly from the Floatist app.
Once the test contract is signed and everything looks right, the template is ready to go live. If anything looks off, contact support@floatist.com with the issue and we’ll adjust before you start using it in production.