2024
December 19
Section titled “December 19”V1 of Inventory Management
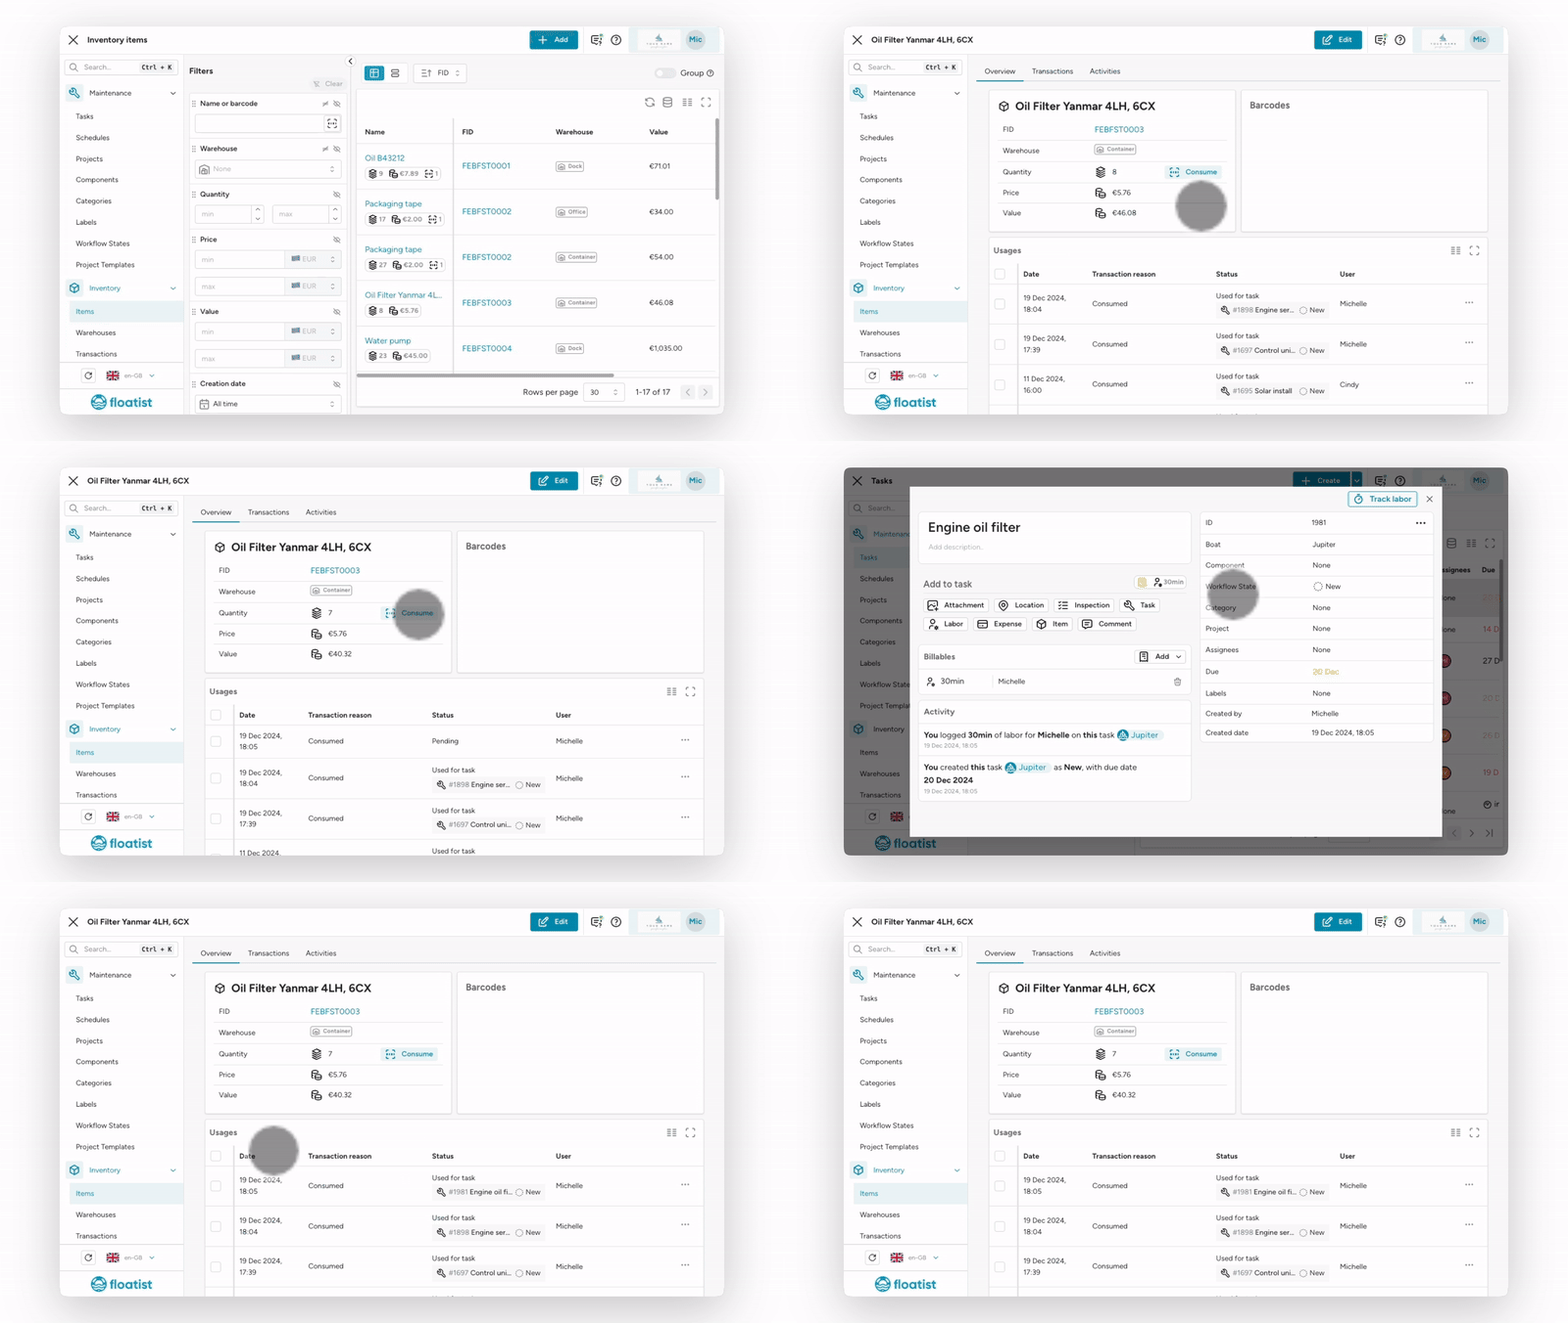
Section titled “V1 of Inventory Management”The first version of Inventory Management is ready to be used! In this first version, it is possible to:
- Keep track of your items, with their quantities, prices, barcodes, and in which warehouse they are stored
- Trace any transactions done with parts
- Keep track of consumed or sold parts
- Add parts directly to tasks
- Scan barcodes with your mobile device camera or link a barcode scanner
- Take parts out of the warehouse (consume) and then add them to a task, or return them if you didn’t end up using them
- Keep track of who added parts to tasks
Refer to our User Guide links below for detailed instructions
In order to start with Inventory Management, you can create warehouses, add parts to your warehouse, and consume parts on your tasks. Refer to the Inventory management article for detailed instructions. If you would like to import a big file with parts, please contact us on support@floatist.com and we’ll be happy to assist.
Billing
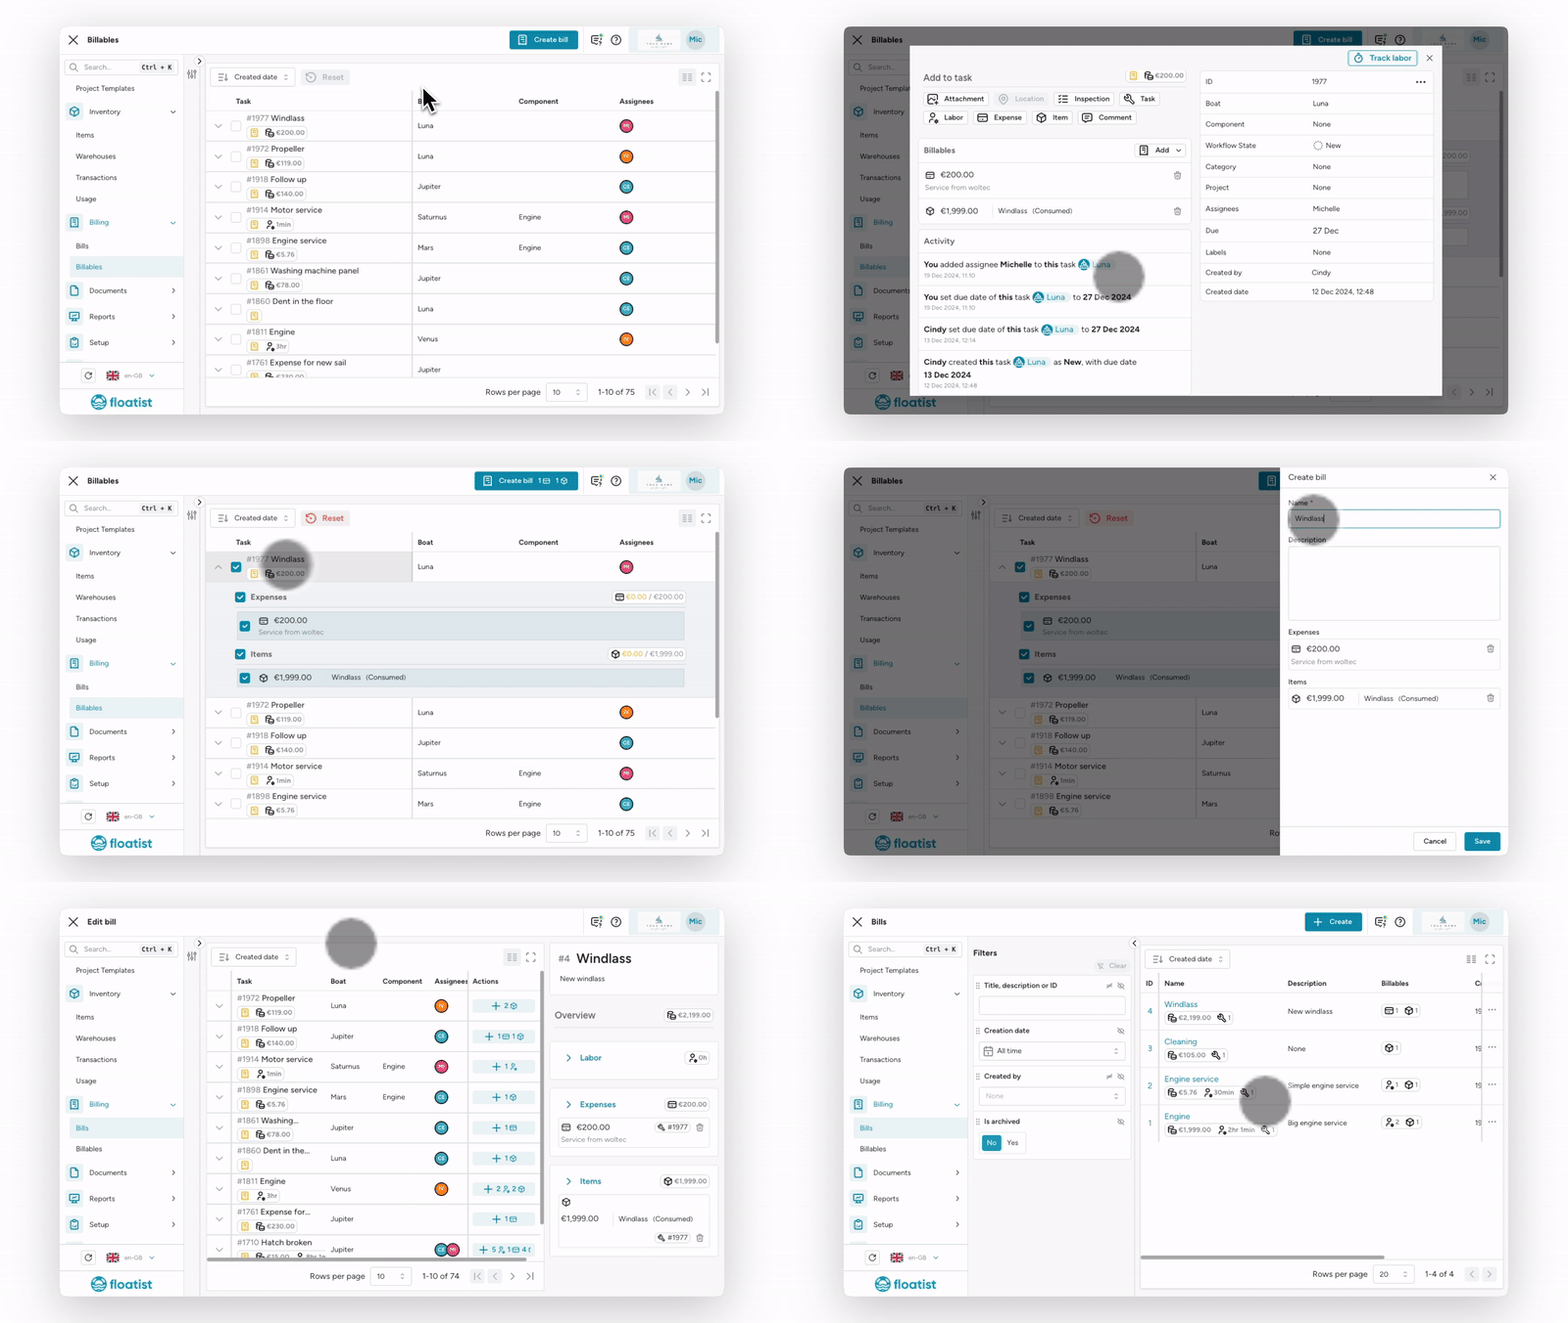
Section titled “Billing”To close the loop and be able to keep track of things you have and haven’t yet billed to your boat owners, we introduced the Billing feature. In the new Billing menu, you can see two new pages:
- Bills: created bills
- Billables: show all tasks with outstanding billables. This means any parts, expenses or labor for which no bills have been created yet. From this view you can create bills in Floatist, and this view essentially acts as your ‘to do’ list in terms of billing external parties. We recommend you use your own invoicing system to create an invoice when you create a bill in Floatist.
Using the Billables overview will make sure you never miss out on expenses incurred or parts sold again.
For billing the same holds as for Inventory Management, please do let us know your thoughts and suggestions based on this initial release.
December 13
Section titled “December 13”Task Calendar View
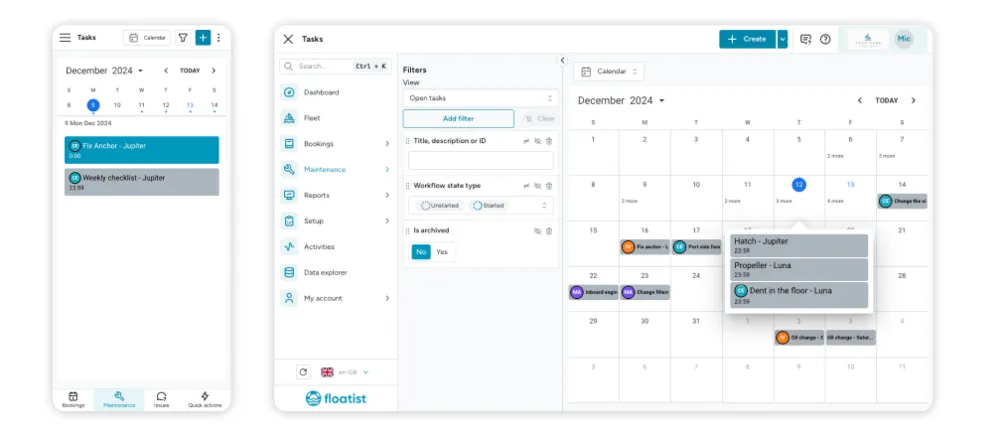
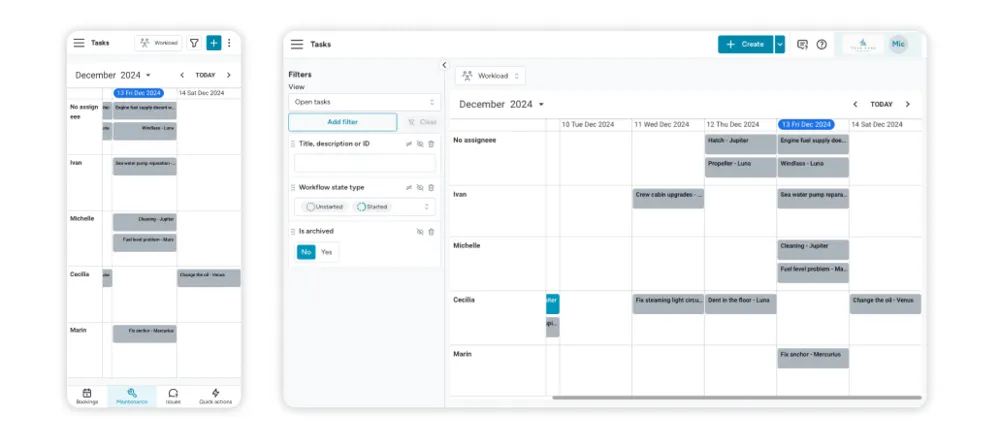
Section titled “Task Calendar View”One of the new views for visualizing tasks: the Calendar View. This view shows all tasks based on their due date in a calendar view. On Desktop, the view shows you the entire month automatically. On mobile, it will show a daily view. You can drag and drop tasks to different days to change their due dates.
You can select the Calendar view from the dropdown on the top of the Tasks page
Task Workload View
Section titled “Task Workload View”Next to the Calendar View, we have added the Workload View to the different task views. This view allows you to see all tasks based on their due dates and their assignee. This is useful if you want to have a look at the workload for everyone in your team. In this view you can also drag and drop tasks to different people and days to change their assignee or due date.
Improved Filters
Section titled “Improved Filters”We have migrated all of our existing filters to a new and improved version. The new filter setup will make it easier to find the filter you need for your purpose, because by default not all filter options will be shown. For example, especially on the Tasks page there were numerous options which could make it complicated to find what you are looking for.
On the Tasks page, we have created 3 different views:
- My tasks: all open tasks assigned to the current user
- Open tasks: all open tasks
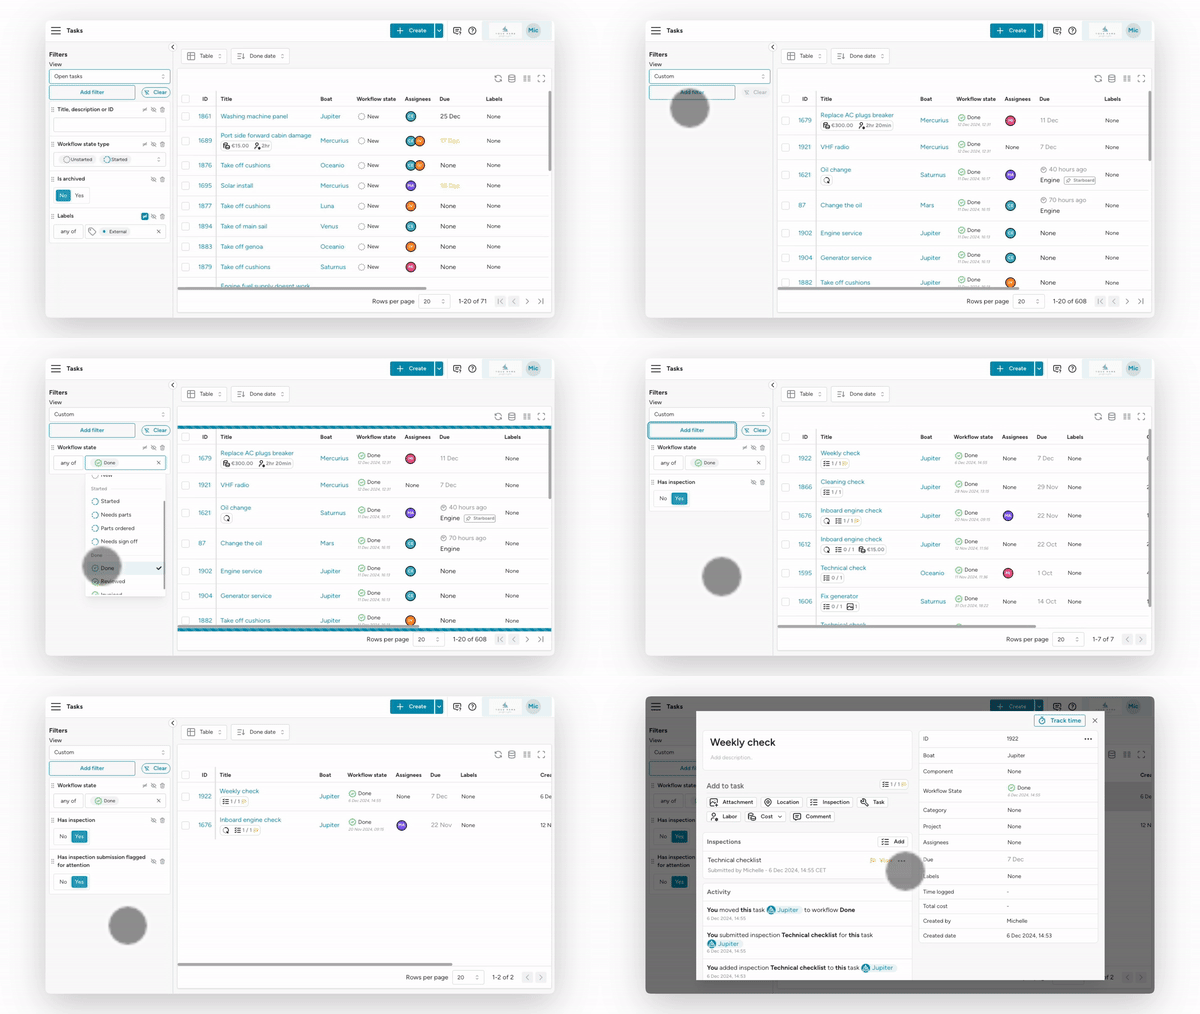
- Custom: this view allows you to create your own custom view using the different filter options.
For all filters, you will now also be able to negate them, which means do the opposite of what you are selecting, for example “Show me all tasks that are NOT linked to boat A”.
You can also simply disable the filter by clicking on the eye icon, and it will not be taken into account.
In this example recording below, you can see how to build a filter view. In this example we’ll build a view to check all tasks that have an inspection which is completed, but has something that was flagged during the inspection.
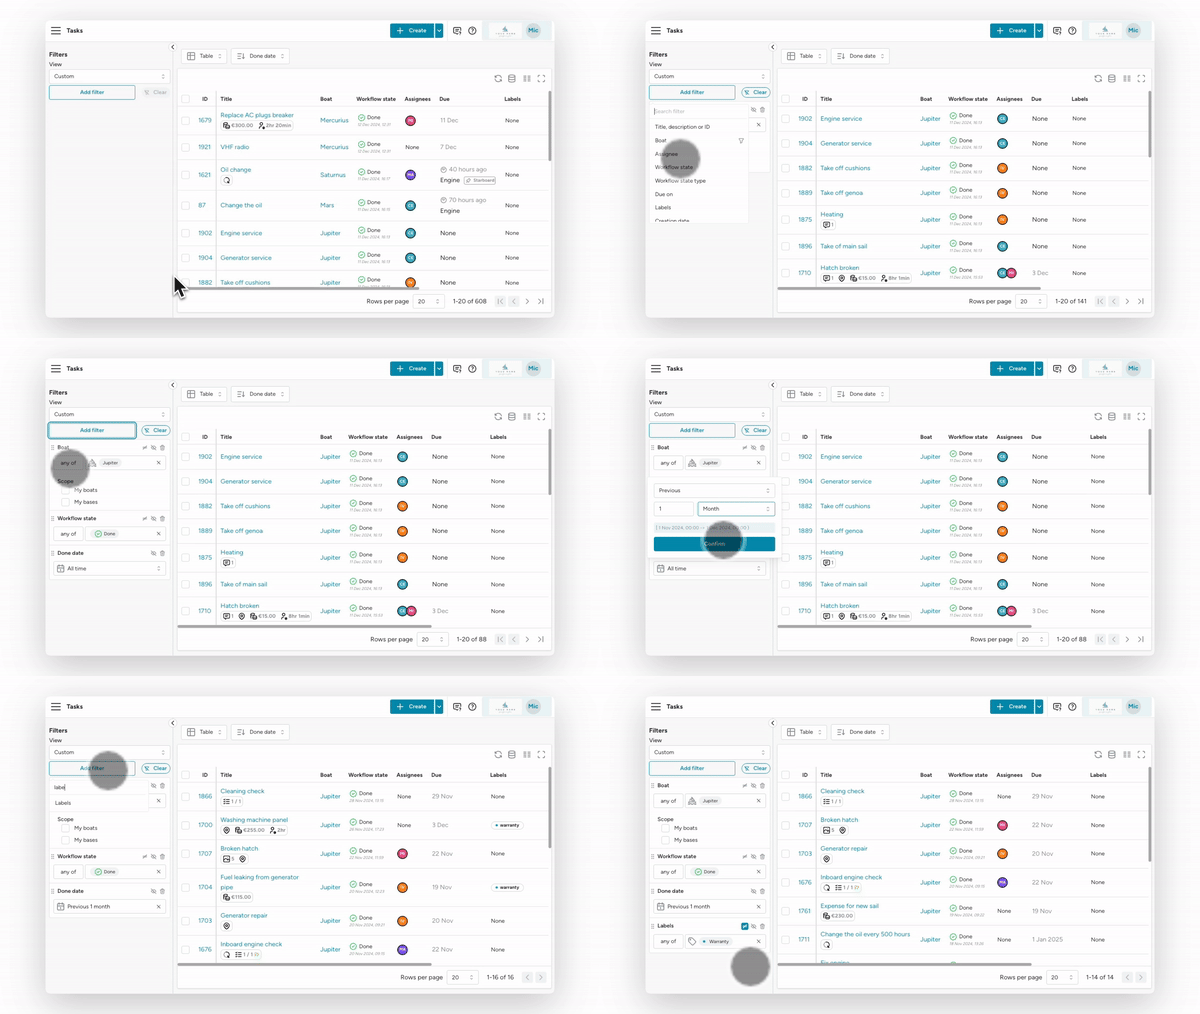
Another example of how to use the new filters below, with an example where we want to see all tasks that have been completed in the last month on yacht Jupiter, but excluding the tasks that have the “warranty” label.
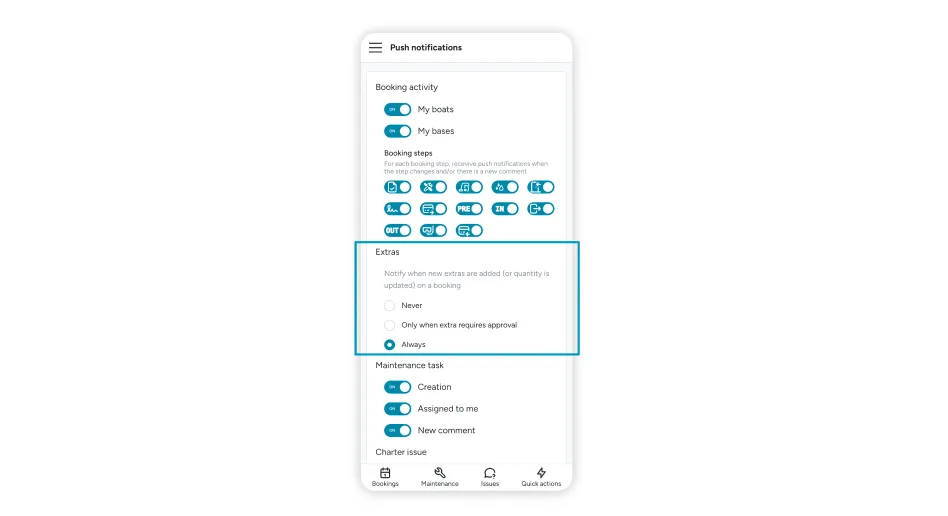
We have added a notification type for when new extras are added to the booking. A push notification will be sent to everyone who has push notifications turned on Always. You can also decide to only want to receive notifications of added extras if the extra requires approval.
Multiple Assignees on Tasks
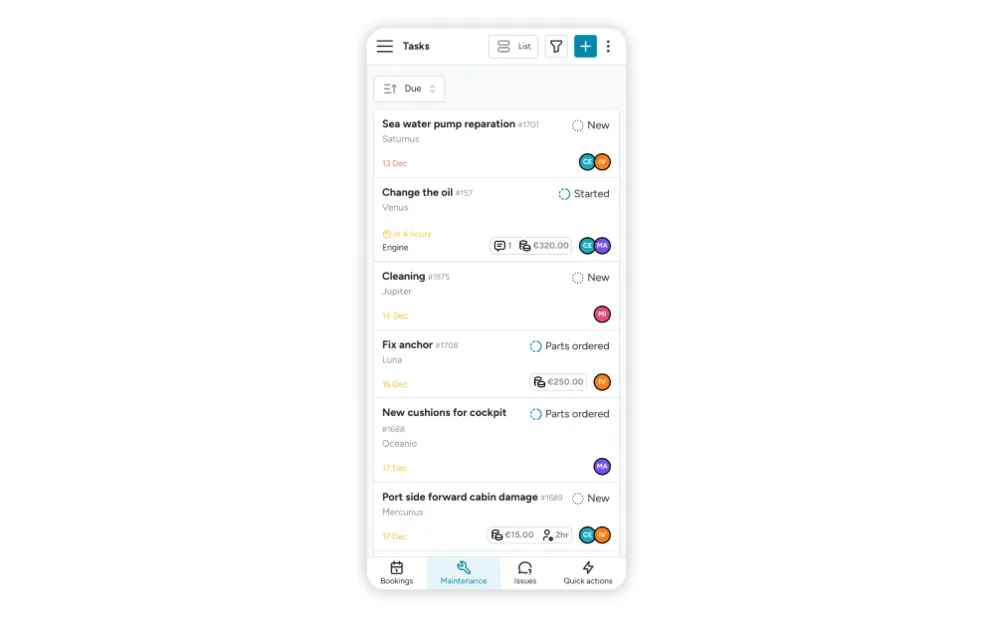
Section titled “Multiple Assignees on Tasks”It is now possible to have more than one assignee on Tasks. We have also added colorful badges with assignees’ initials to easily distinguish between assignees from the different task views.
Labels on Tasks
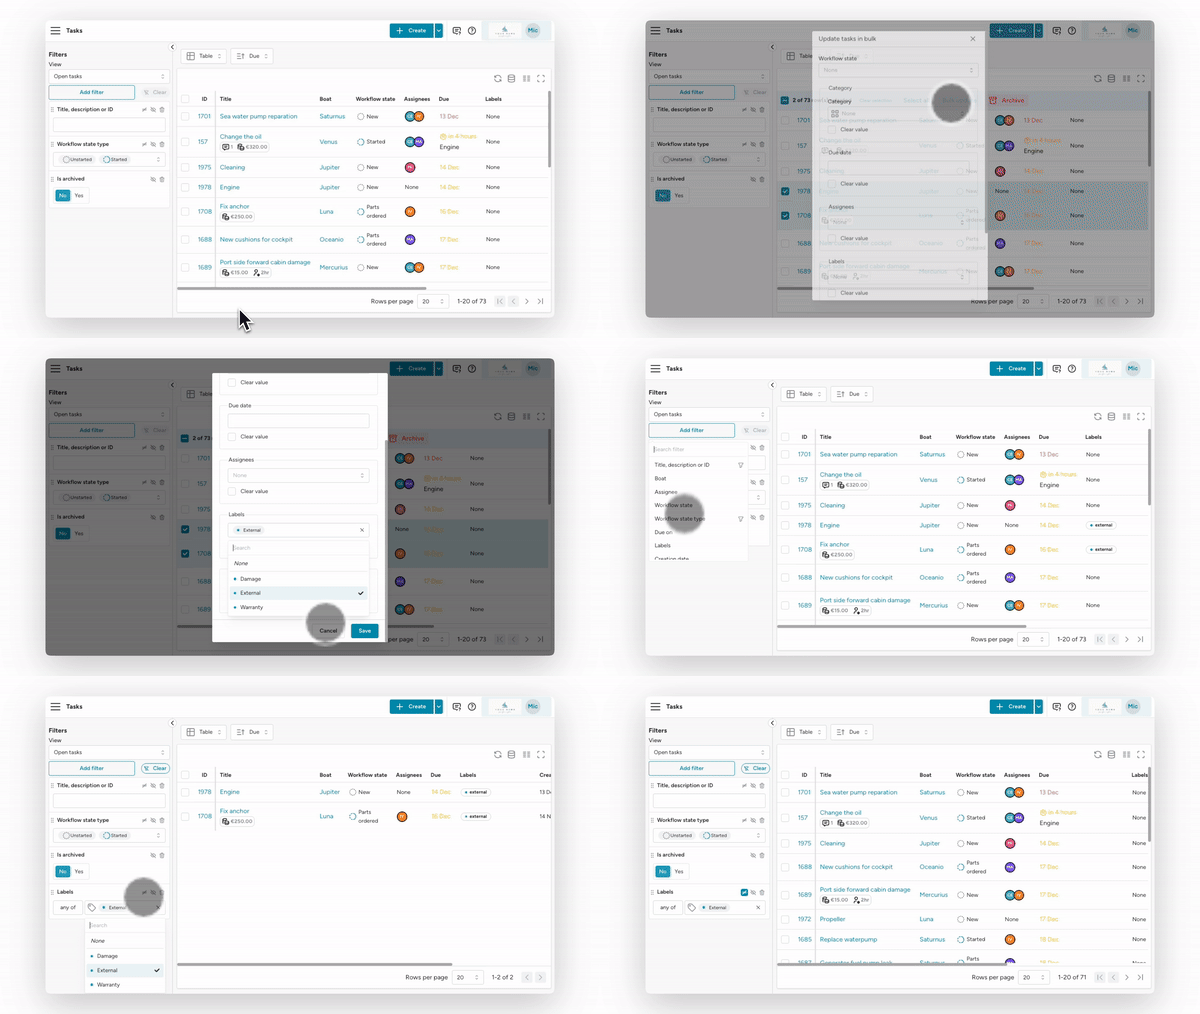
Section titled “Labels on Tasks”We have expanded the labels usage for tasks. It is now possible to add labels in bulk using the bulk edit function, and using the new filters you can also search for tasks that do not have a certain label, by negating the filter.
Component Locations
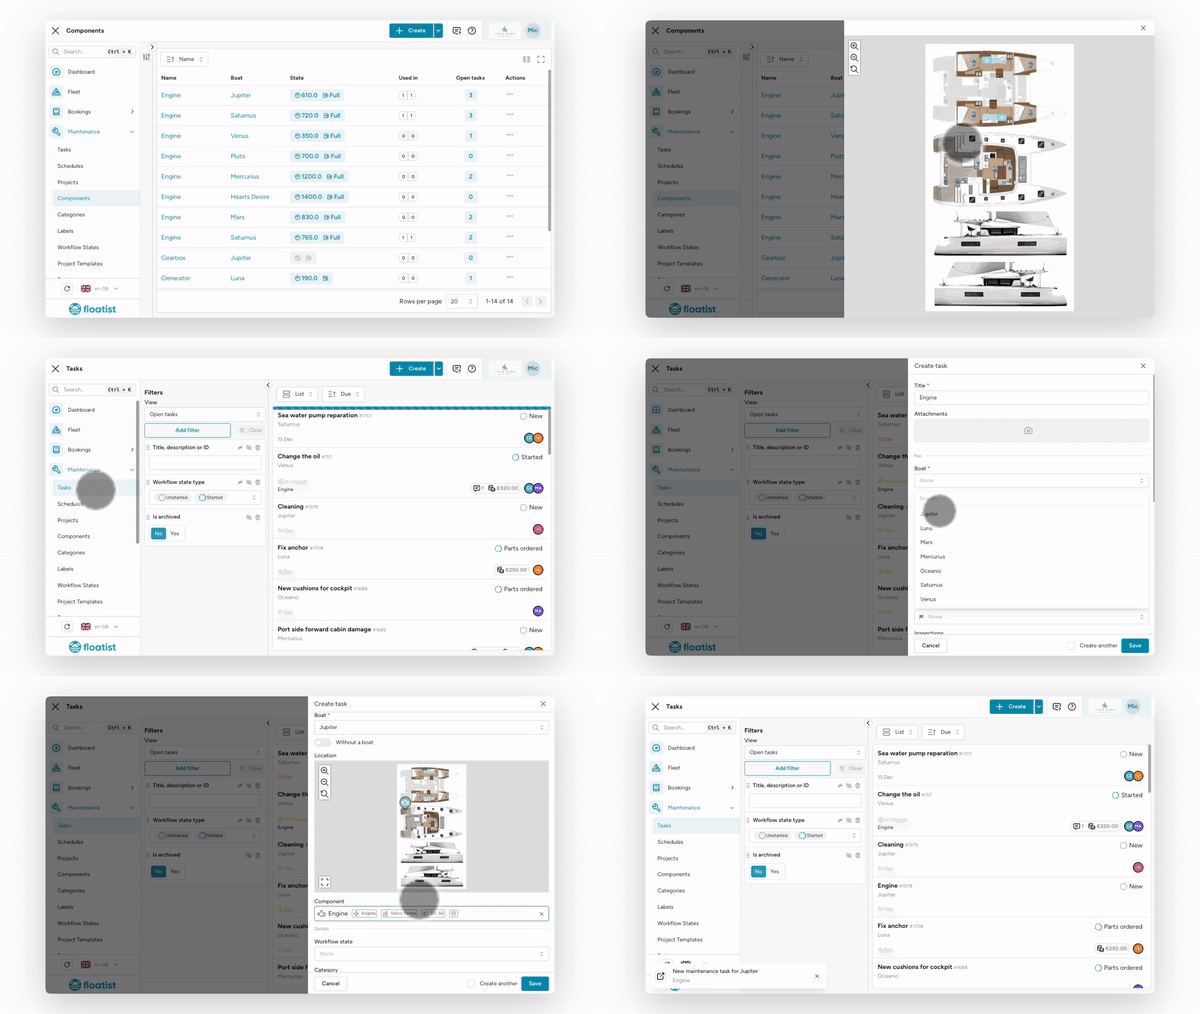
Section titled “Component Locations”You can now add locations for your components from the
Fleet > Components page. Adding locations will mean the component will show up automatically on the boat plan when linked to a task.
Submitted Checklists Notes and Filters
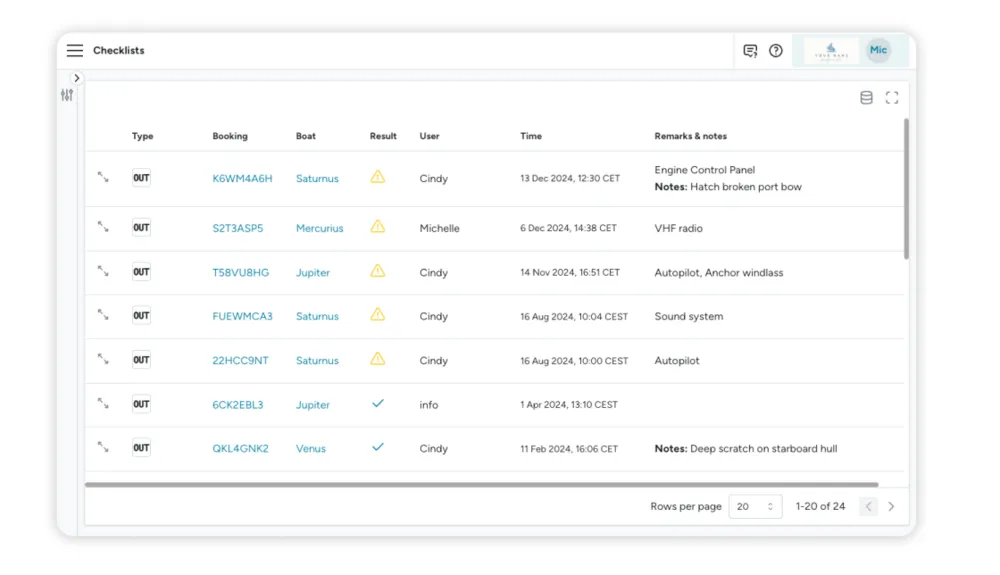
Section titled “Submitted Checklists Notes and Filters”In the Bookings > Checklists page in which all submitted checklists can be viewed, we have added the Notes to the last column. This means that if any notes were added on the checklist submission, they will show up there, where before they would not.
App Startup Performance Improvement
Section titled “App Startup Performance Improvement”We improved the performance on first opening the app, which could be slow on first startup showing only a white screen for a while. This happened especially with slow internet service. Performance is improved now, and we will continue to make changes to improve the speed of loading.
October 23
Section titled “October 23”Tasks linking
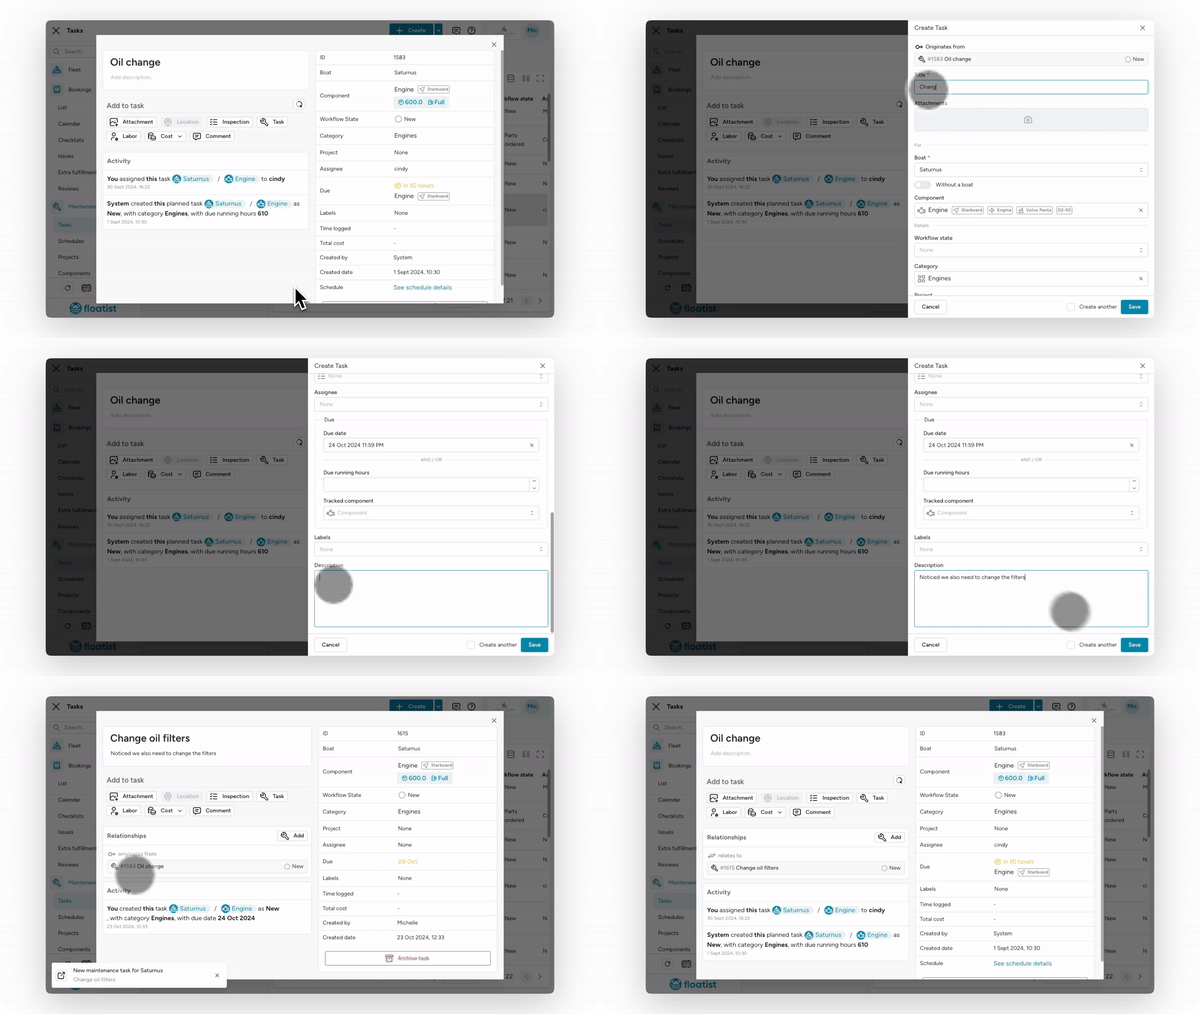
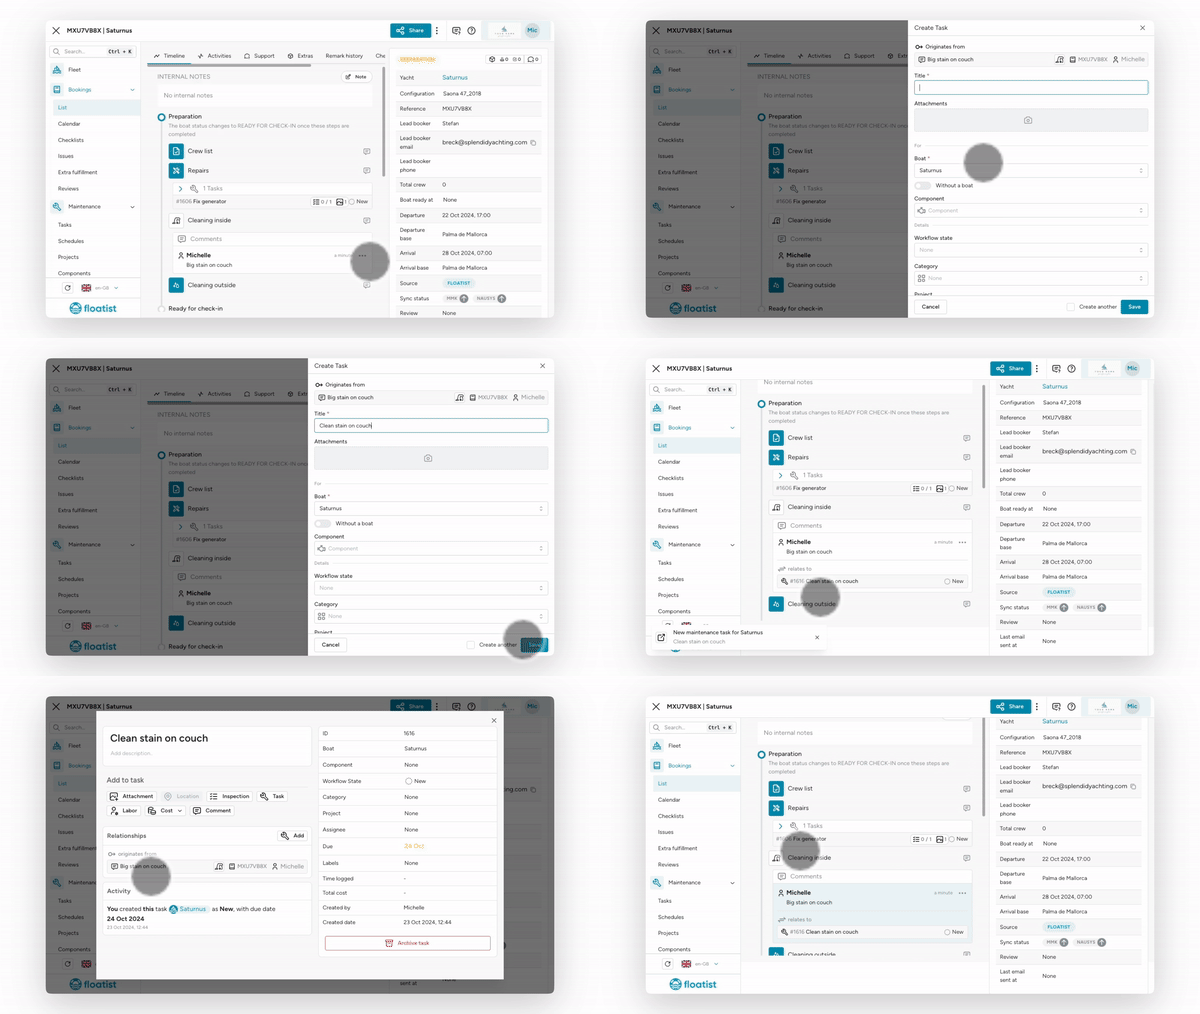
Section titled “Tasks linking”It is now possible to link tasks to each other and other objects within Floatist! This allows you to keep more information about where tasks originated from. The following links are now possible:
- From a task to another (follow-up) task
- From a booking comment to a task
- From a charter issue to a task
After creating a task from another object, you can always see in the task where it originated from from the “Originates from” part that will be displayed in the Relationships card on the task. This will lead you right back to originating object.
As a next step for this functionality, we’ll also make it possible to link tasks from checklists, so you always know from which booking’s check-in/out a task came.
Task from Task
Task from charter issue
Section titled “Task from charter issue”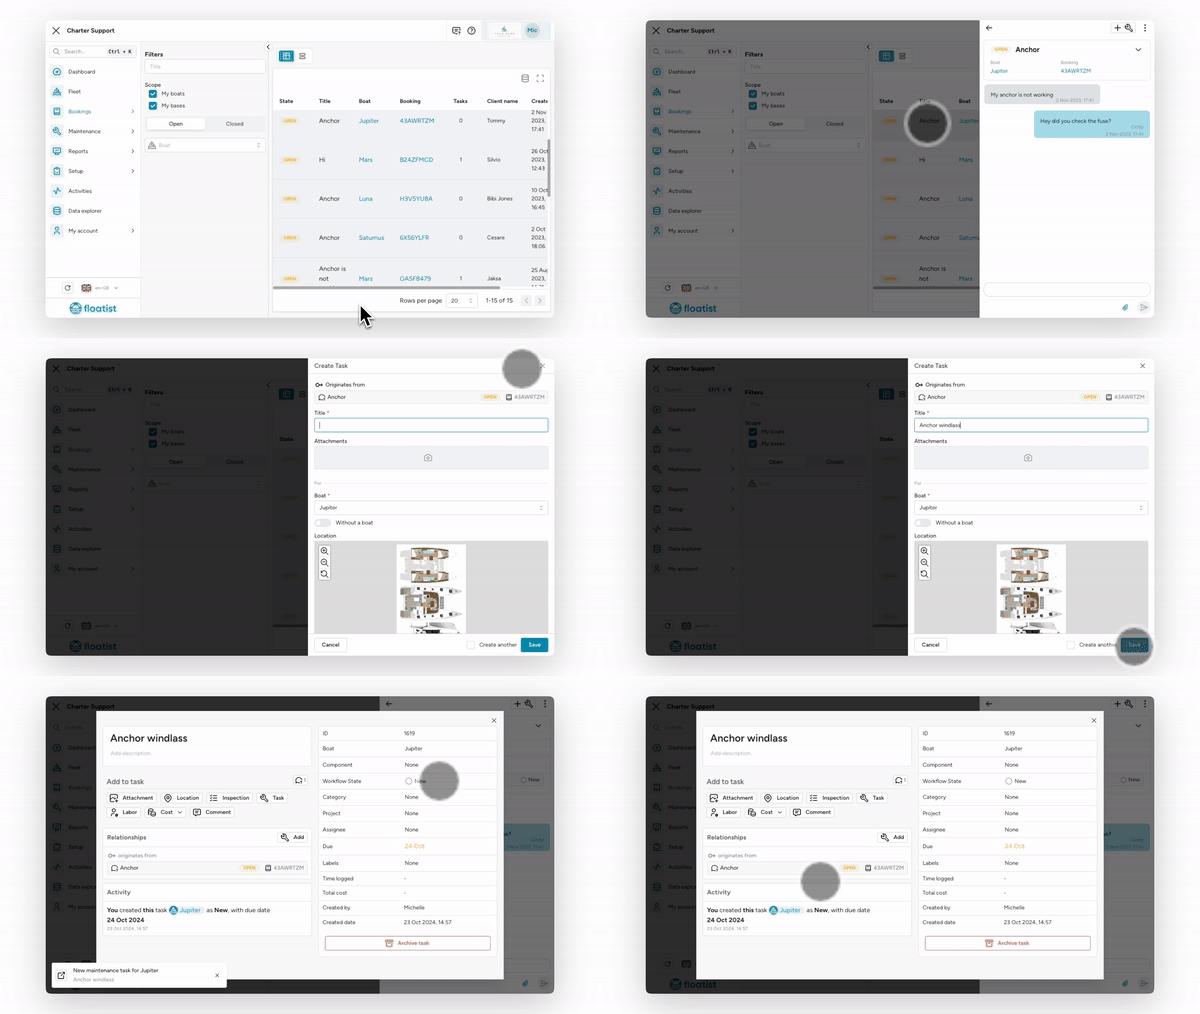
Improvement of Inspection definition creation
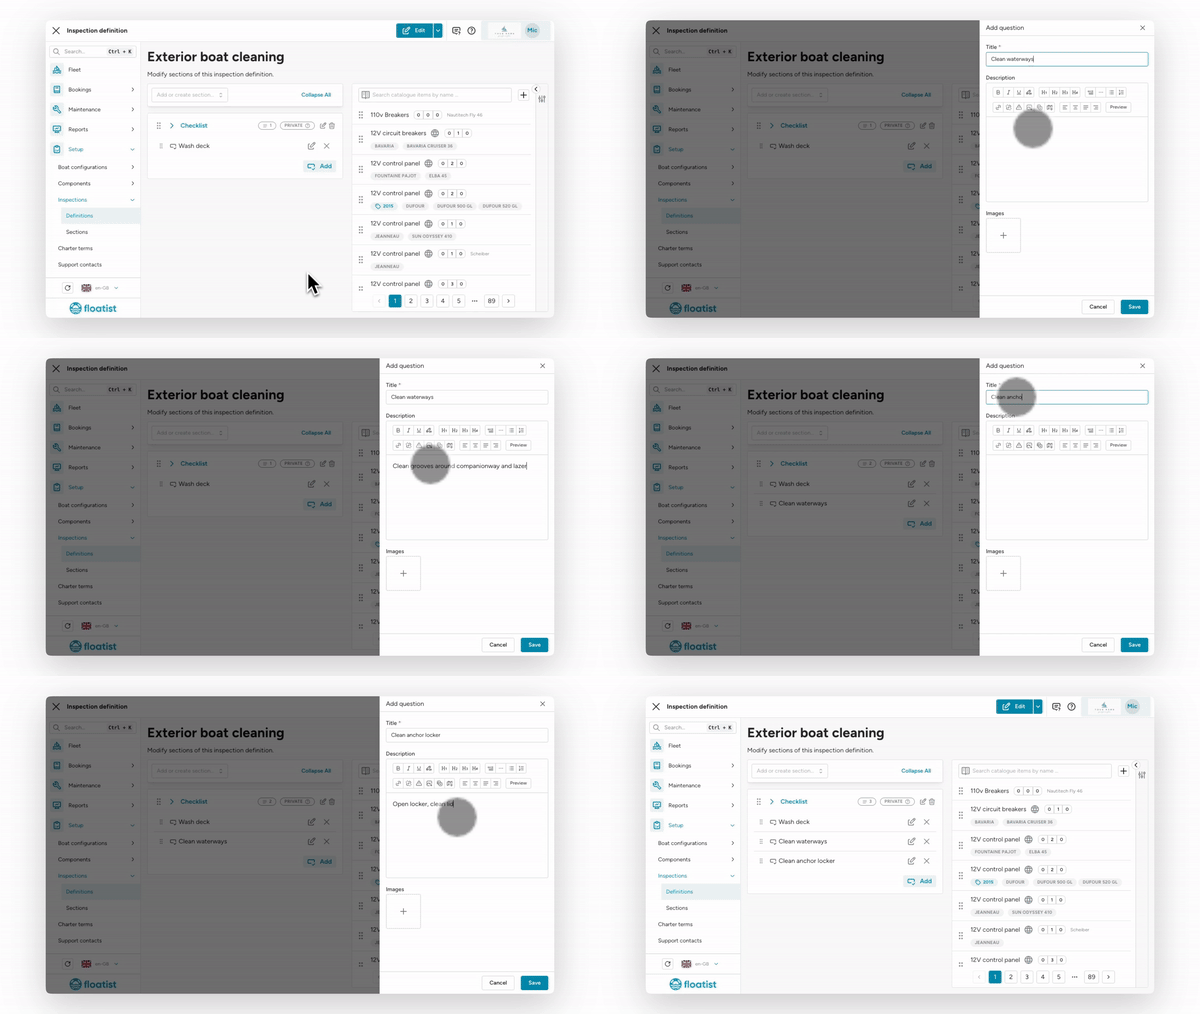
Section titled “Improvement of Inspection definition creation”With this latest update it is now possible to create inspection line items without creating a catalogue item first. This is helpful if you want to use a line item that you do not plan on reusing in any other inspections, or if it is a very simple line item. You can still add a description and image.
It is now also possible to use inspections in Project Templates and when creating tasks in bulk!
Components can now have an expiry date
Section titled “Components can now have an expiry date”Your components in Floatist can now have an expiry date. This is useful to track expiry in for example fire extinguishers, or other components that need to be replaced at a certain date. Additionally there is a new filter to filter by expiry date in the components list so you can quickly see which components are expired or about to.
October 1
Section titled “October 1”Boat plans
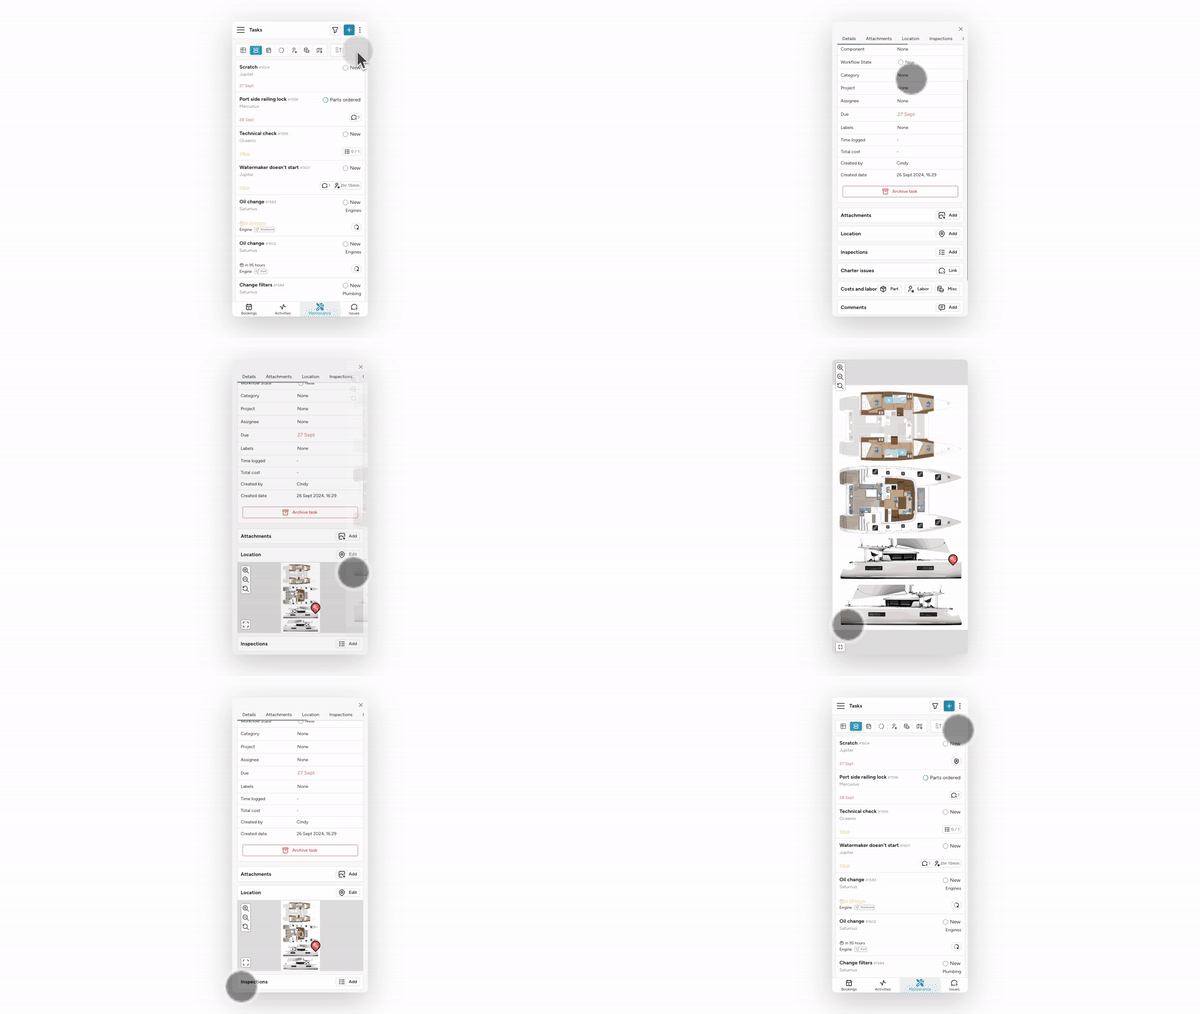
Section titled “Boat plans”A long awaited feature and requested by many: Boat plans! The first version is now live and ready to be used in your app! This first version of boat plans includes the option to use plans in tasks and schedules. This will allow you to mark where on the boat plan the task is located.
- Tap on the plan to set a location for a task
- To edit a location, click Edit to go to edit mode. Then location markers can be dragged to changed
- To remove a location, in edit mode, click the red marker and confirm delete by clicking the bin icon
We are currently in the process of collecting and creating the boat plans for all common boat models. Once we have your boat models, you can add them to your boat. If you want to speed up the process to start using a boat plan for your boats please respond to this email and we can prioritize your boat models.
This is just the start of boat plans, the next steps for boat plans are:
- Using boat plans for damages in check-in/out
- Using boat plans to mark where inventory items are located in the plan (for charter guests’ check-in)
Tasks reporting
Section titled “Tasks reporting”We have added a number of visualization tools to further dive into task analytics. Each of the tabs in Tasks page will allow you to visualize tasks in a different way. From right to left, the tabs on this page will show you:
- Task locations (on the boat plan)
- Task total costs
- Task total labor
- Task progress
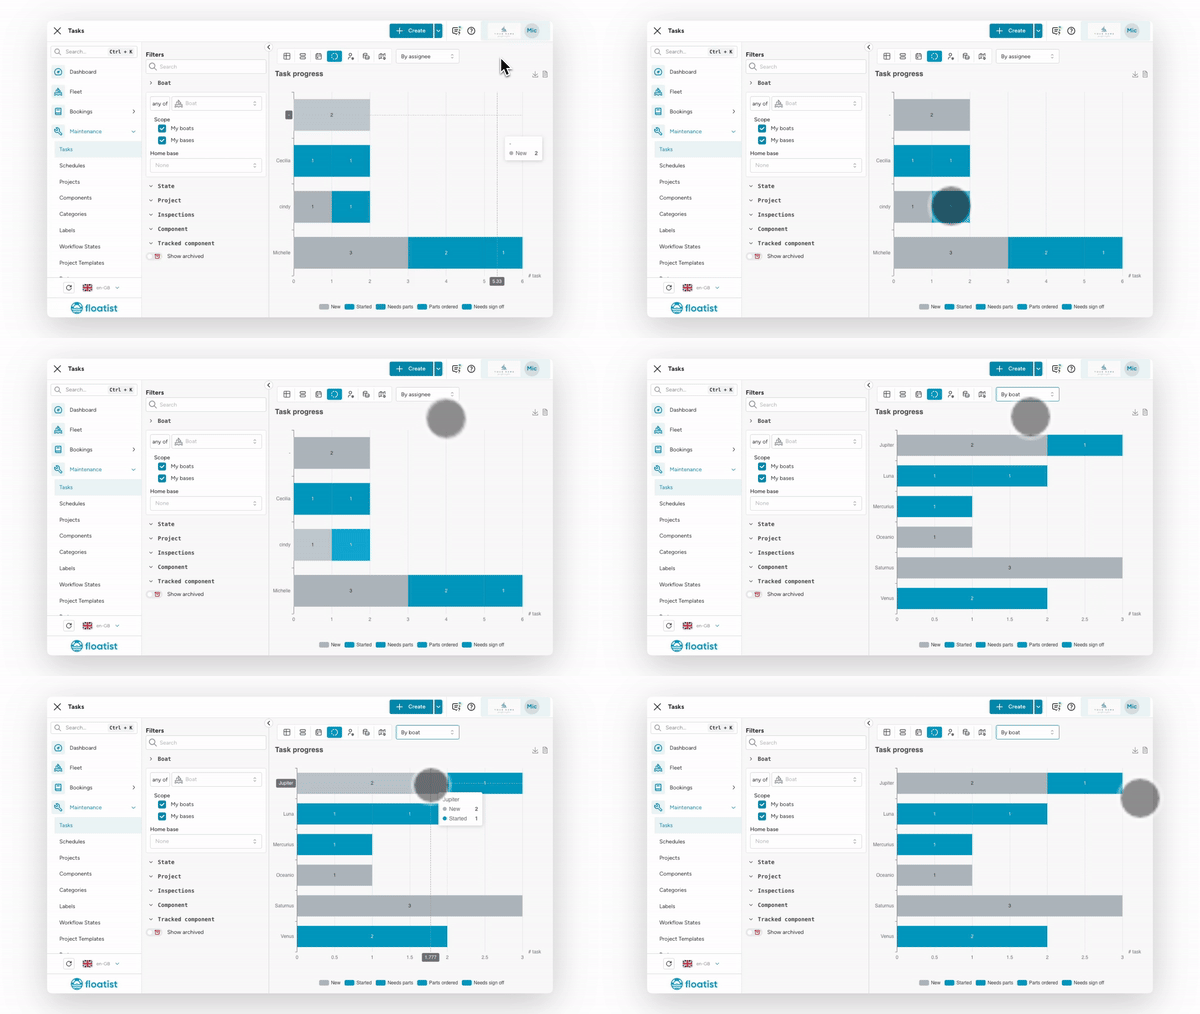
For each of these fields, you can decide how to group the tasks shown. For example, you can see the Task progress per assignee, per boat, or per category, as shown in the example below.
Task progress
Task labor
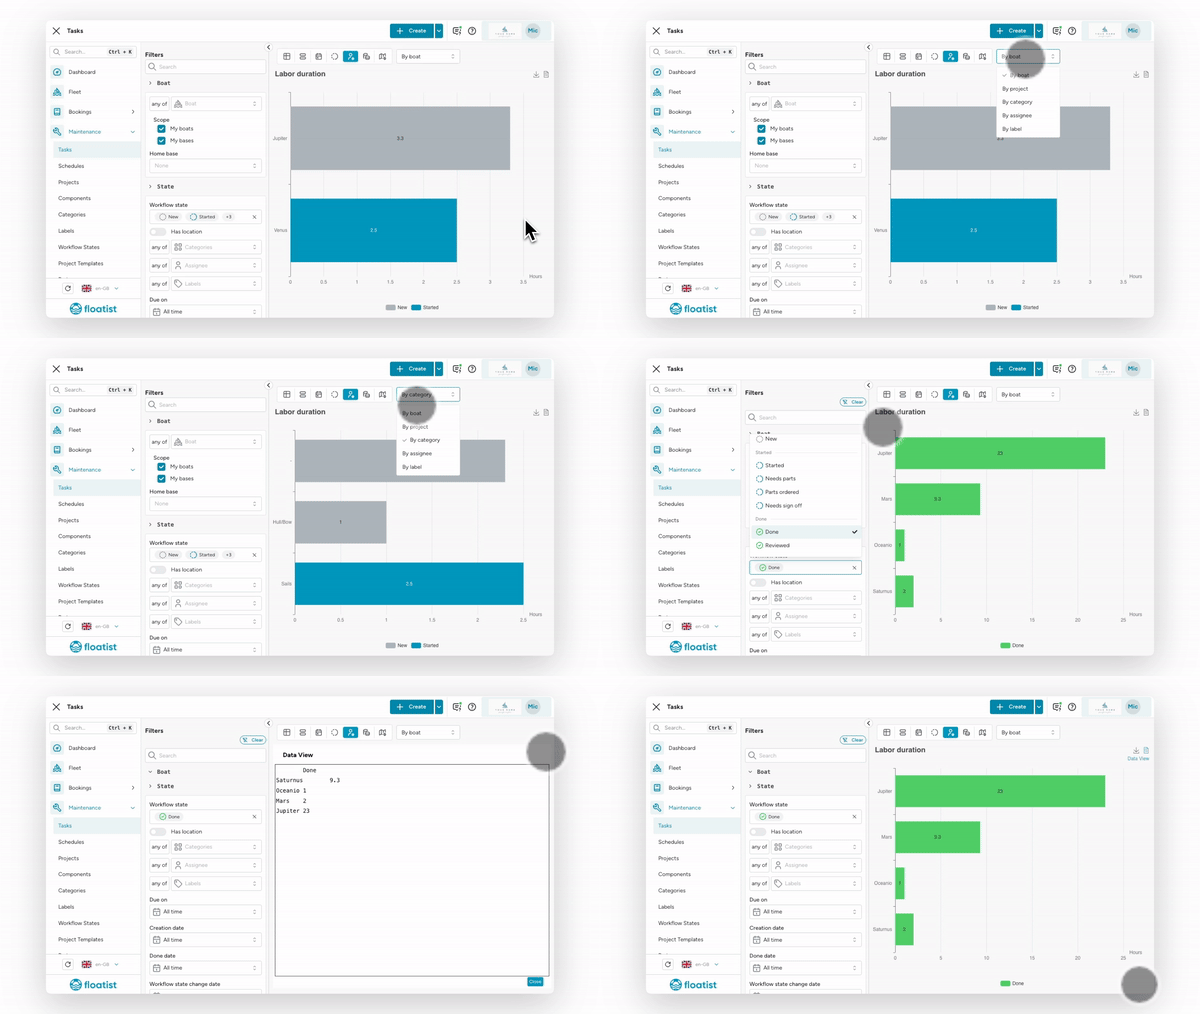
Task labor shows the total amount of labor logged on the tasks.
Additionally, for each of the 4 visualization options mentioned above, you can also download the image to share with external stakeholders, or copy the data from the data view, which can directly be pasted into Excel for further analysis or manipulation. This is shown in the example below.
Task total costs
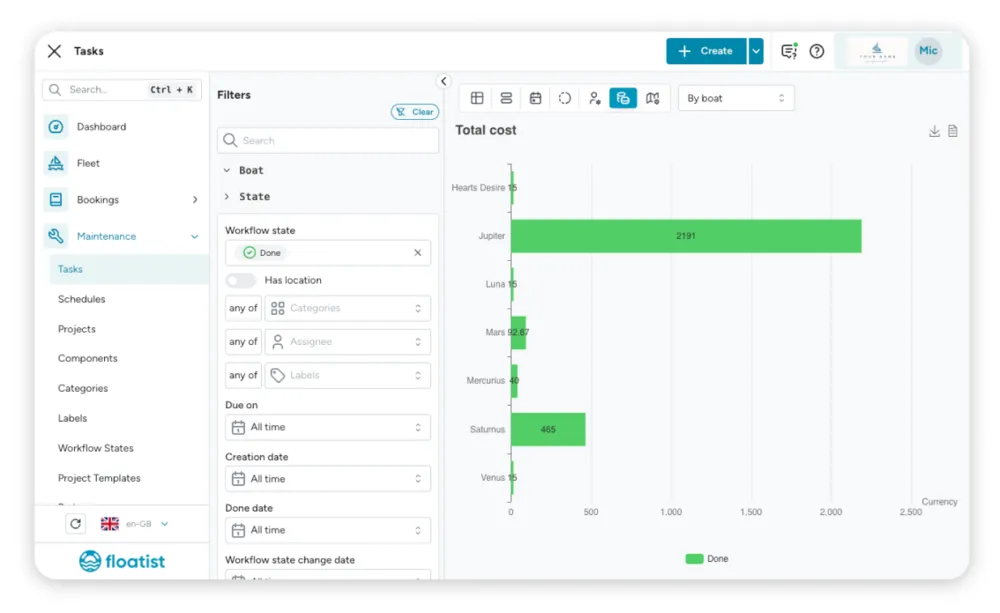
The costs tab will show the total amount of costs per grouping. Again, you can group by the same fields; boat, assignee, label, category, etc.
Task locations
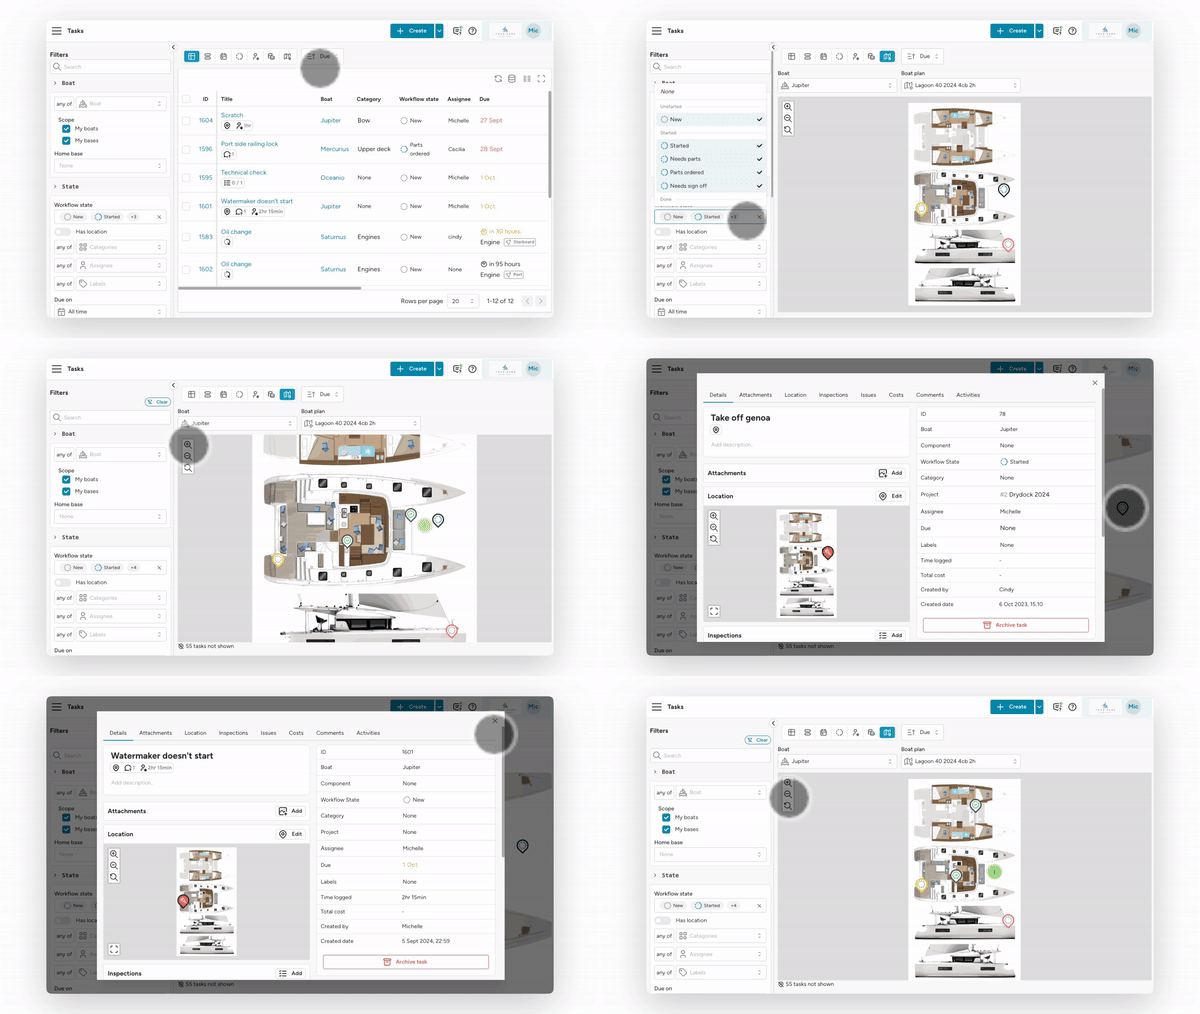
With the new boat plan that allows to set locations for tasks, we can now also visualize these aggregated locations of multiple tasks on the boat plan. The right most tab will show the locations of tasks, for boats that have a plan and locations set.
Besides showing the locations of the tasks, each marker will also show the task progress using the icon in the middle of the marker, and whether or not the task is due soon or overdue by coloring yellow or red. You can click on the markers to see details of the tasks.
Bulk creation: Components
Section titled “Bulk creation: Components”Components can now be created in bulk. This will save a lot of time when setting up multiple components for multiple yachts!
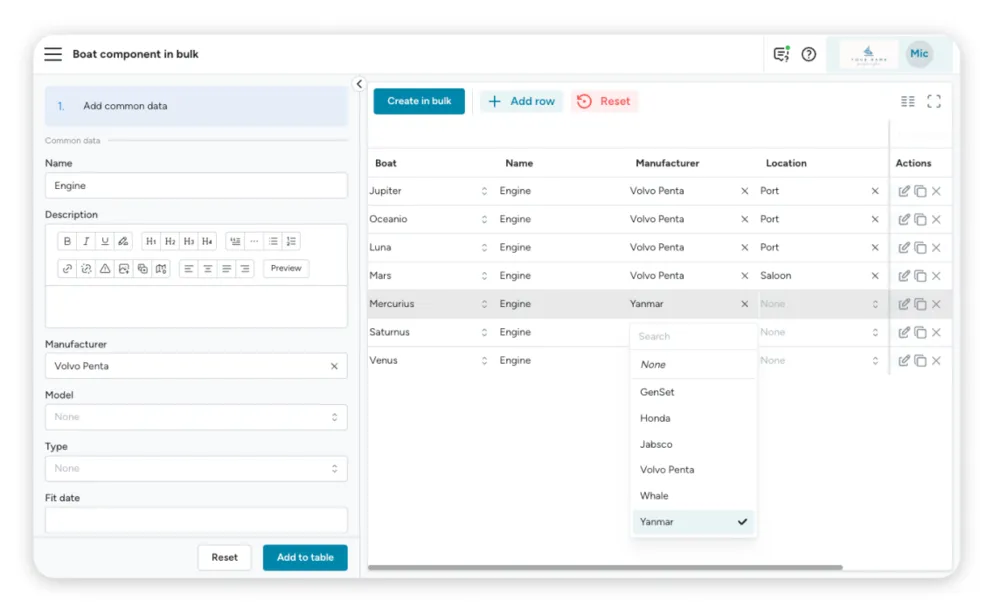
As shown in the screenshot below, the bulk creation tool on the left allows you to add components to the table on the right. After adding them to the table, you can make changes before actually creating the components.
To illustrate an example, if you have Volvo Penta engines for your entire fleet, except for one yacht, you could do the following magic using the bulk creation tool to easily create all of your engine components in one go:
- Fill in Engine and Volvo Penta
- Select all your boats
- Click Add to table
- Change the manufacturer of the yacht that has a different engine to the correct one, in the example below the engine manufacturer of yacht Mercurius is changed to Yanmar
The bulk creation tool allows for advanced bulk creation. If you would like help setting up your components, please reach out to us and we’ll get you sorted.
Bulk creation: Task schedules
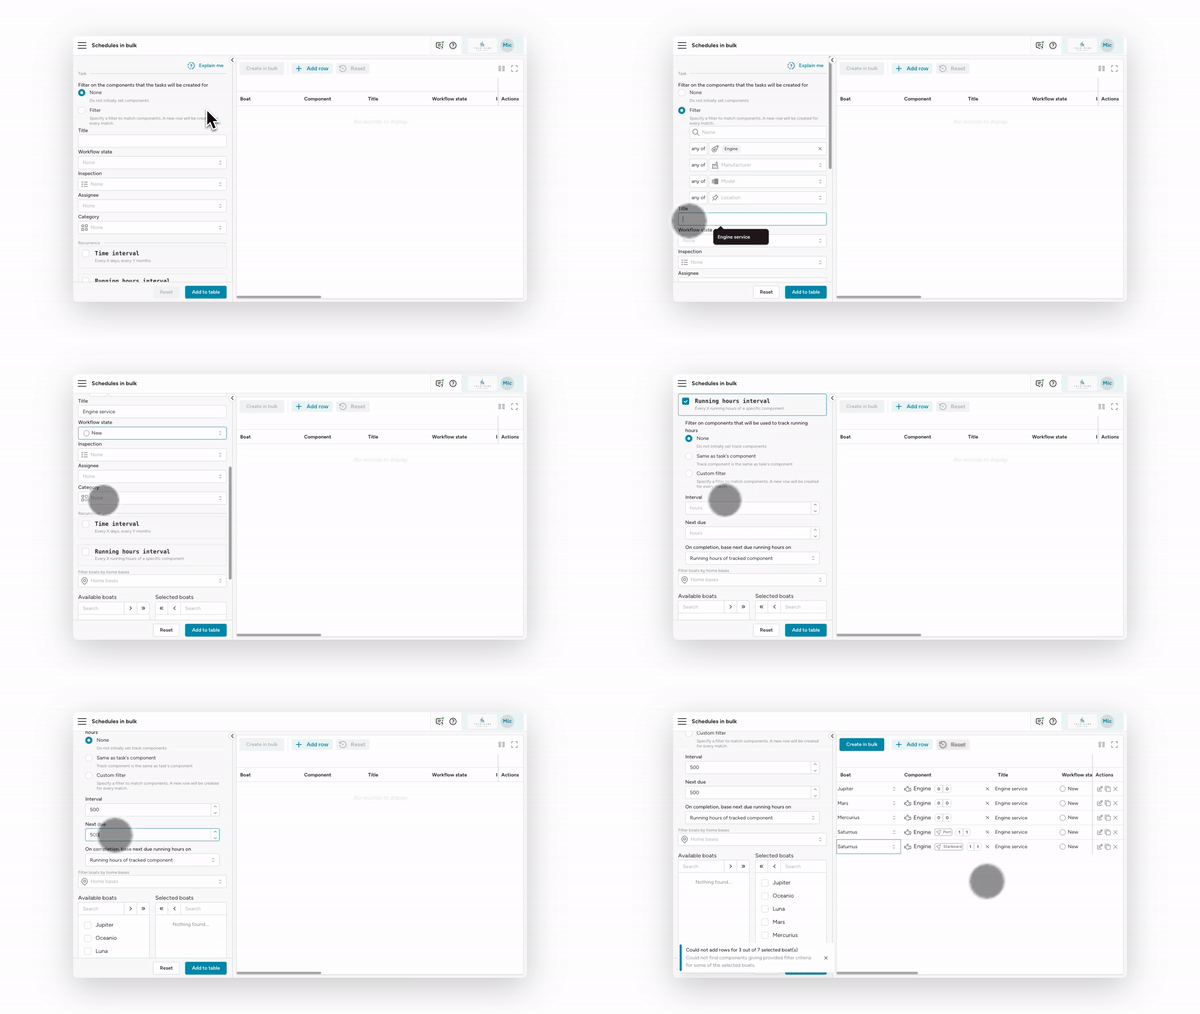
Section titled “Bulk creation: Task schedules”Similar to creating components in bulk, we have also added the functionality to create schedules in bulk. It works in the same way as the Component Bulk Creation tool, where you can use the left panel to add schedules to the right hand side table, adjust the rows, and then create the final items.
In the example screen recording below you can see how we quickly added task schedules for all of our engines in our fleet, that will create automatic tasks and reminders to do engine service on them.
- We want to select all components of type Engine, so we filter on those
- We set the title to Engine service for all to be created schedules
- We added a category
- We set the Interval and the Next due hours to 500
- We select the boats
- We click Add to table, after which 5 new schedules are shown. Before creating them (click Create in bulk), we can check if everything is correct and make changes as desired on a row basis
Updated filters: Any of / Set / Unset
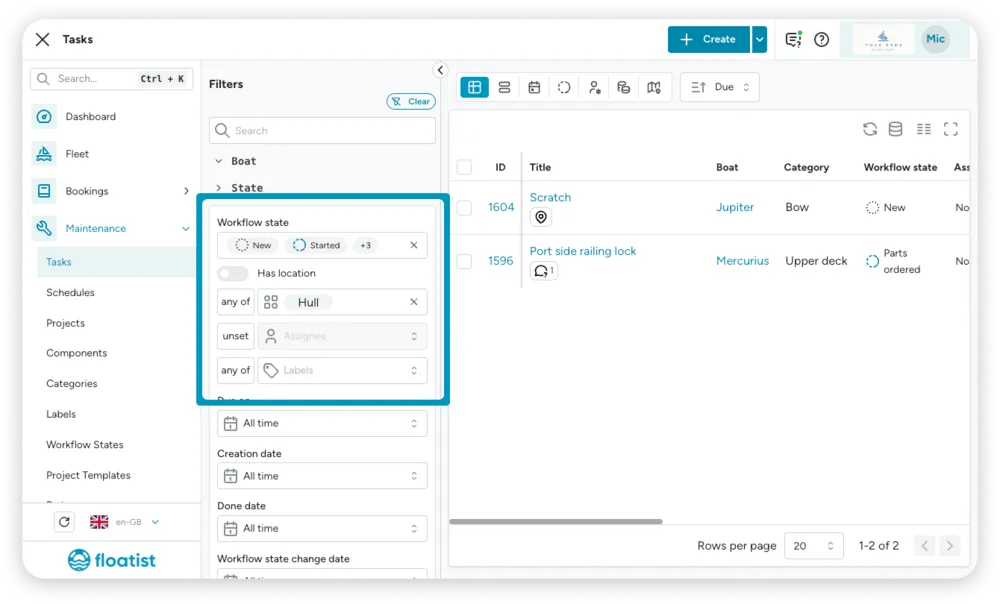
Section titled “Updated filters: Any of / Set / Unset”We added filters to further increase the options of finding the exact data set of tasks you are looking for by adding Any of / Set / Unset filters.
- Any of: if no items are selected, no filters are applied, but if there are items select only tasks with any of those items (boats, assignees, labels) will be shown.
- Set: to show tasks that have the field set. For example, if you select Set for Category, it will show all tasks that have a category set.
- Unset: to show tasks that have the field unset. For example, if you select Unset for Assignee, you will see all tasks that do not have an assignee.
You will see these filters used in multiple places for different filter types.
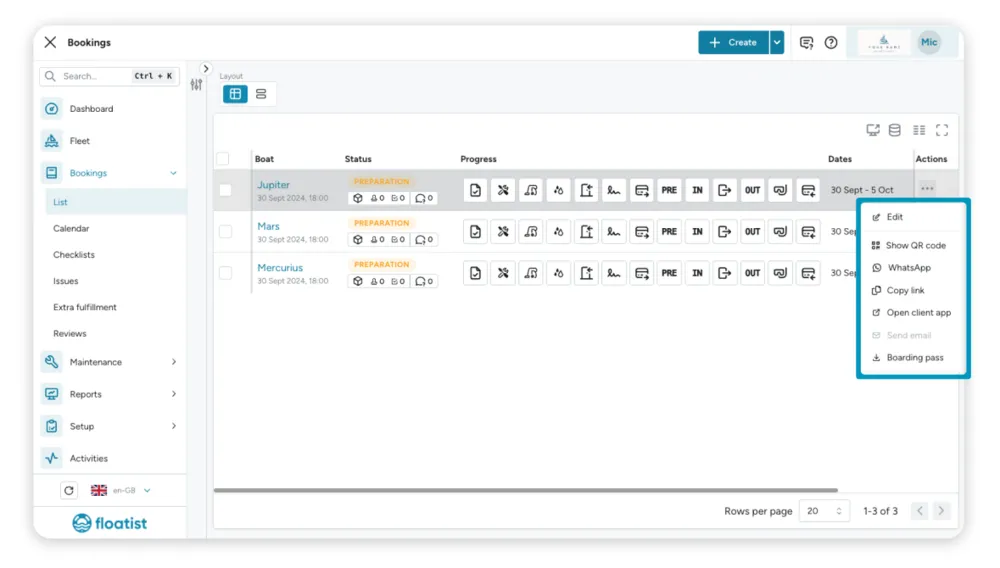
Booking actions available from bookings list
Section titled “Booking actions available from bookings list”The actions Show QR code, WhatsApp, Copy link, Open client app, Send email and Download boarding pass are now available directly from the Bookings > List.
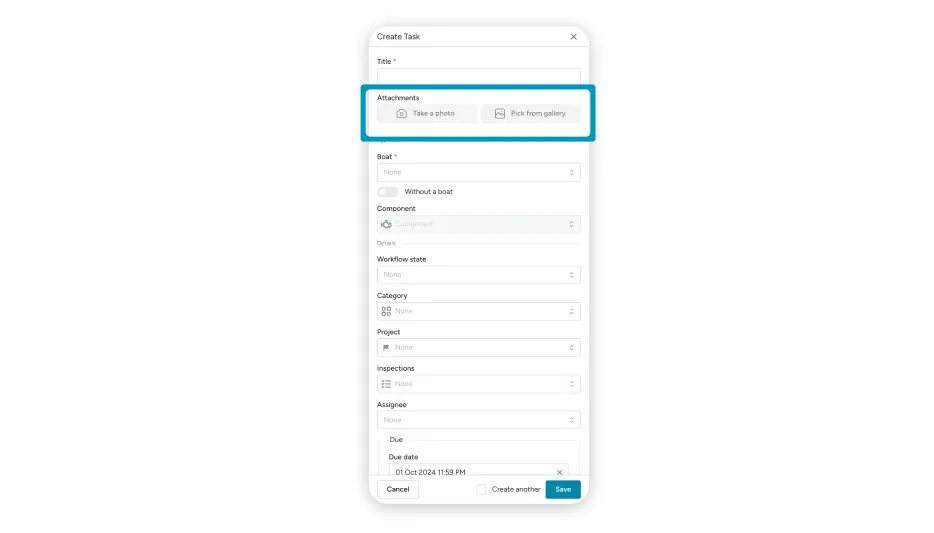
Add image during task creation
Section titled “Add image during task creation”Task creation with images just got easier! You can now add a photo or existing image straight from the task creation form.
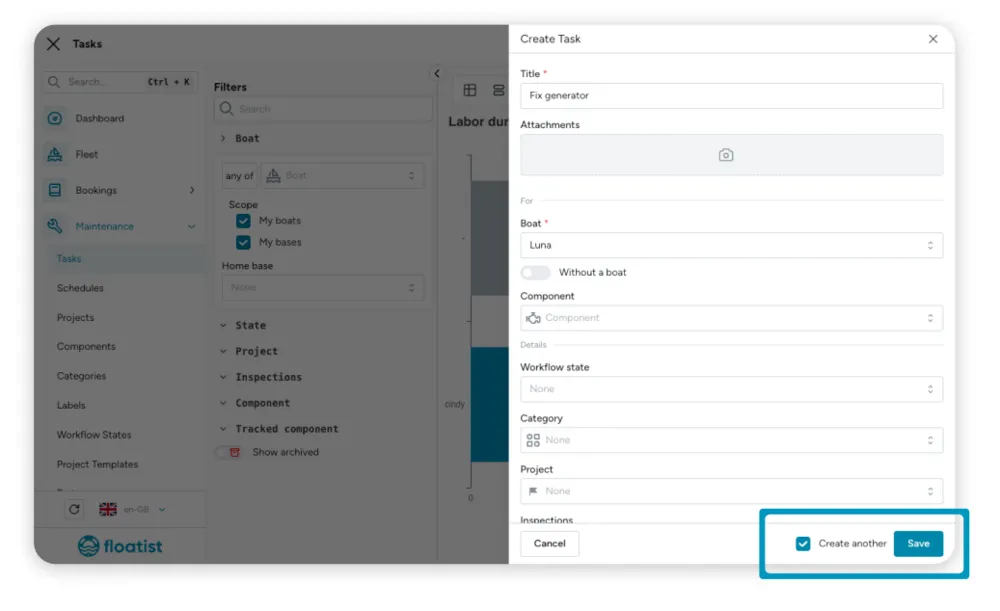
Create another Task
Section titled “Create another Task”It is now possible to create multiple tasks after another, without having to open the task creation drawer again. Simply check the ‘Create another’ box, and you can create a new task after saving the current one.
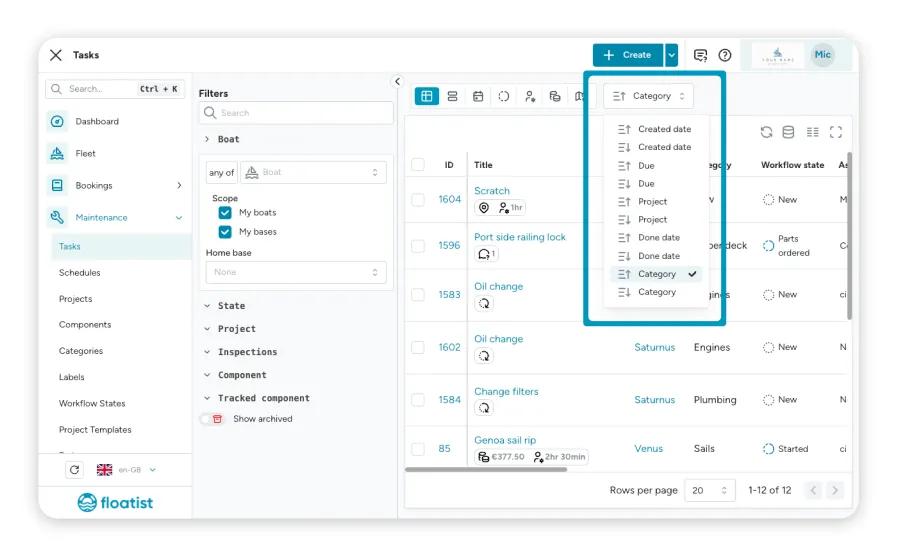
Sorting by category
Section titled “Sorting by category”You can now sort tasks by category. Simply use the dropdown to select your preferred sorting method.
September 3
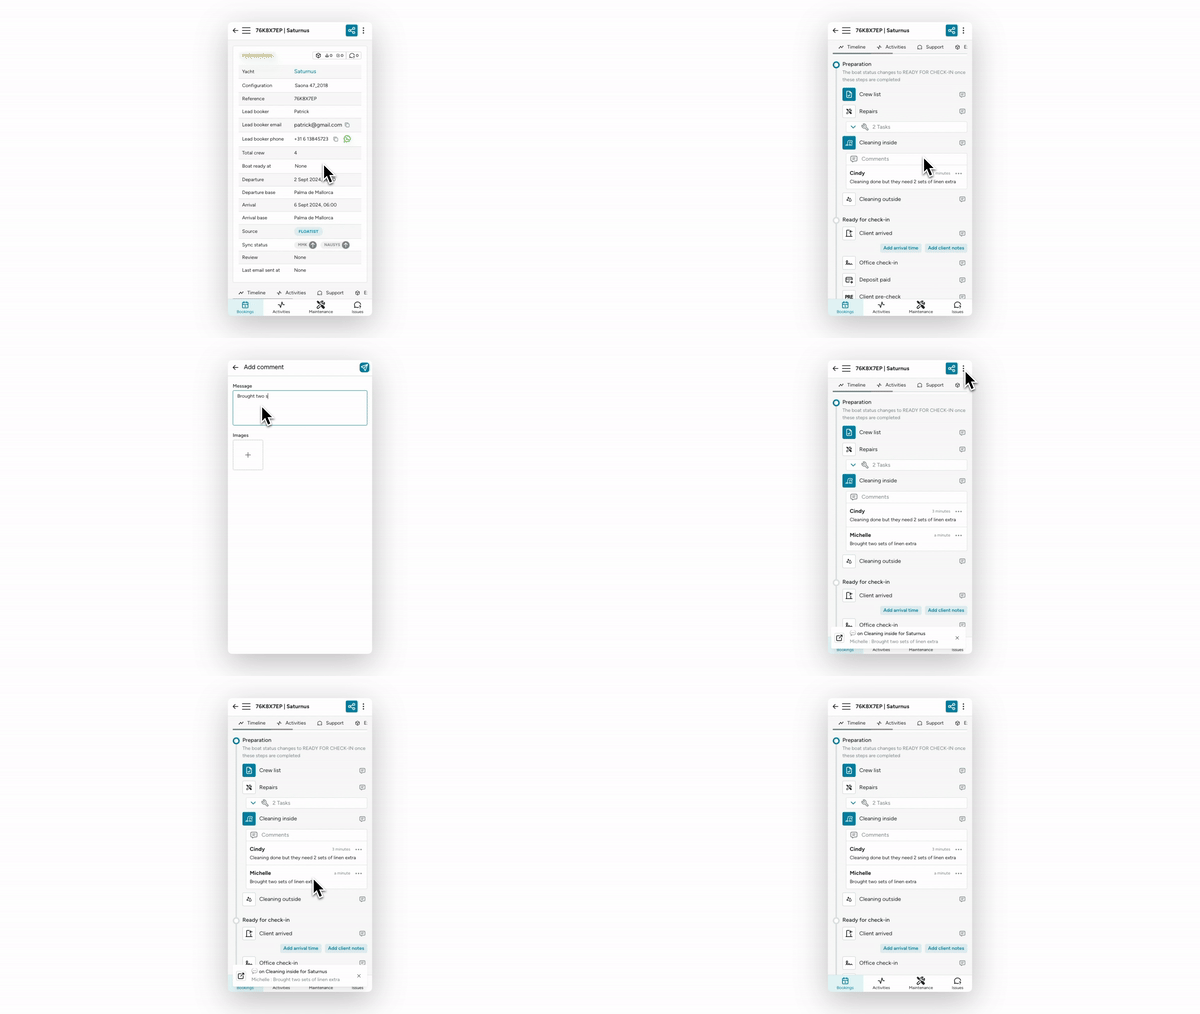
Section titled “September 3”This is a super exciting change that will be very useful during turnaround days. Please read carefully and inform your team so you can get the optimal value out of this new functionality!
The booking timeline now has Comments available on each step. This means that anyone in your team can leave a comment, and it will be shown under the step of the booking, with their name and the timestamp of the comment. Booking comments can have both text and images. Additionally, everyone subscribed to the notifications for that step will receive a notification (more on that below).
The booking timeline basically functions as a well organized chat now!
Subscribe only to notifications relevant to you
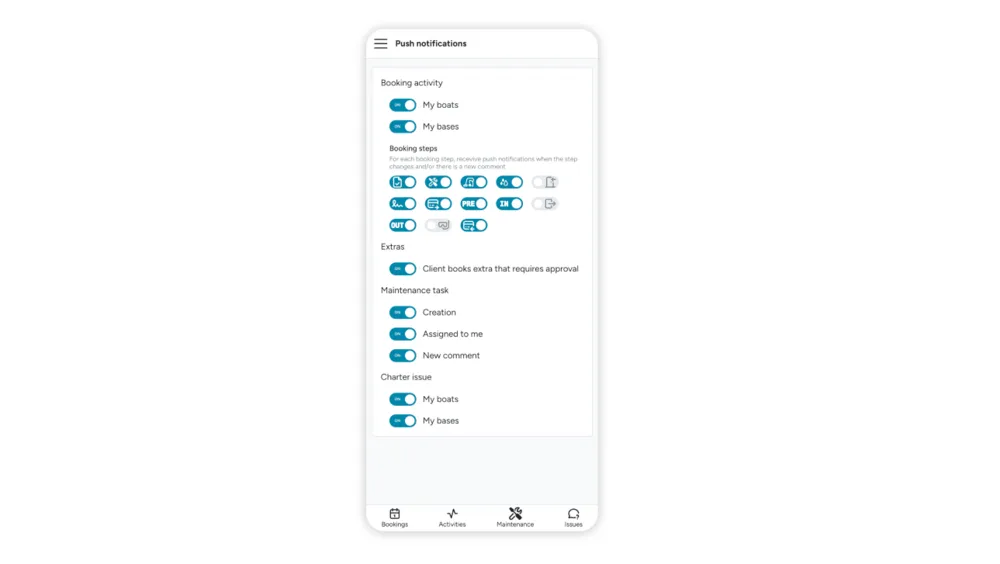
Section titled “Subscribe only to notifications relevant to you”Instead of receiving all notifications for a yacht booking, you can now select only those notifications relevant to you. We have also improved notifications’ delivery speed significantly, they will arrive much faster now.
In order to configure the notifications you want to receive, go to your profile on the top right of the screen (or top of the menu on mobile), select Push notifications, and toggle the notifications you want to receive, shown using the same icons from the booking timeline.
Maintenance task comments images and notifications
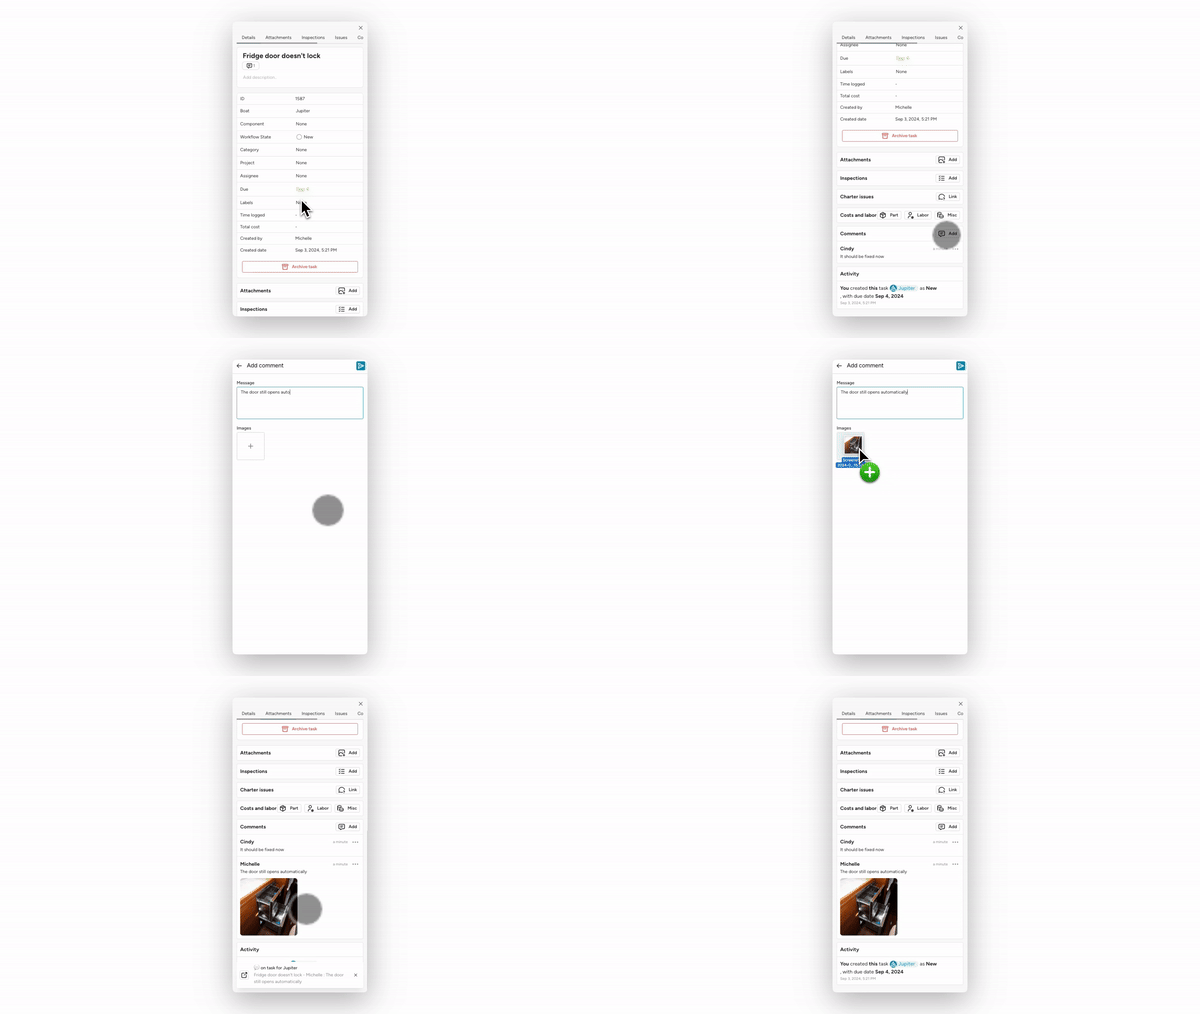
Section titled “Maintenance task comments images and notifications”We have improved maintenance task comments so that you can images to each comment separately. Additionally, you can now receive a notification for each new comment on a task! Please note you have to turn this notification type on manually in your notification settings to start receiving it.
Link to page on notifications
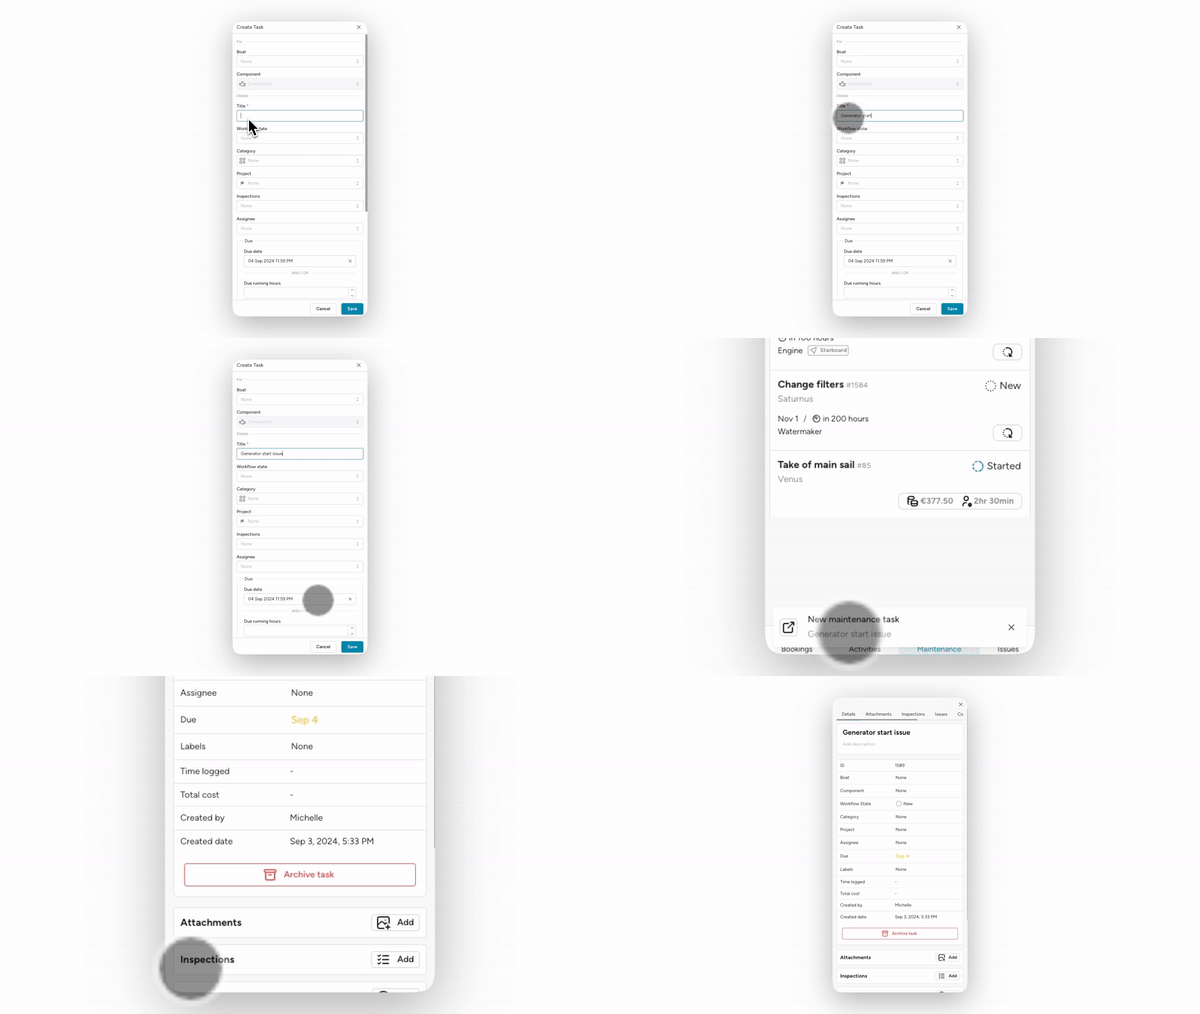
Section titled “Link to page on notifications”When you receive a notification, it will now have a button with a link to the relevant page in the application, such as the linked booking or task. Using this button you can go directly to the page to get more information.

August 27
Section titled “August 27”New: Inspections
Section titled “New: Inspections”We have generalized the current checklists that you know for Check-in and Check-out into Inspections. This allows you to create a list of items that need to be checked, and do so on a one-off or a routine basis.
In order to create an Inspection you can go to
Settings > Checklists > Definitions, where you can define an inspection in a very similar way you are used to create checklists for check-in / out.
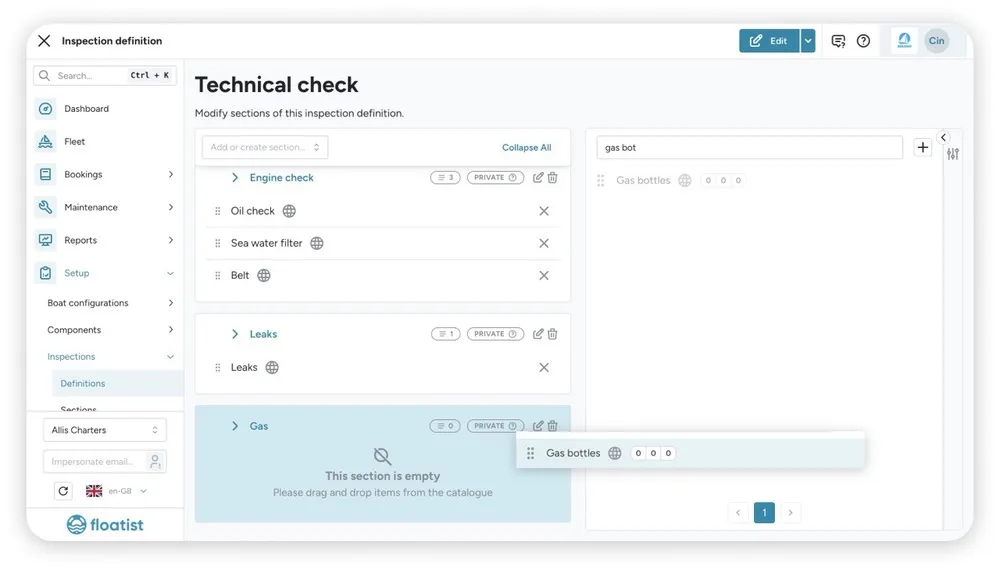
In order to use an Inspection after creation, you can either link it to a Task or to a Task Schedule.
Linking an Inspection to a Task
Linking it to a task can be done from the new and improved task interface, which has a section for
the inspection. Simply select the inspection you want to add, you can also add multiple. You can
also add it from the task creation form right away.
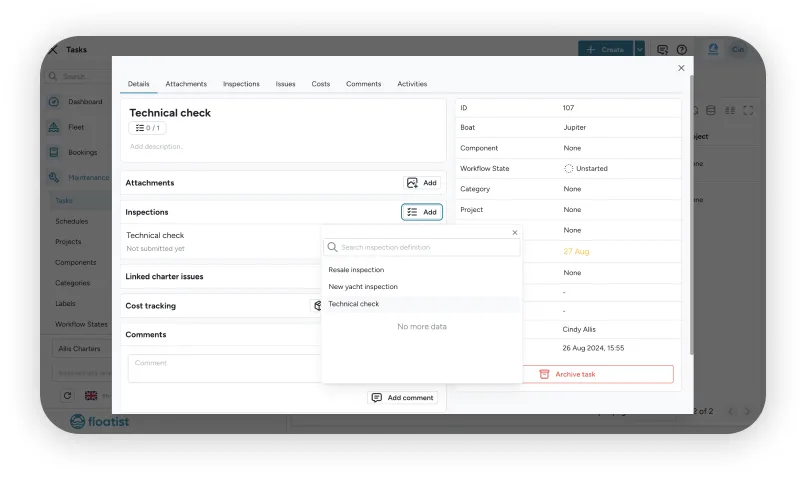
Linking an Inspection to a Schedule
Linking it to a schedule can be done from the Schedule creation / update form. You can select the
desired Inspection from there, and it will automatically be added to your task when the task is
created.
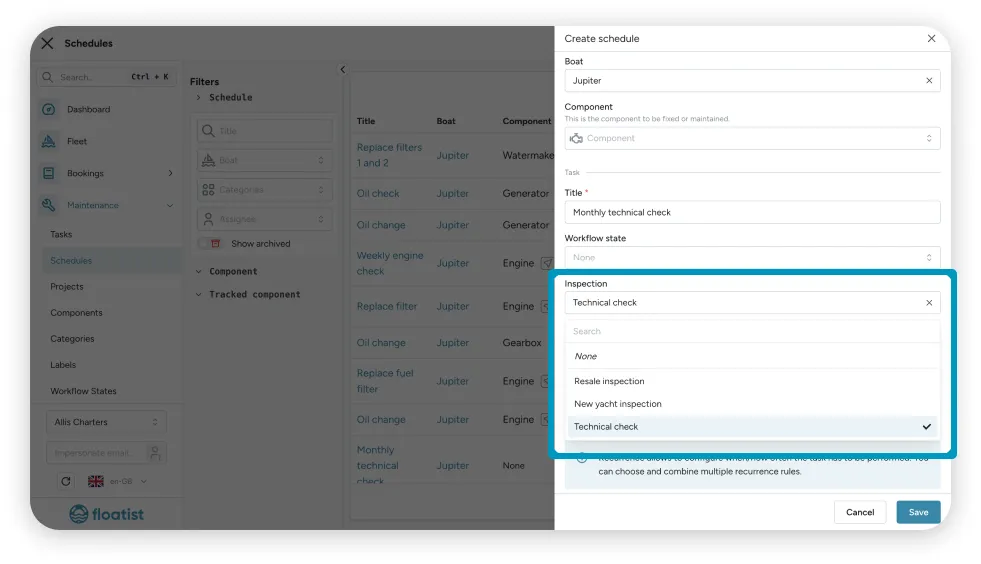
Next Steps for Inspections
For inspections’ next steps we will create the possibility to have different question types, such as
multiple choice or inputs, instead of only OK/NOT OK types. Additionally, we will make it possible
to link inspections to bookings, so you can have additional inspections next to the default check-in
/ out lists.
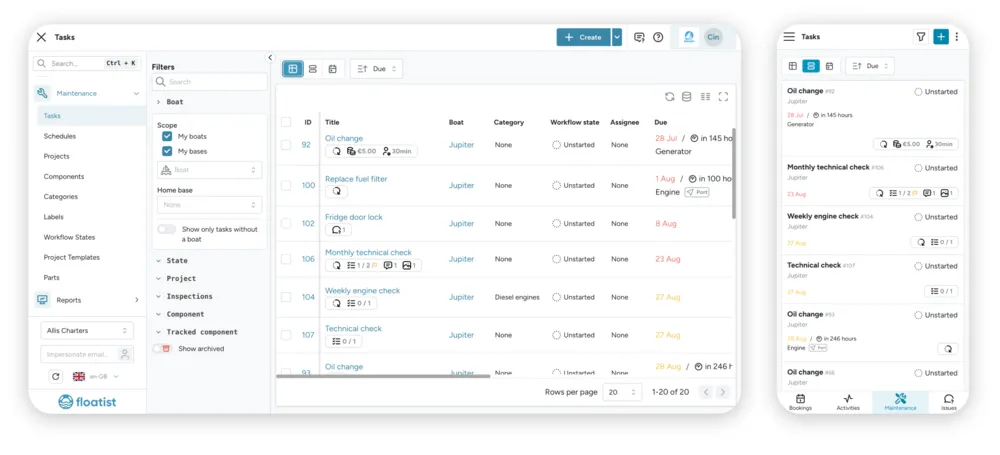
New Task Summary Badge
Section titled “New Task Summary Badge”In order to quickly get a view of important details of a task, we have created the Task Summary badge. This badge can be found on tasks, and displays any important information on the tasks, such as whether there are inspections that need to be done, whether there are linked charter issues, images, comments, labor, and costs on the task. Additionally, there is a little flag that will be displayed if an inspection has been completed but one or more item has been marked as ‘Not ok’ or has a remark. The flag indicates someone probably needs to look at it or do a follow up.


This badge is visible on individual tasks and on the list views both on mobile and desktop, which helps you to at a glance see which tasks have what type of information added to them.
New and Improved Dashboard
Section titled “New and Improved Dashboard”We have added a number of graphs to the Dashboard that will help you analyze your base operations within Floatist.
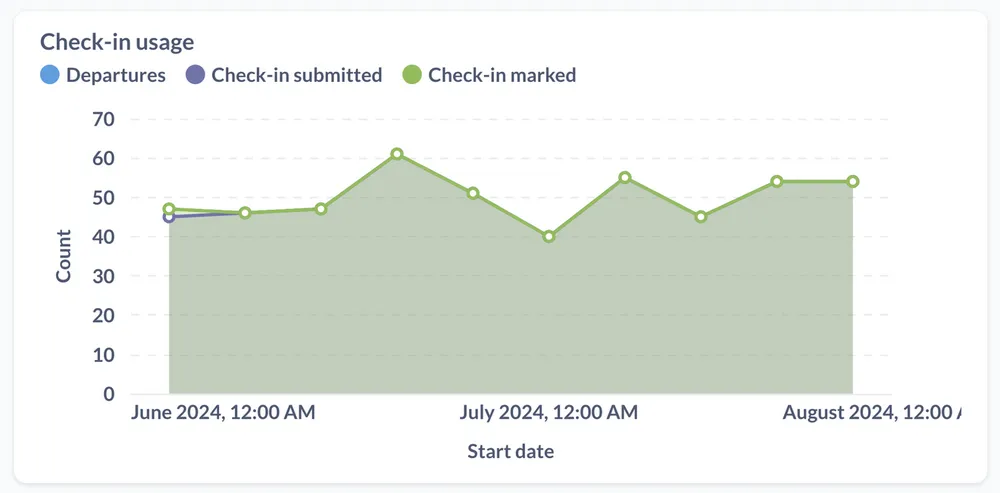
Check-in usage
This report shows you for all of your bookings, whether or not the check-in has been submitted and /
or only marked as done. Ideally, you want to have a check-in submitted for all of your bookings,
which means in the optimal scenario these three lines are overlapping, as shown in the graph below.
Upcoming departures
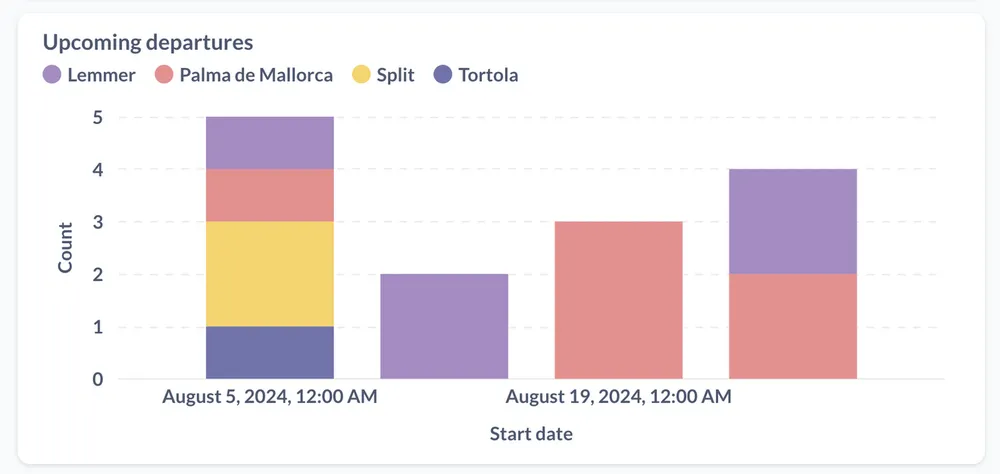
Section titled “Upcoming departures”The upcoming departures shown per week per base
Tasks over time
This graph shows the cumulative number of tasks created and tasks done over time. If the number of
tasks created and tasks done are diverging, this might mean that work is added faster than it is
being completed, which could indicate the end of the charter season coming soon, for example.
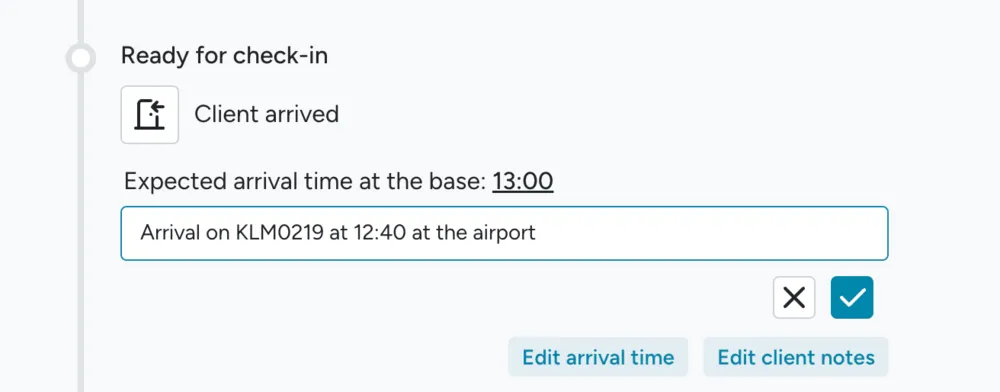
Client Arrival Time & Notes Editable from Timeline
Section titled “Client Arrival Time & Notes Editable from Timeline”We made it more straightforward to add client arrival time and notes straight from the timeline, instead of having to edit the booking itself. Note that what you fill in there is visible for the client in their application as well!
Deposit Client Notes
Section titled “Deposit Client Notes”We have added the option to add client deposit notes to the Deposit booking stage. This note will be displayed on the check-out PDF and can be used as a way to tell the customer why the deposit is not released entirely. The check-out PDF will now only be sent to the customer once the deposit stage is marked as done.
New Role: Cleaning Manager
Section titled “New Role: Cleaning Manager”We added a new role Cleaning Manager, which has similar permissions to the Cleaner role but can also create and update tasks.
Improved Checklist Usability
Section titled “Improved Checklist Usability”We have improved the checklist usability by informing users better if there are one or more items that are not completed yet. This should prevent any confusion at the end of checklist as to why a list cannot be submitted yet.
New Filter: Done Date
Section titled “New Filter: Done Date”It is now possible to filter by Done Date on the tasks page, which helps you quickly find tasks based on their done date. We also display the done date in the overview now.
August 1
Section titled “August 1”New: Reports
Section titled “New: Reports”You might have spotted it already in the app: we added a new section in the menu called Reports, where we will be adding more reports as we go. We have added three for now, explained below.
If you have a request for a specific report you would like us to add, please do not hesitate to contact us at hello@floatist.com
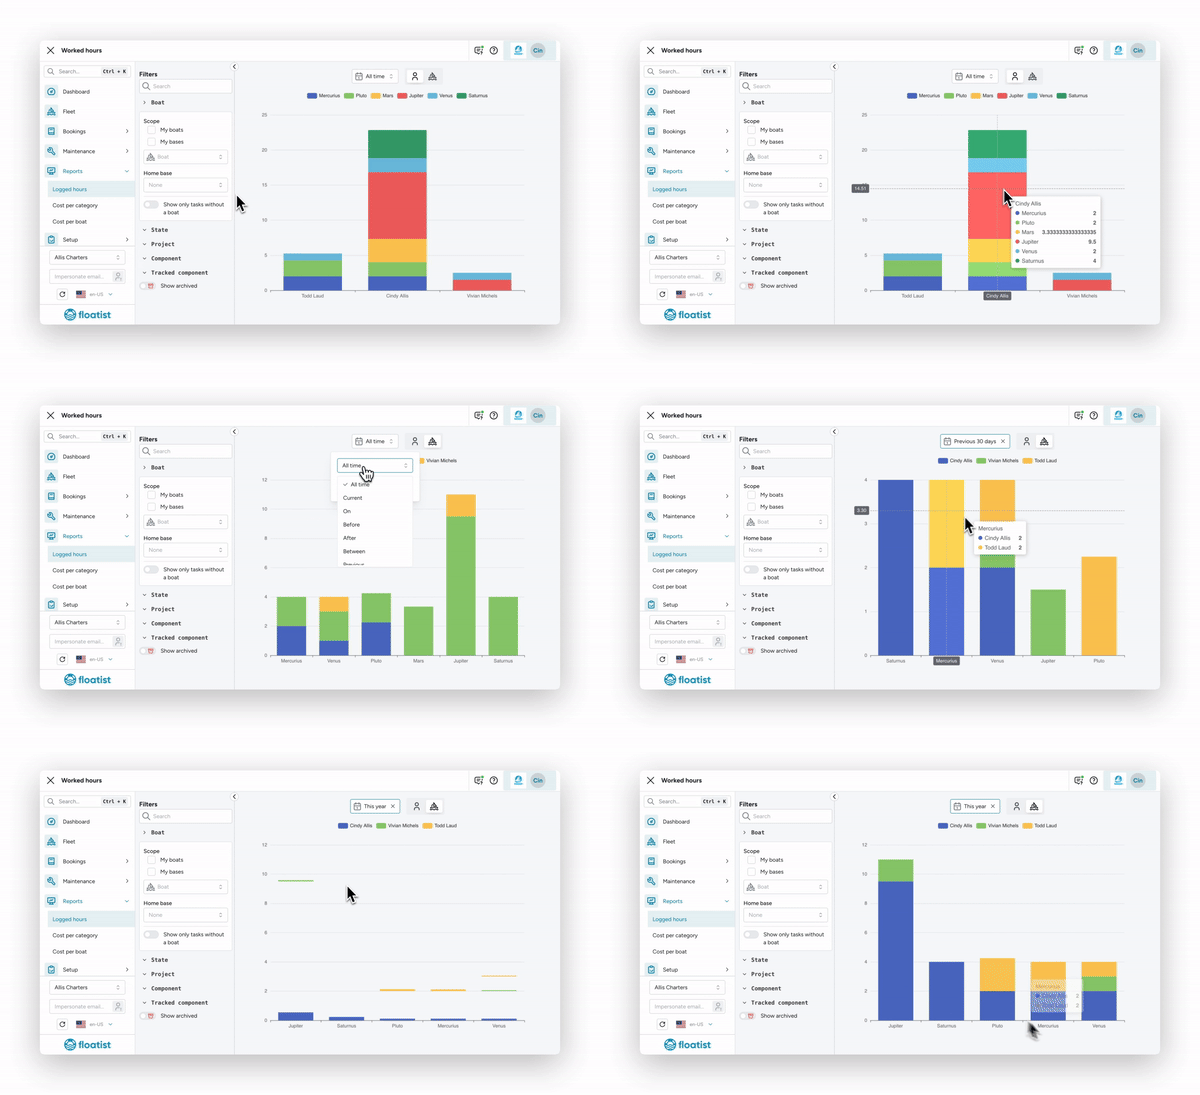
Logged Hours
Section titled “Logged Hours”This report shows the amount of logged hours on Tasks. You can view logged hours per yacht or per user, adjustable at the top. At the top you can also select the time period you want to view the report for.
Using the side filters you can adjust the view even further, specifying particular objects of interest. For example, you can select the time period, or filter by boat, base, or even component.
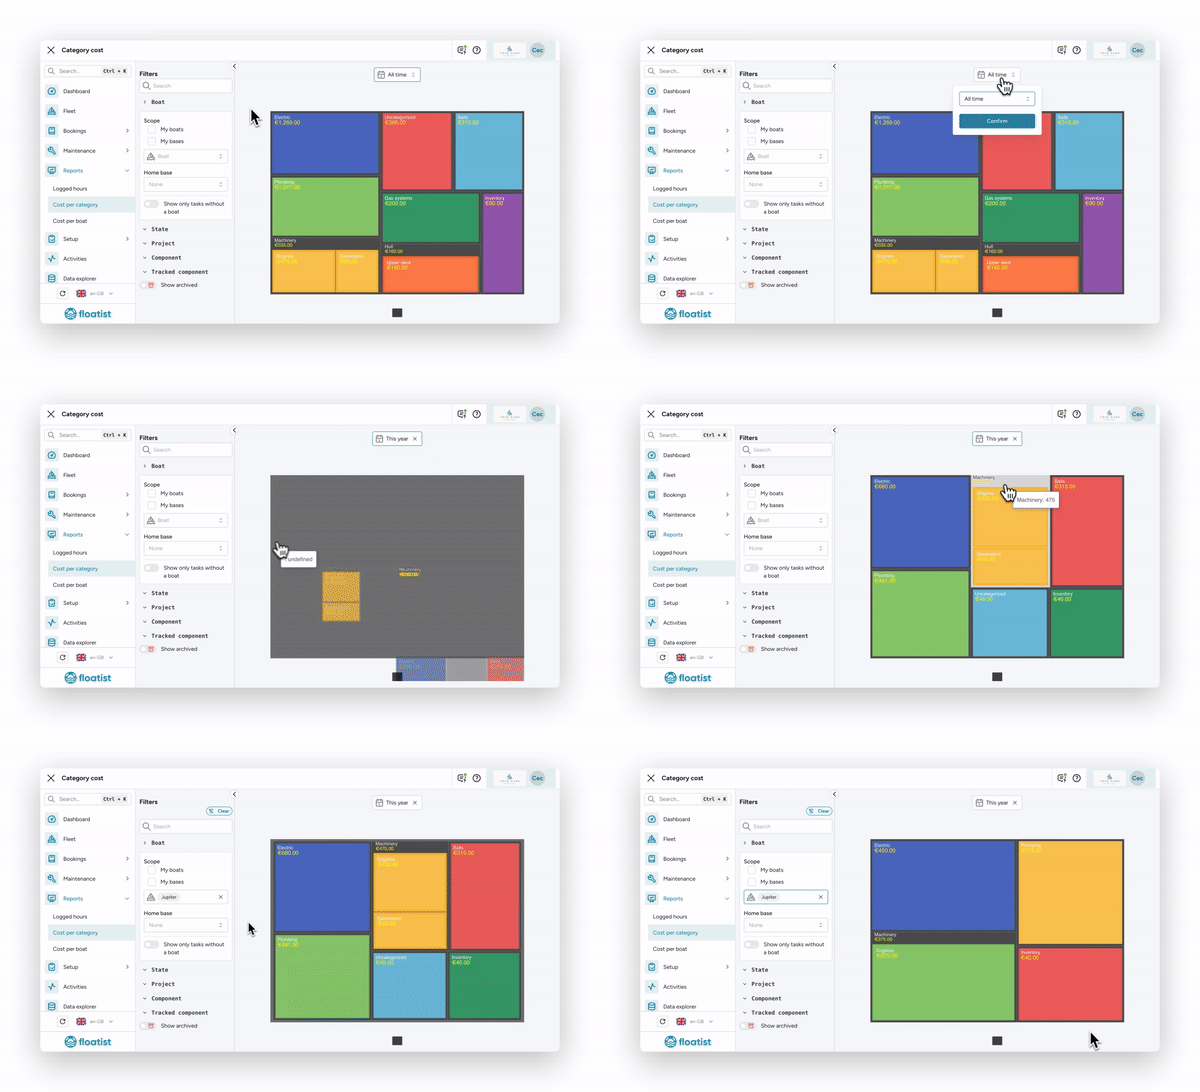
Cost per category
Section titled “Cost per category”This report allows you to inspect the total costs in a specific category, including all subcategories. All of the same filters are available to further specify this report.
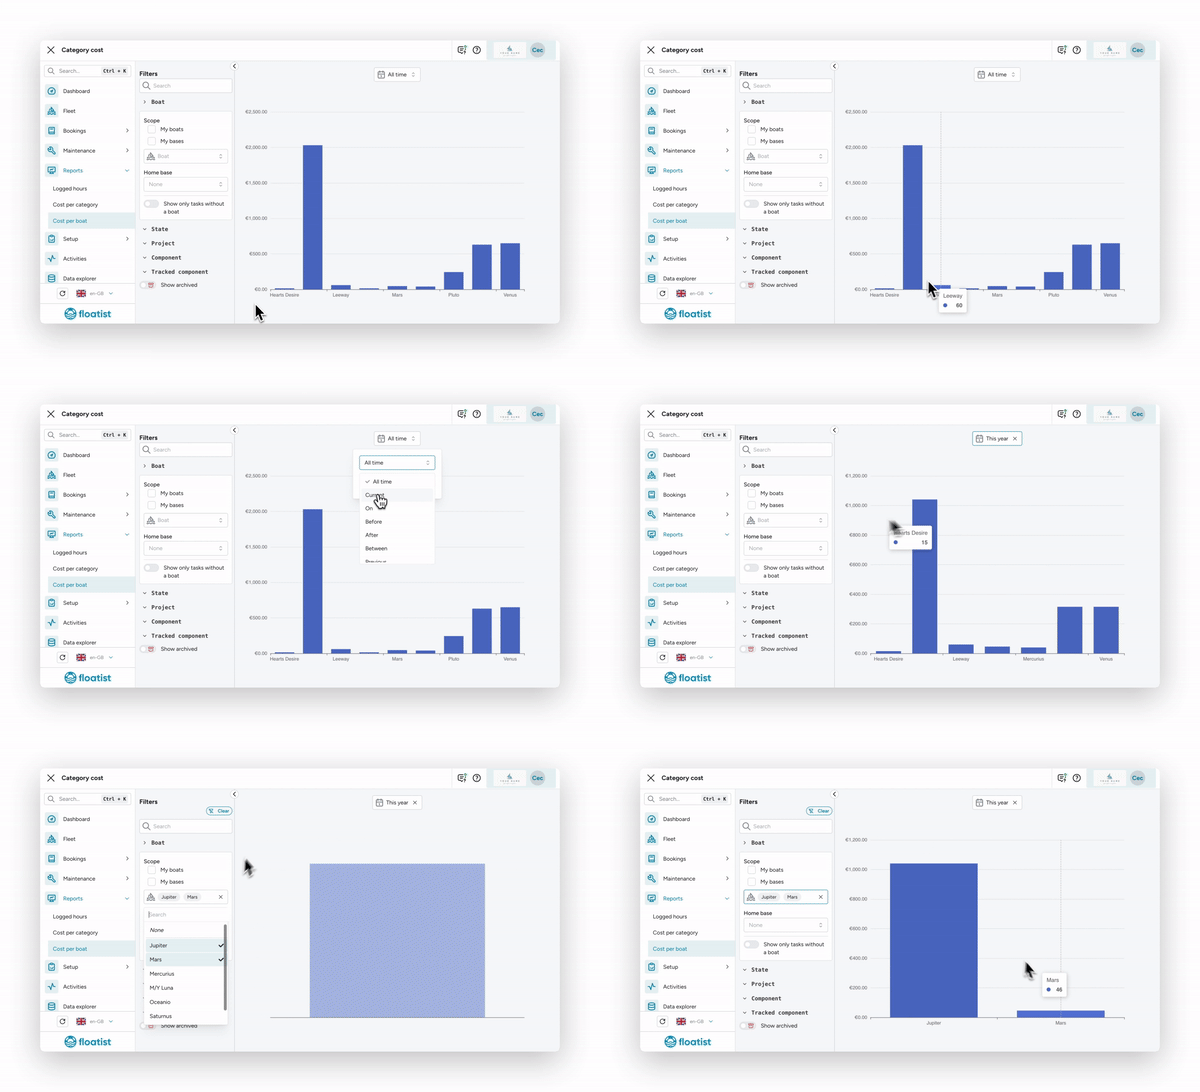
Costs per boat
Section titled “Costs per boat”The total cost per boat can be viewed in this report. Again, the same filters are available in each report to further specify your query.
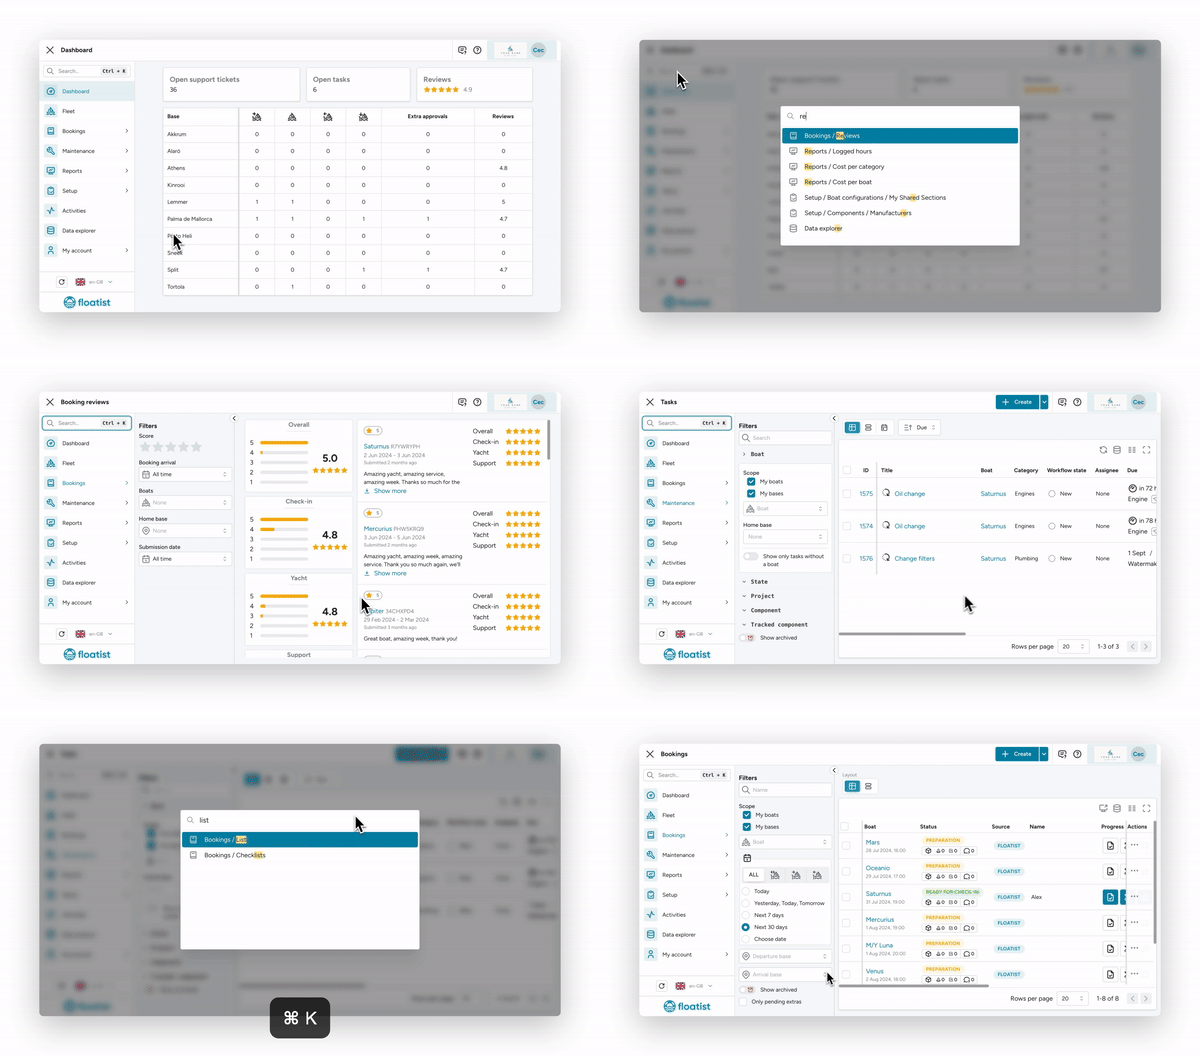
Search Spotlight
Section titled “Search Spotlight”Quickly navigate to any page by using the new Search Spotlight on the top left corner of the app! On desktop, you can also use the shortcut Ctrl + K or Cmd + K on Mac.
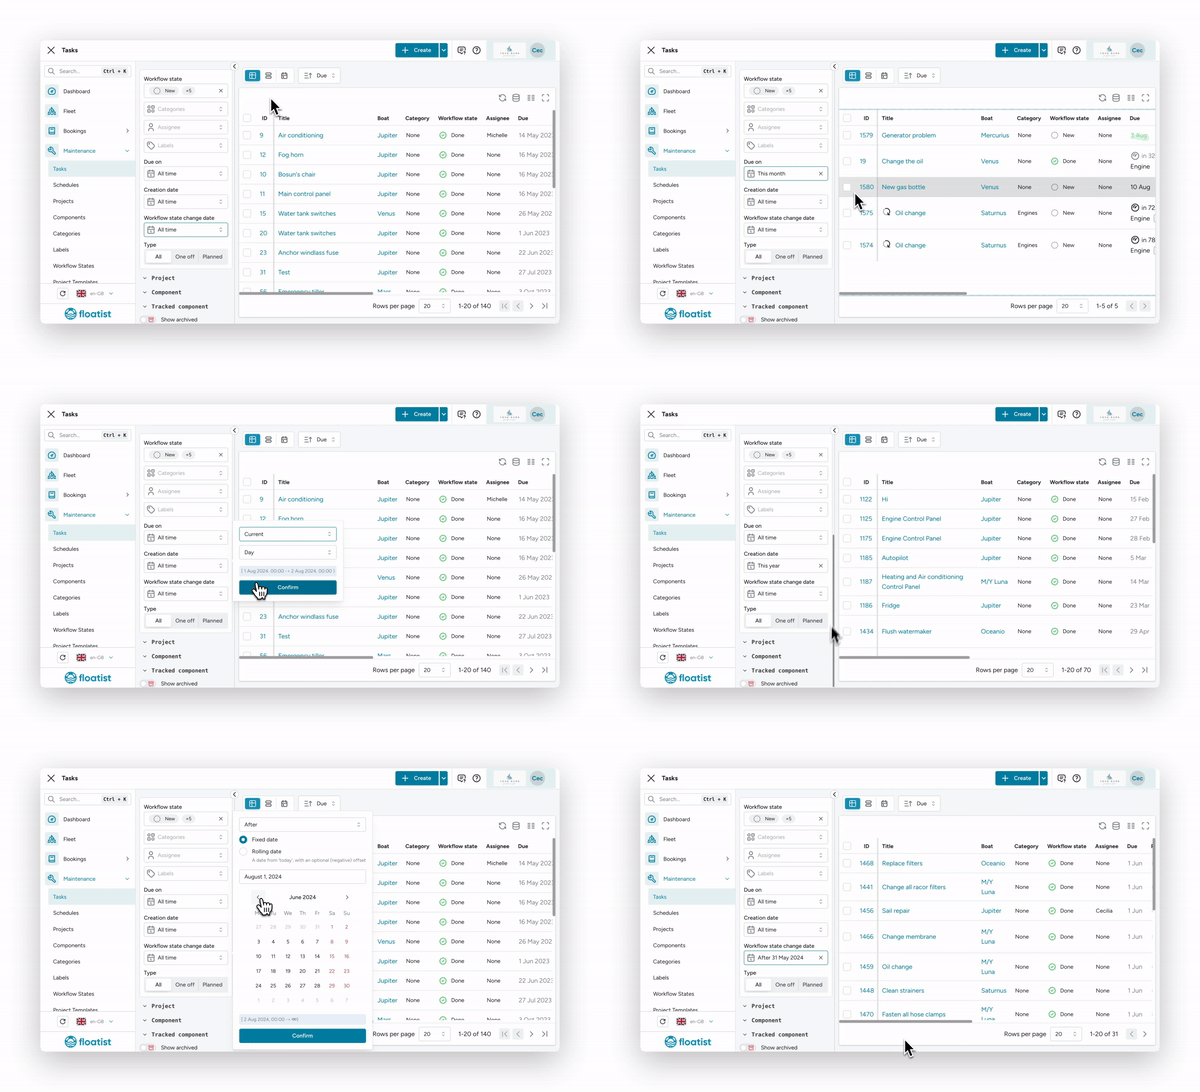
Improved date range selectors
Section titled “Improved date range selectors”We have improved our date range selector. It is now extremely flexible, and you are able to select any possible date range. Using clear wording to describe different options we made it powerful yet simple to use. These filters are available on all pages with date range selectors.
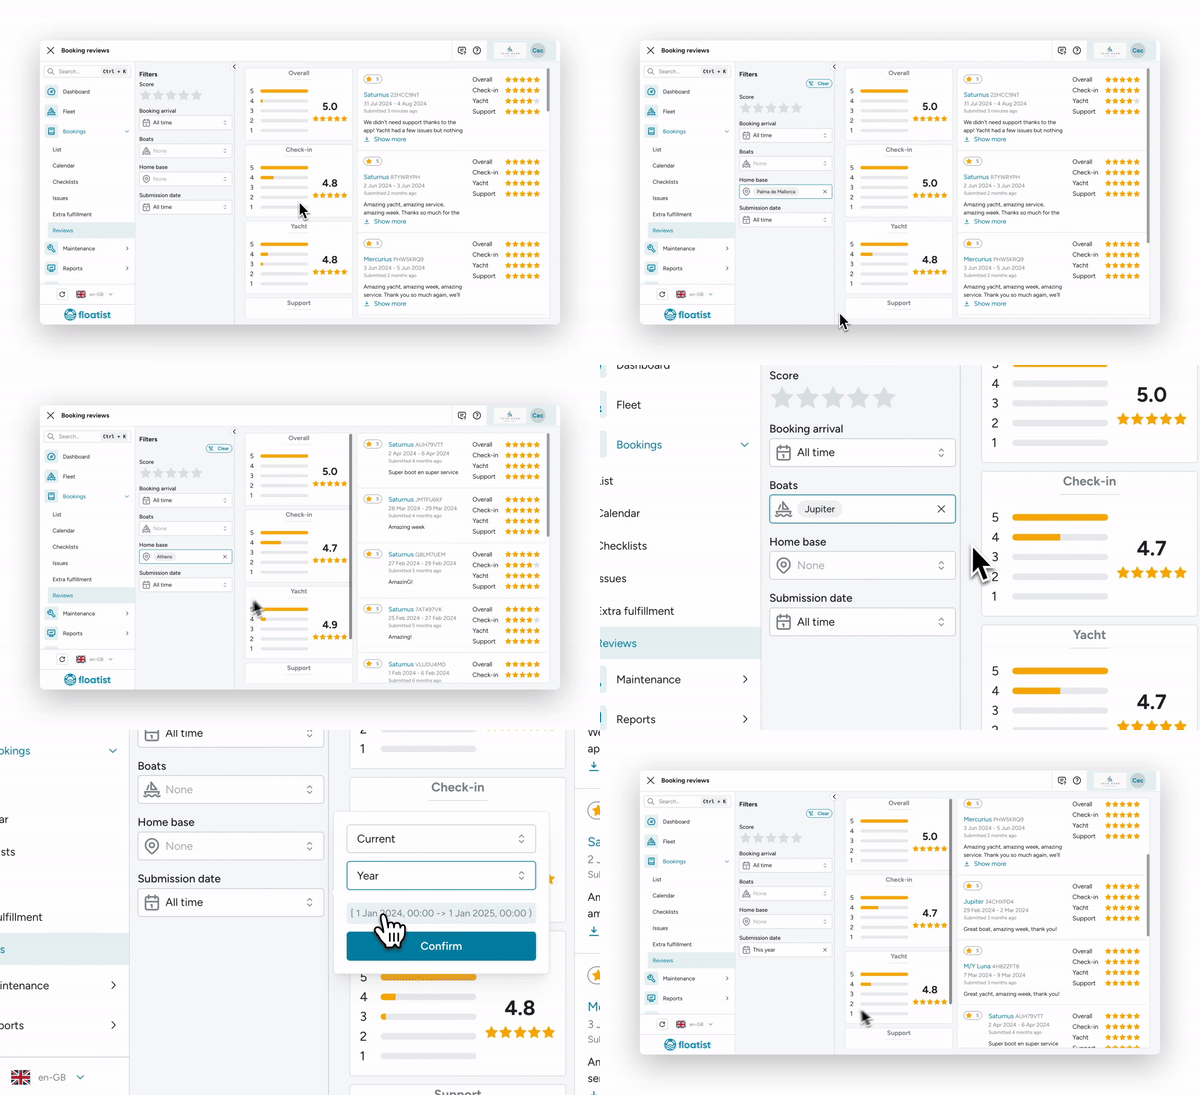
New filters on Review page
Section titled “New filters on Review page”We have added filters to Reviews page, now allowing you to filter by base, boat, rating, submission date, or time of the charter.
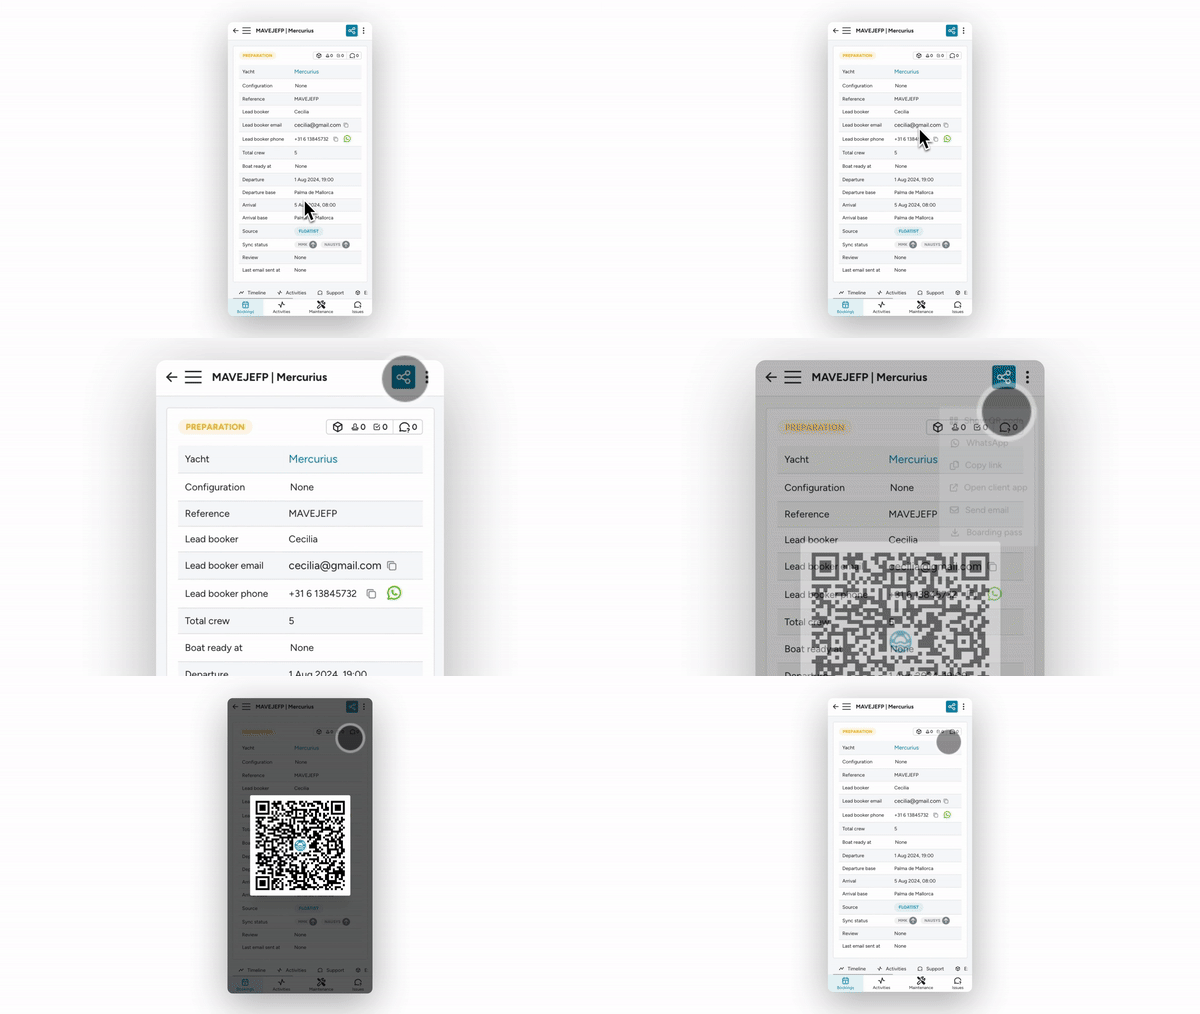
Technicians now also have the permission to share the booking link.
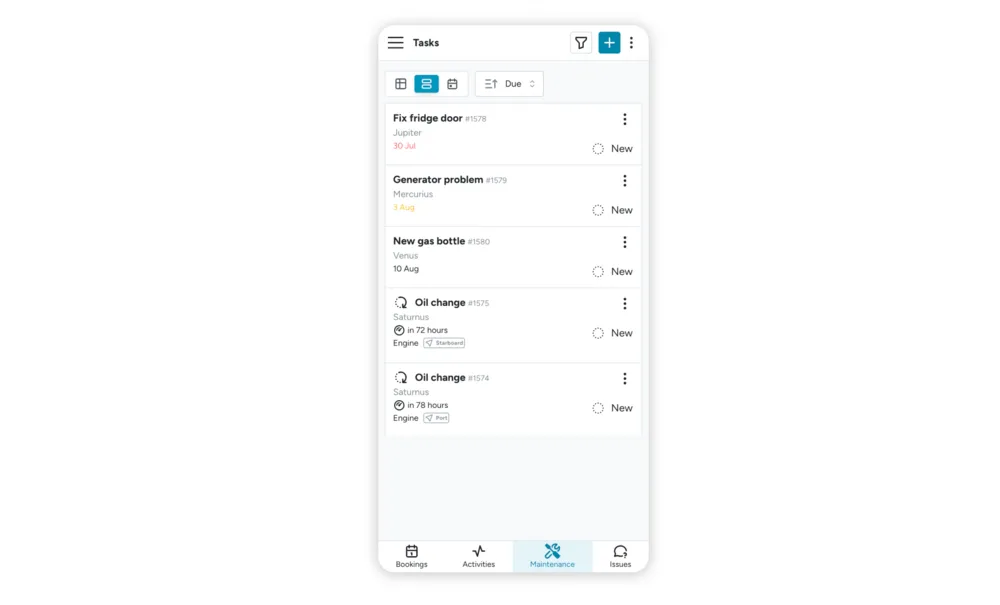
Task due date now visible on mobile
Section titled “Task due date now visible on mobile”We’ve added tasks’ due date to the mobile view, where before this was only visible from the table (desktop) view. Now you can see with one glance which tasks are overdue or coming up soon, even from a mobile device.
Default maintenance task filters updated
Section titled “Default maintenance task filters updated”By default, base managers now see all tasks in the base instead of only seeing tasks assigned to them and having to clear the filter to see all tasks. Technicians still see only tasks that are assigned to them by default, but can always remove the filter if desired.
🪲 Fixed: Booking detail view back button after submitting a checklist
Section titled “🪲 Fixed: Booking detail view back button after submitting a checklist”After submitting a checklist from the mobile app there was an issue with going back to the list using the back button. This issue is now fixed.
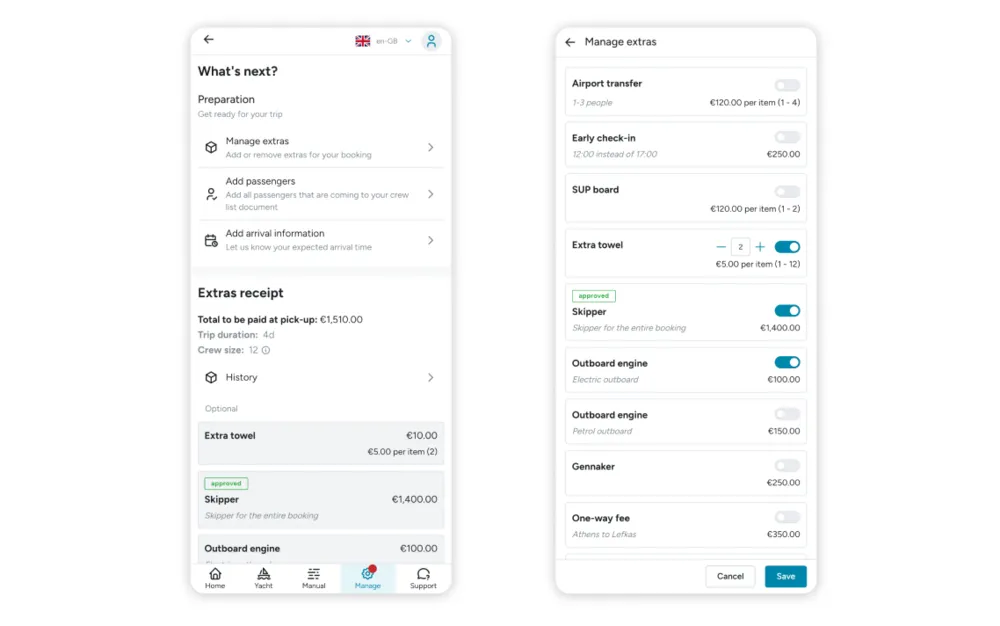
July 24
Section titled “July 24”To make it more clear for customers who have booked an extra that requires approval, whether or not this extra is approved, we added the ‘approved’ badge both in the Extras Receipt as in the menu where customers can select and edit extras.
Checklist performance and UX improvements
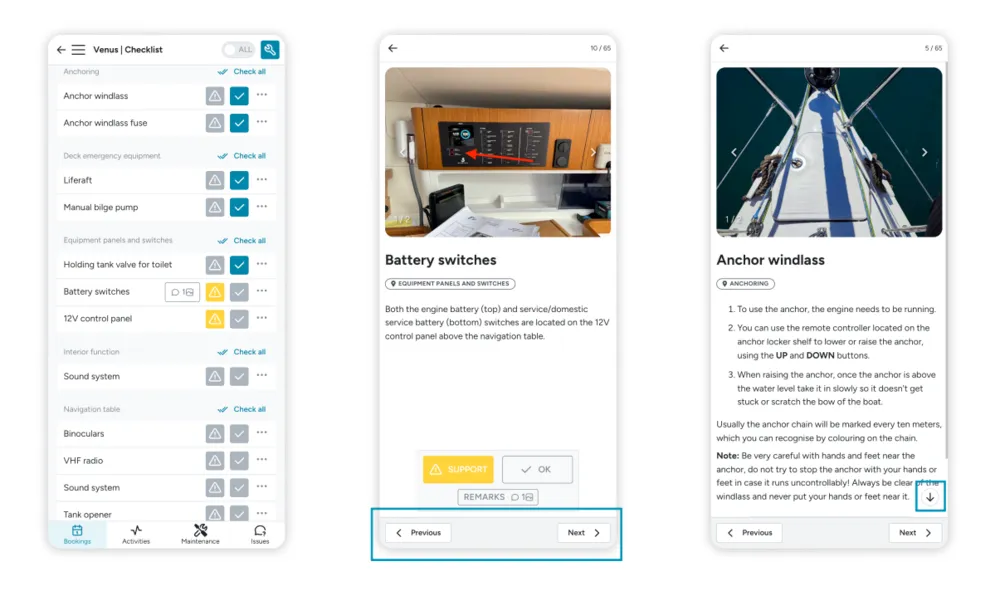
Section titled “Checklist performance and UX improvements”We’ve made significant improvements to the checklist experience. It is now faster and has multiple animations to engage the user.
- We have made the ‘previous’ and ‘next’ buttons more clear for the user to understand how to navigate between items
- Charter guest users will automatically start on the first item instead of in the list view
- We have made a floating scroll button to indicate there is more text to read below, and placed the confirmation buttons at the end of the text so the user is encouraged to read the entire instruction before continuing.
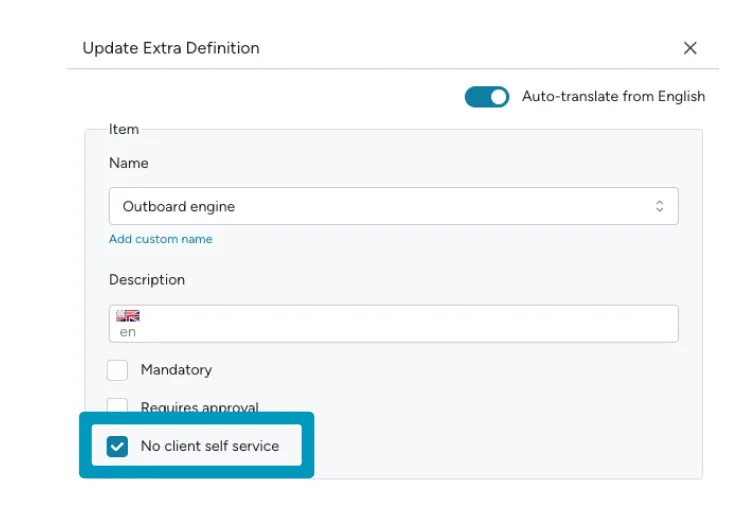
We have added the option for you to create extras which are unavailable for customers to select from the booking app. This is useful in case you want to gift extras for free and add them to a booking, but don’t want customers to be able to select those extras themselves.
To use this functionality, follow the following steps:
- Check the box ‘no client self service’ in the Extra definition of the item
- Add the extra to the customer booking from the Booking page > Extras
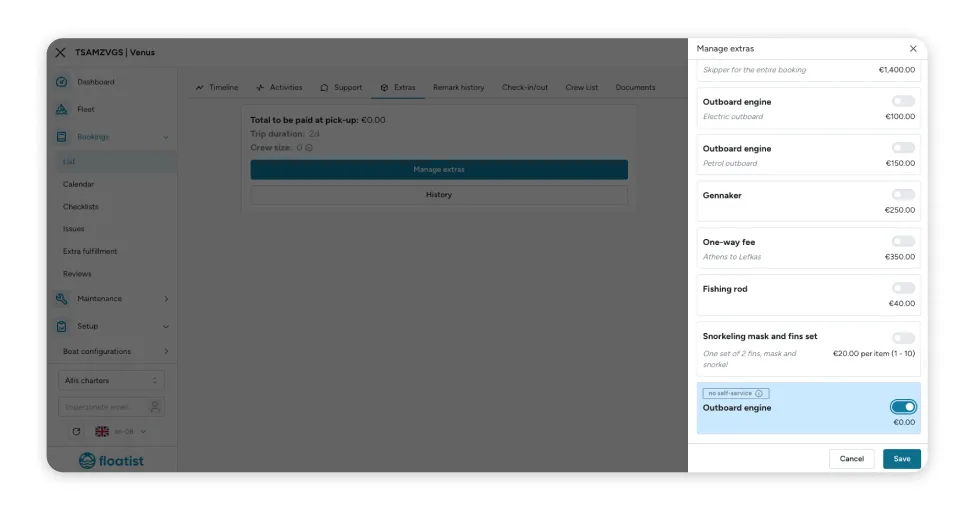
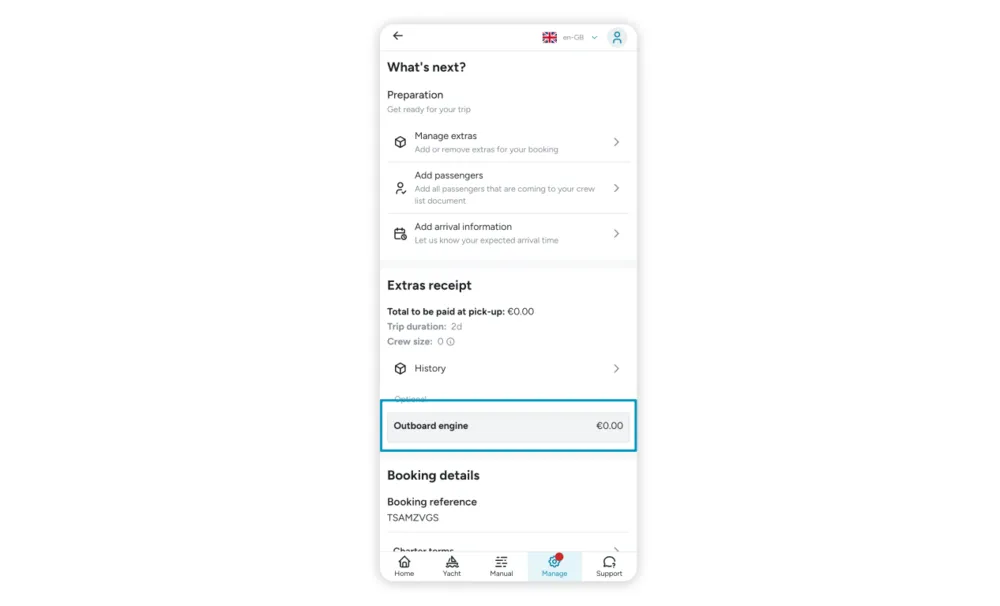
- The extra will show up for the customer in the Extras Receipt, but they won’t be able to add or remove it themselves.
July 4
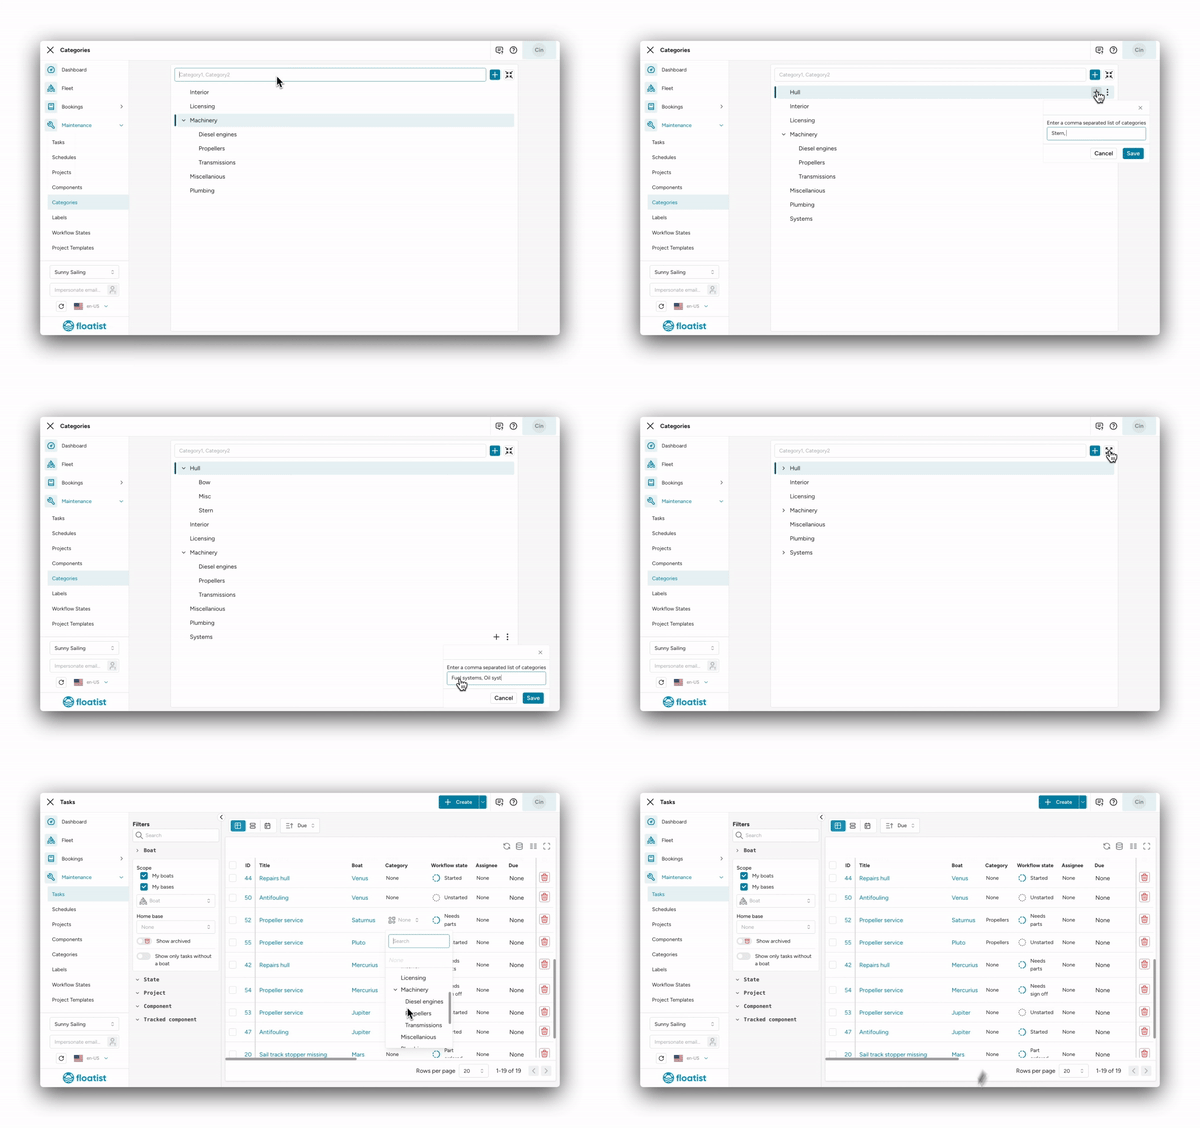
Section titled “July 4”By popular demand we have added categories to tasks, so you can create your own categories and assign each task a category.
Categories can have different hierarchies, so you can create subcategories, and subsubcategories, etcetera. The system is designed fully flexible so you can completely customize it to your workflow. If you would like help setting up your categories, please reach out to us and we’re happy to assist.
You can create you categories under Settings > Task management > Categories, and after creating them you can start using them in tasks.
Improved Schedules
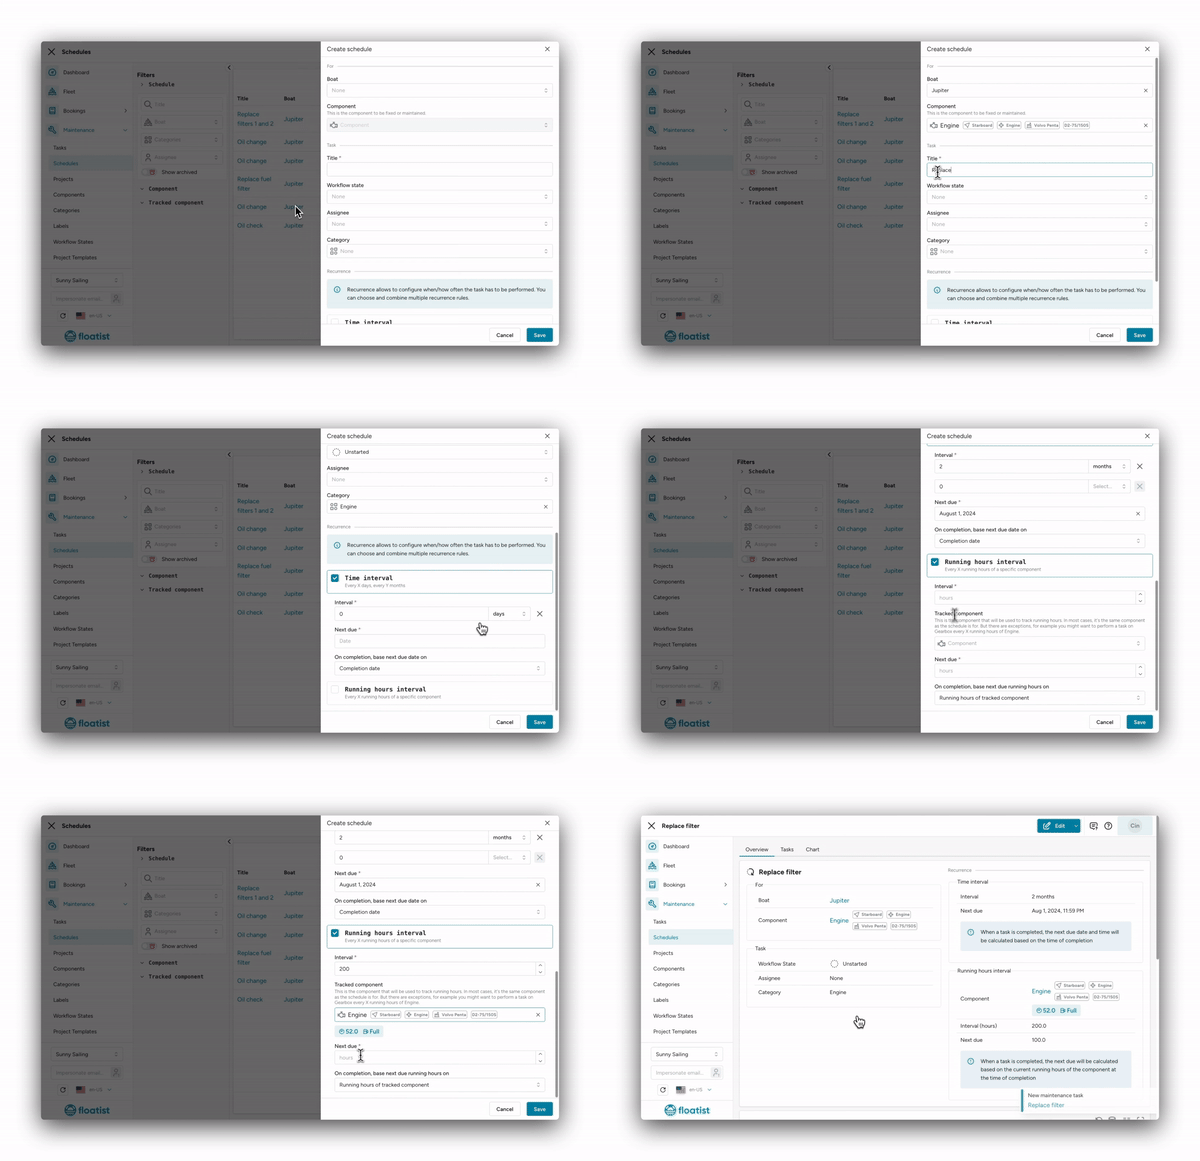
Section titled “Improved Schedules”We made big improvements to the existing ‘periodic rules’, also renaming them to Planned Maintenance Schedules at the same time. You can now find them underTask management > Schedules.
Everything imaginable is now possible, where you can for example track a certain component’s hours in order to do maintenance on another component. For example, you might want to do a service on the gearbox, based on the engine’s running hours.
We also have added graphs which displays the planned versus actual completion times of scheduled tasks. Differences in running hours and days are visualized using color-coded indicators to assess the timeliness of task execution. This should help you quickly get a grasp on how well you are actually adhering to your intended maintenance schedule.
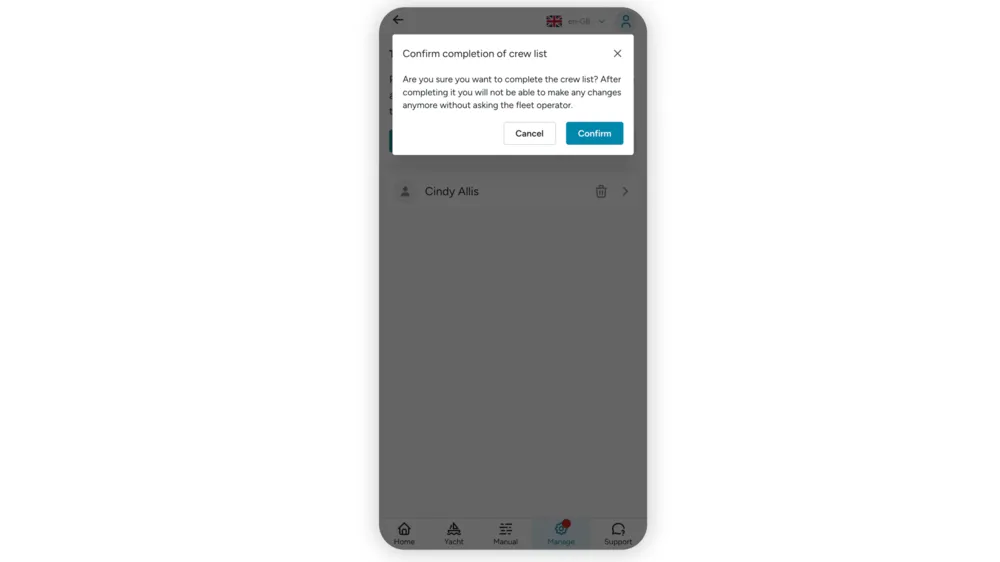
Charter customers get a warning when submitting the crew list
Section titled “Charter customers get a warning when submitting the crew list”We have a added a quick warning modal for charter customers that lets them confirm that the crew list is complete, notifying them that they won’t be able to add any passengers anymore after confirming (without contacting you). This will help prevent customers confirming the list and needing to ask for the crew list to be opened again later to add additional passengers.
Boarding pass updated
Section titled “Boarding pass updated”The boarding pass now has more information on it, such as the yacht name, departure and arrival dates, base names, and the client name. You can download the boarding pass from the Bookings > Booking Detail View > Share > Download boarding pass.
Hungarian has been added
Section titled “Hungarian has been added”Hungarian is now one of the languages in the language list.
June 11
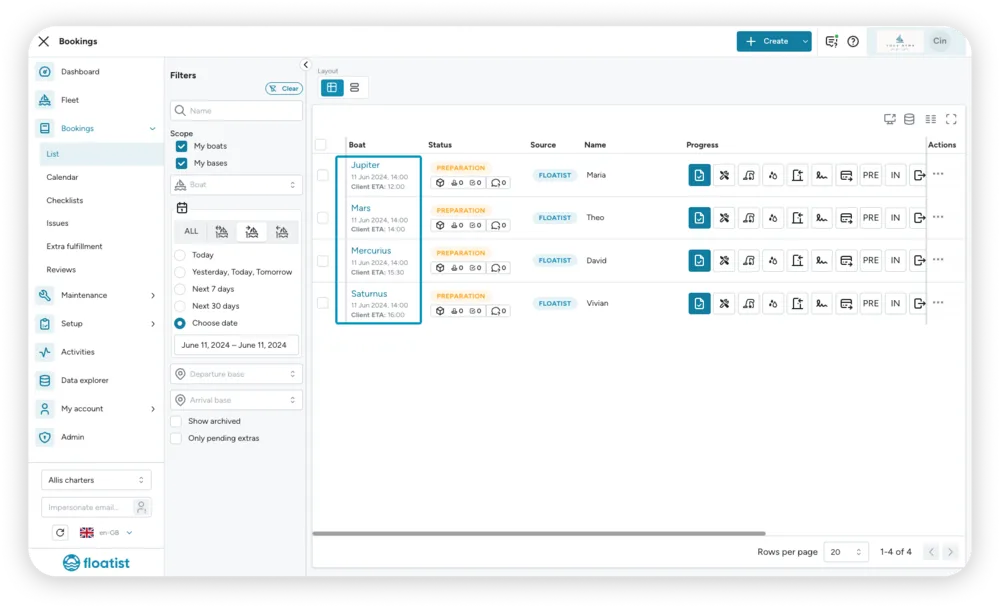
Section titled “June 11”Bookings list is now sorted by client ETA, if available
Section titled “Bookings list is now sorted by client ETA, if available”We have recently added the option for clients to tell you when they expect to be in the base (refer to the release notes of May 27), and we are now using this information to show you your bookings in the right order. This will help your team understand which yachts should be ready first, all based on your customers’ expected arrival time.
The ETA of the client is shown in the first column.
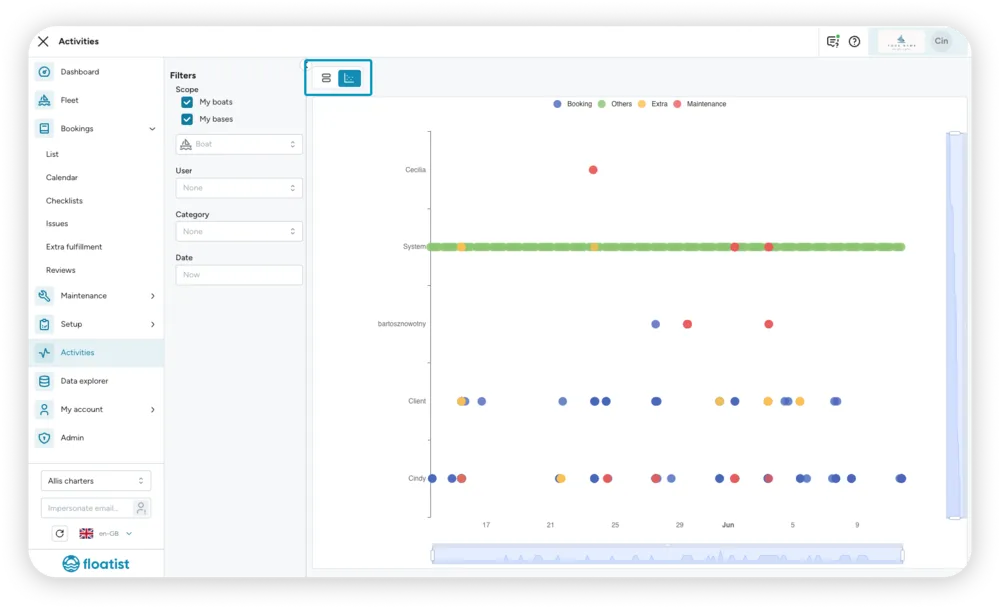
Activity feed as a graph
Section titled “Activity feed as a graph”We have created a graph version of the Activities page. You can access it by clicking the graph icon on the top left of the activity feed.
Updated permissions to complete or undo a pre-checkin, check-in or check-out
Section titled “Updated permissions to complete or undo a pre-checkin, check-in or check-out”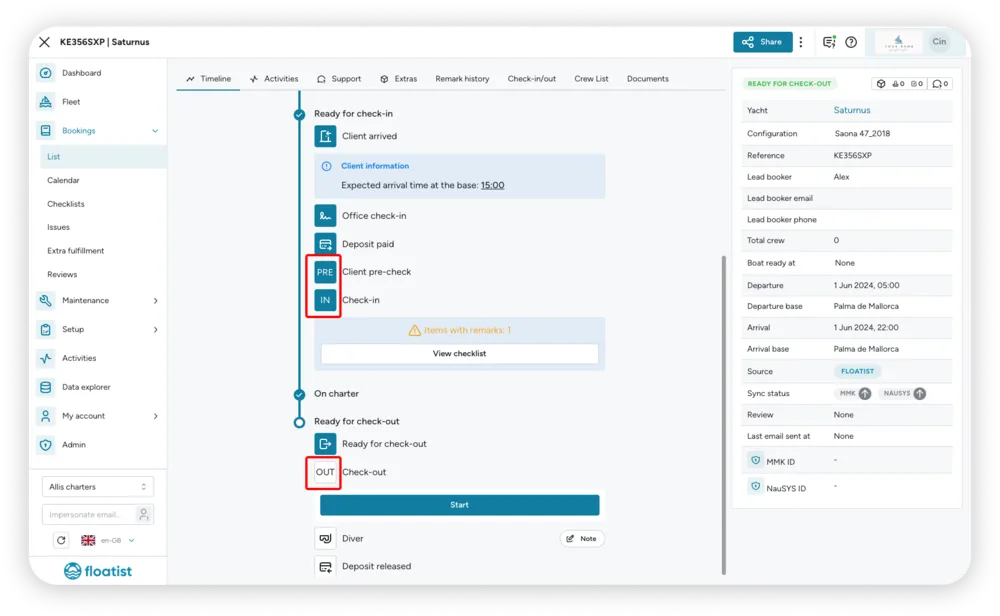
May 27
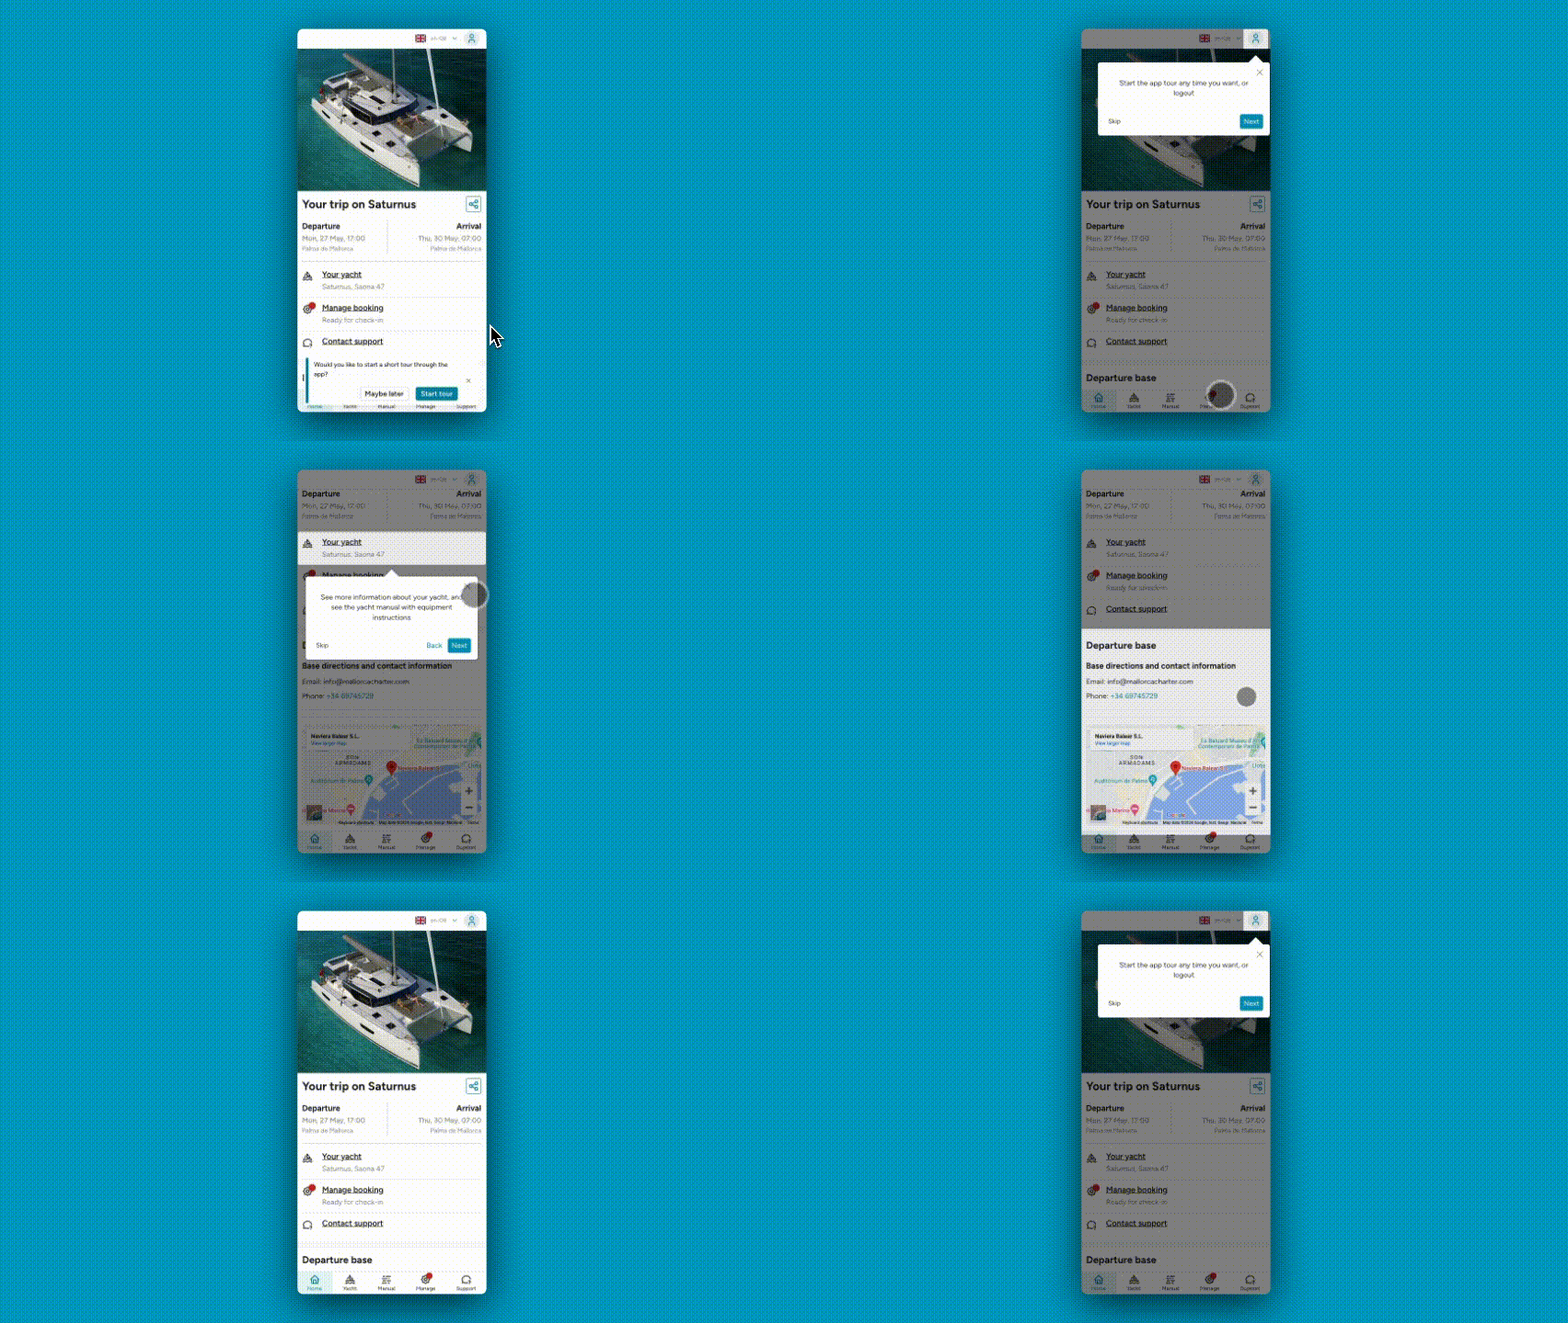
Section titled “May 27”Client App Explanation Tour
Section titled “Client App Explanation Tour”We have added a product tour to the client app! This means that every first time the client app is opened on someone’s device, it will automatically ask the client whether they would like to start the tour. Alternatively the client can choose to do it later, the tour will always be accessible from the menu on the top right.
Please let us know if you would like any components to be added to the tour, which we can easily do.
Client App Arrival Information Form
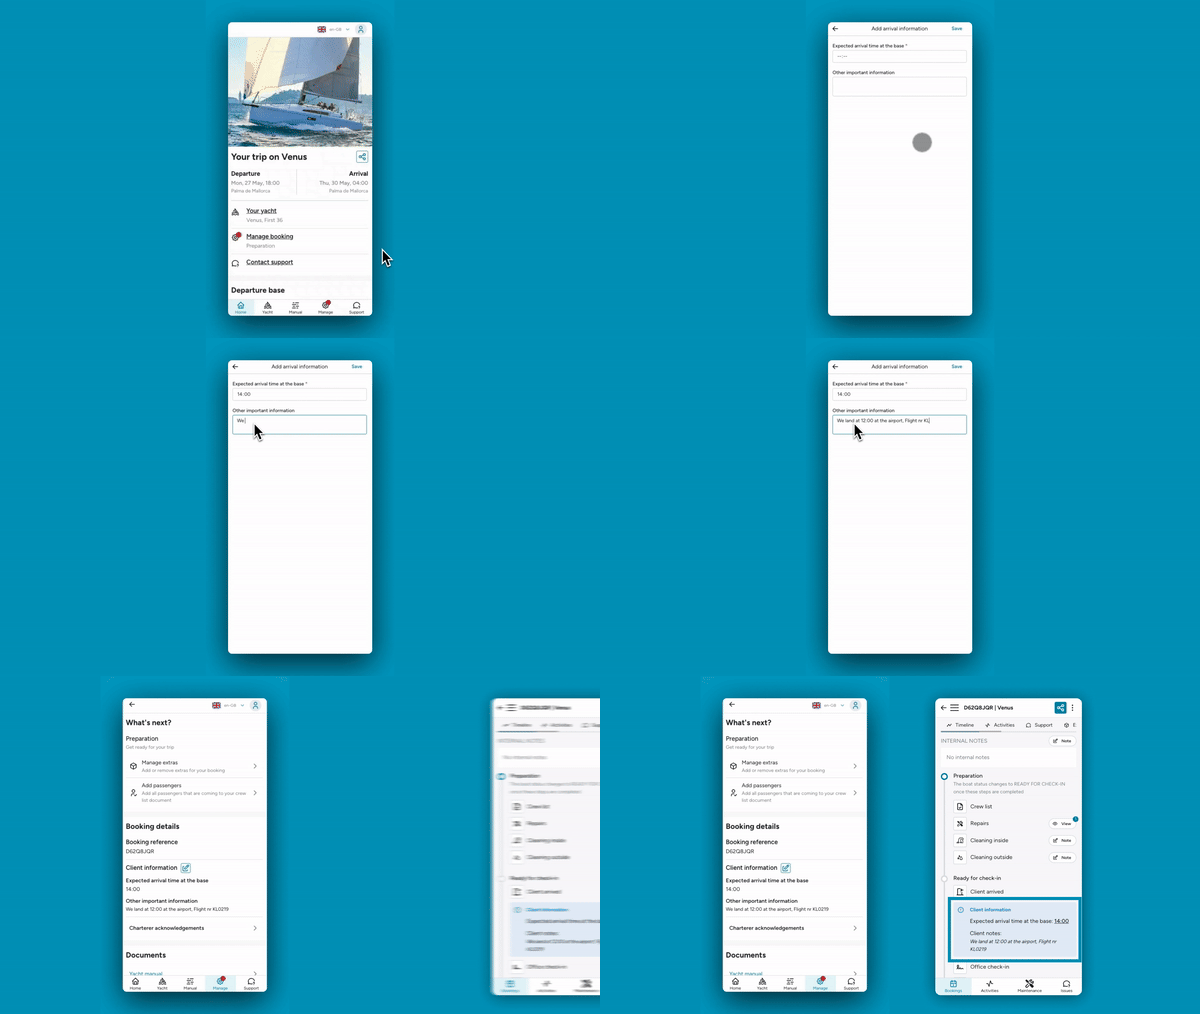
Section titled “Client App Arrival Information Form”We have added a new menu option in the client app, where they are asked to fill their arrival information. This will allow you to more carefully plan and prioritize your tasks for Check-in day.
Once the client has filled their information, it will show up in the timeline as shown below. Client can still edit it from the Manage menu in their app. You are also always able to edit this information on behalf of the client from the Edit Booking menu.
🚨 This is an important change because all of your clients will now see this form available in the application. In case you do not want to show this form to your clients, please contact us.
As a next step, we will add the arrival time information to be available in the Bookings List table as well, and you will be able to sort the yachts on customer arrival time.
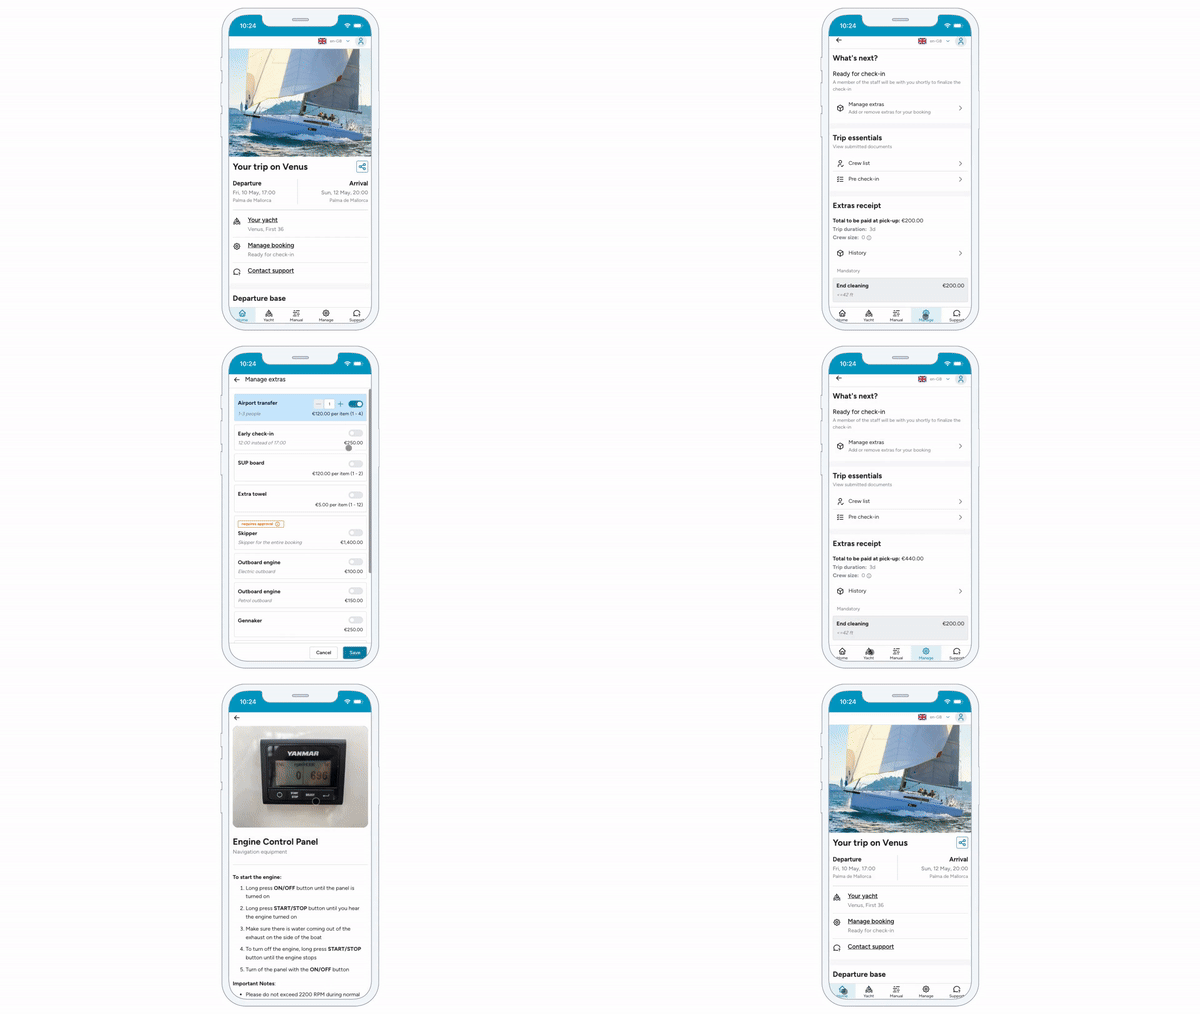
We have updated our Charter Client Application with an improved layout. We have added an extra page ‘Manage’ from which clients can manage their booking, see their documents, and manage and request Booking Extras.
If clients request an extra that needs approval, this will be shown in the bookings list.
Please note that if you do not have any Extras defined for your base, the Manage Extras option will not be available in the client application, but otherwise they will be available for your clients to book.
Polish language now available from the app
Section titled “Polish language now available from the app”We have added Polish as an available language in the app. As always, please let us know if you require any other language.
April 23
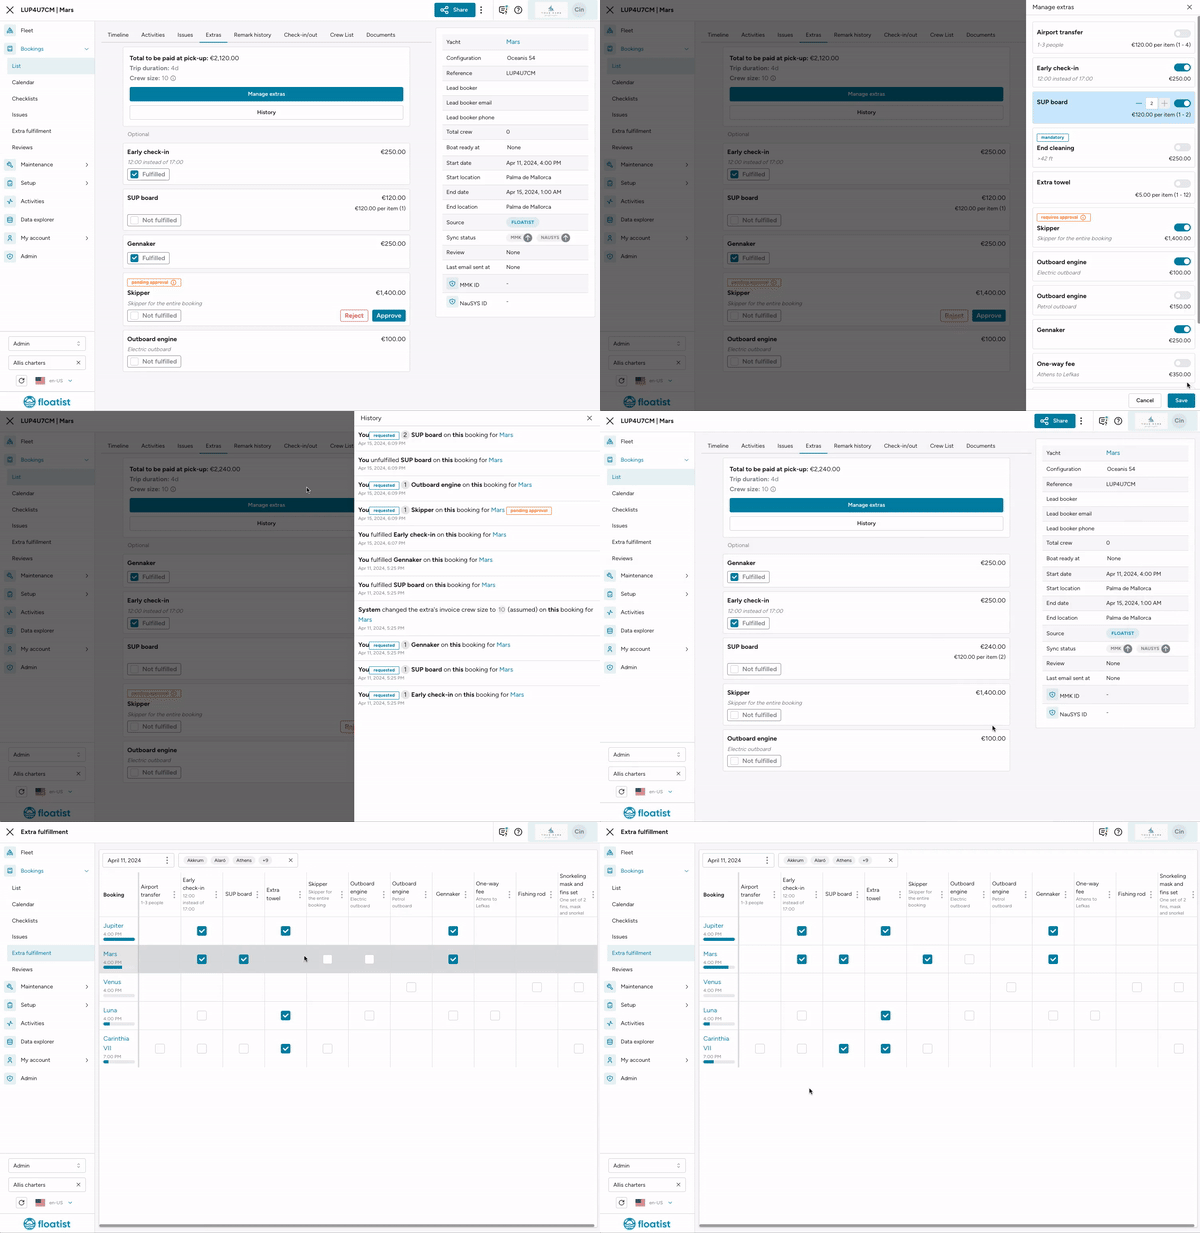
Section titled “April 23”This feature, requested by many of you, has been in the works for a while, and we just released v1! Please note that we will still expand on it (one essential part still to be finished is making it available to charter guests) but you can already start using the first version within your own team.
In v1 it is possible to:
- Define your extras, both mandatory and obligatory
- Add them to bookings and manage approval processes revolving around that
- Have an overview for check-in day to see which ones are already delivered and which ones still have to be added
We have created documentation to explain in detail how to use Extras:
- Extras Setup — defining your extras
- Extras Operations — adding extras to a booking, fulfilling them, and keeping track of delivery
Next up for Extras we will add:
- Customers can request extra’s from their applications
- Push notifications around extra’s
Please let us know if you have any questions or suggestions regarding the v1 functionality of extra’s! The easiest and fastest way to reach us is to WhatsApp us on our support number.
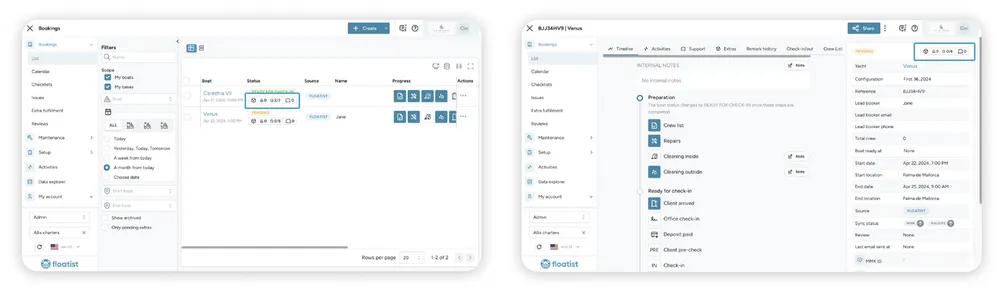
We have added an extra widget which keeps you informed on the status of extra’s and support tickets. You can find this widget in the booking list, in the Status column, and you can find it on the booking detail page, on the top right corner.
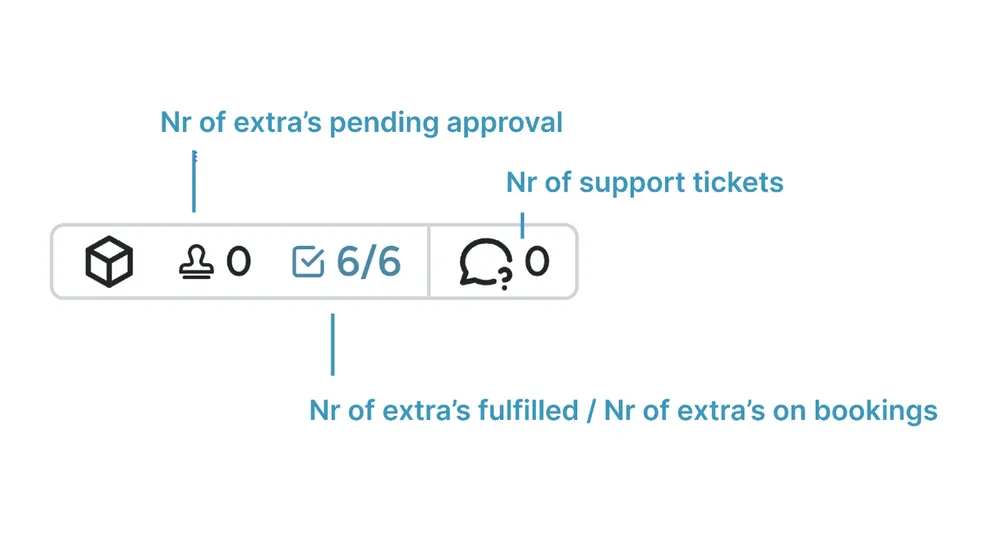
From left to right, using this widget you can check:
- How many extra’s are pending approval (which means that someone has added an extra that needs approval)
- How many extra’s are fulfilled, and how many extra’s are added onto this booking in total. In the example below there are in total 6 extra’s, and all 6 of them are already fulfilled. If 2 of them would have been fulfilled it would have displayed 2/6.
- The number of support tickets linked to this booking.
When you press the extra’s widget you will be taken straight to the extra’s of this booking, and when you press the support tickets part you will be taken straight to the support tickets.
Automatically Request Google Reviews with a link in Floatist reviews
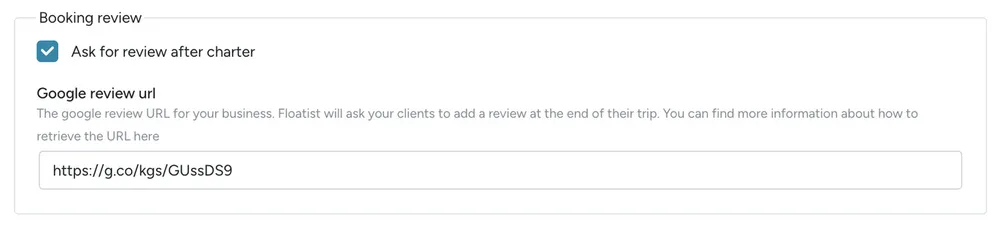
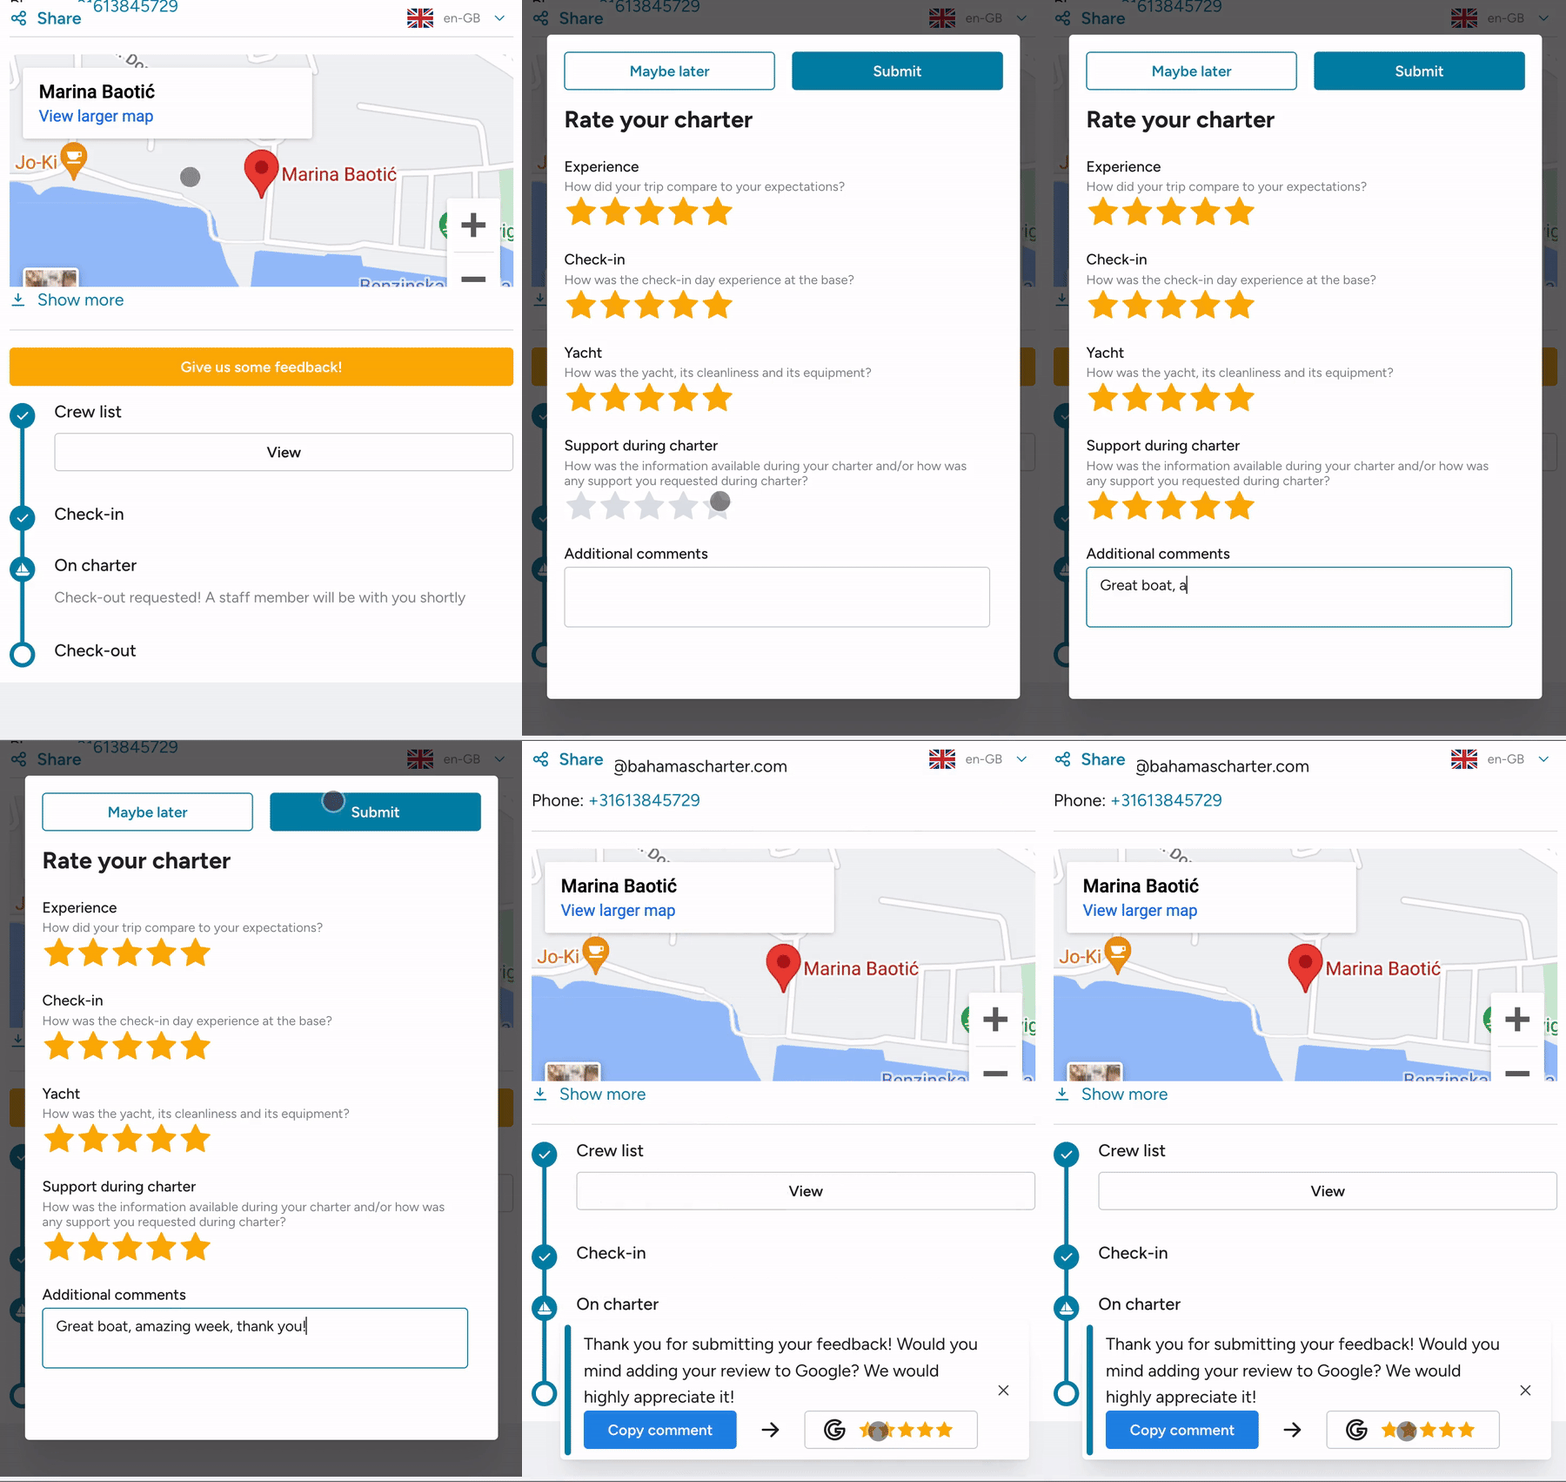
Section titled “Automatically Request Google Reviews with a link in Floatist reviews”We have created a way for you to generate more Google Reviews! You can now add you Google Review request link in Settings > Global settings
How it works:
If a customer gives you a good rating (4 stars or higher) we will show a banner and a copy button and request them to copy it to your Google Review profile. That way you can collect more positive Google reviews!
Simply put in your Google Review url in Settings > Global settings and you’re all set!
New: Dashboard
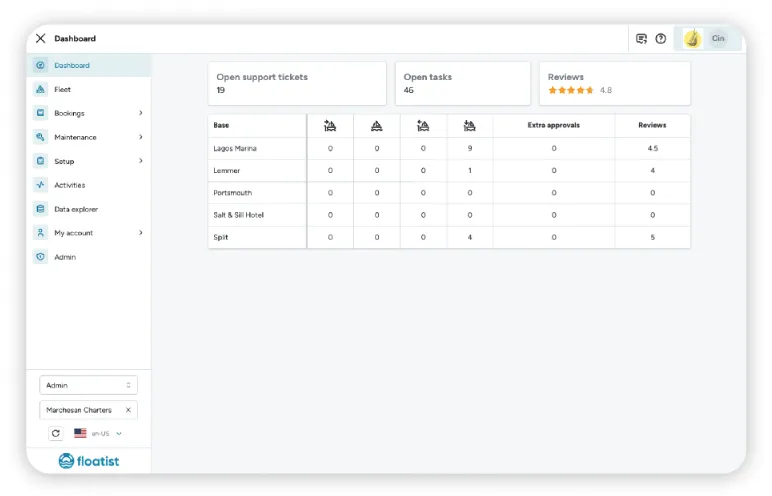
Section titled “New: Dashboard”We have added a dashboard to Floatist, which will be the home screen when first opening the app. The dashboard currently contains the following elements:
-
The number of open support tickets
-
The number of open tasks
-
The average review rating overall
-
A table with a row for each of your bases, and for each base, the following information in the columns (from left to right):
- The number of boats that have at least one booking starting today (boats leaving)
- The number of boats that are out on charter
- The number of boats that have at least one booking coming back today (boats coming back)
- The number of boats that are staying in the base
- The number of open extra approvals
- The average review rating for bookings with as departure base that base
We will add more data points to this dashboard over time, so if you have a suggestion of what else you would like to be displayed on this dashboard, please send us an email at support@floatist.com!
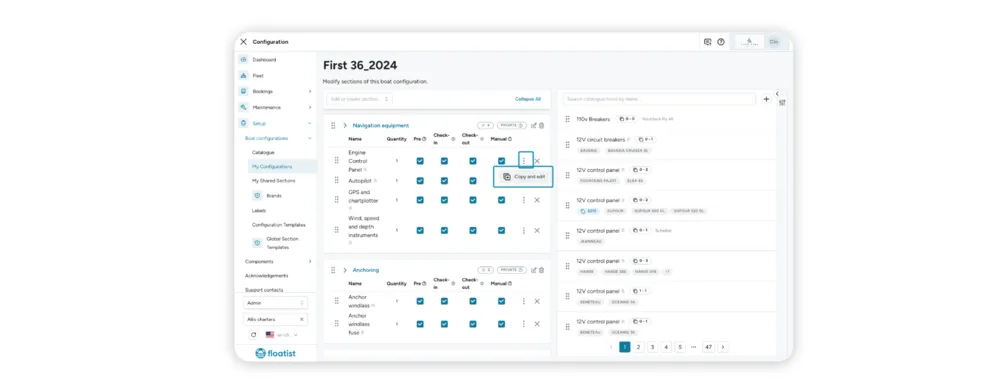
Copy and Editing Global items into local items
Section titled “Copy and Editing Global items into local items”This change will make editing Floatist templates easier! We have added a button called Copy and Edit in the boat configuration component so that if you find yourself wanting to edit a global item, but you cannot, because it is global, you can easily copy this into a local item and add it directly to the section using this button.
It will create a local copy which you can edit, and then you can remove the global item once done.
Improved date filters in the Bookings list
Section titled “Improved date filters in the Bookings list”We have improved the date filters in the bookings list, now enabling you to customize your search so it works in all possible scenarios.
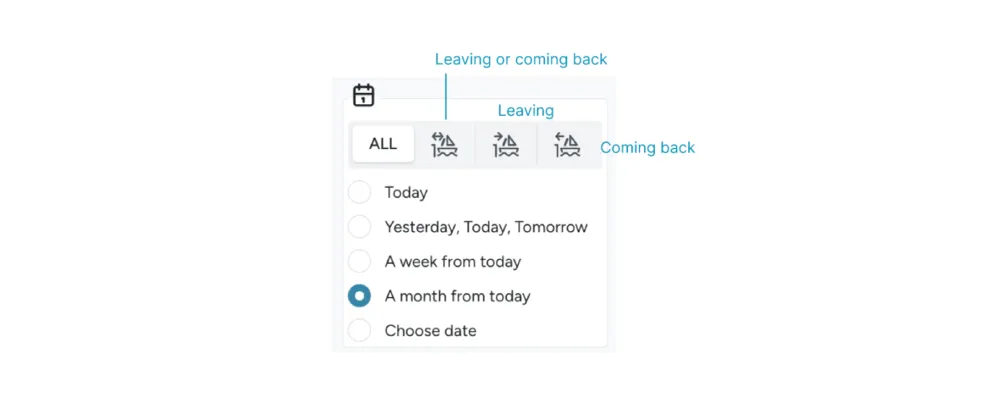
How to use them:
-
First, select which bookings you want to search for. Choose from:
- Boats that are leaving or coming back
- Boats that are leaving
- Boats that are coming back
- Or all (any) of the above
-
Then, select the timeframe for which you want to search for the above. You can choose from:
- Today
- Yesterday, Today, Tomorrow
- A week from today
- A month from today
- Or you can select a custom date
Review functionality is now optional
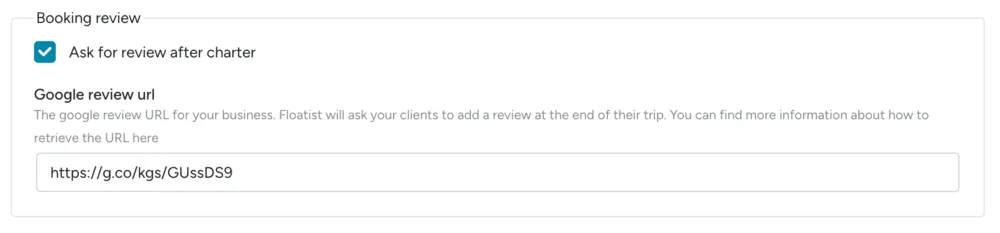
Section titled “Review functionality is now optional”After a booking is in the ‘Ready for checkout’ or any stage after that, charter customers can fill in a review. We have now made this configurable; so if you do not want customers to be requested to fill a review after their charters, please make sure to disable the review functionality in your account.
You can do so by unchecking the box in Settings > Global settings > Booking review.
Booking descriptions
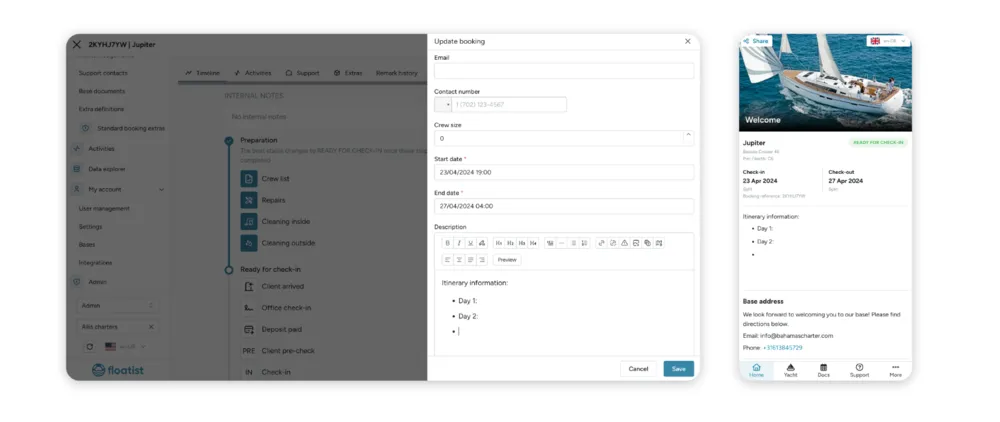
Section titled “Booking descriptions”Next to bases and boats, bookings can now have their own descriptions! This means that if you want custom text for a specific booking, you can. The descriptions functionality makes the experience for your customers as customizable as possible.
The booking description will show up on a bookings homepage, just like the base description.
Alert editors
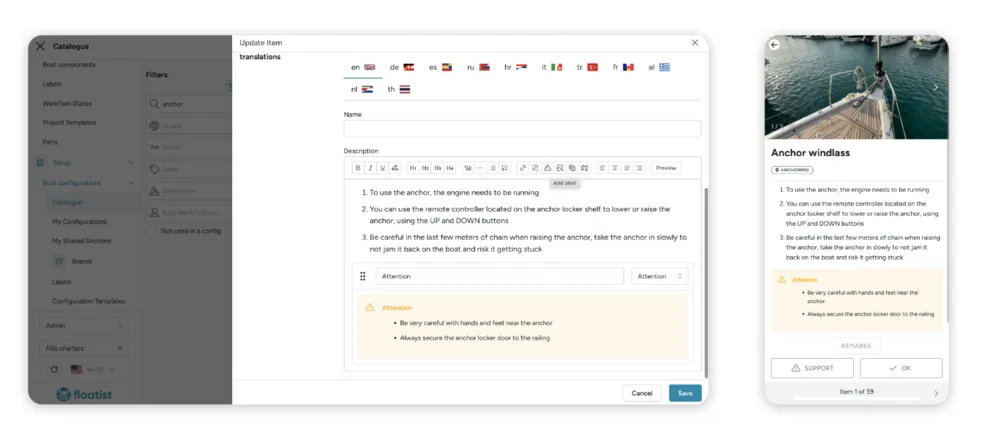
Section titled “Alert editors”We have added the possibility to add alerts in our richt text editor. This means you can use alerts in:
- Catalogue items
- Booking descriptions
- Base descriptions
- Boat descriptions
To use alerts, in the rich text editor press the triangle with the exclamation mark in it. You can choose from different types of alerts, each with their own color and icon. You can also give your alert a title. Below is an example shown for the yellow alert.
Savvy Navvy embedded map
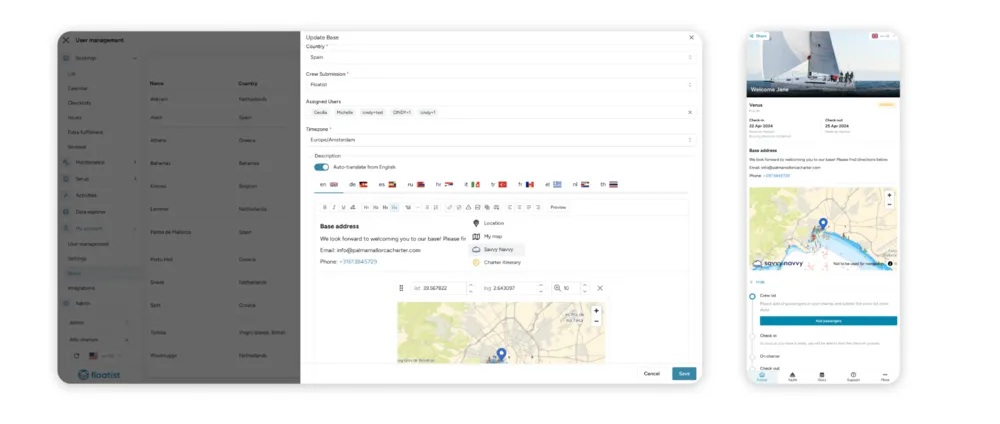
Section titled “Savvy Navvy embedded map”Floatist has partnered up with Savvy Navvy! Savvy Navvy is like the Google Maps for boats. You can now display your base address using a Savvy Navvy map as an alternative for Google Maps (up to you!). The advantage is that your customers will receive a 2 week free trial for Savvy Navvy when they follow the link, so it’s an easy way for you to provide your customers with a little extra added value.
You can use the Savvy Navvy embed everywhere where there is a rich text editor, that is in the catalogue items, in boat descriptions, in booking descriptions, and in base descriptions (shown below).
Simply press the maps icon and choose Savvy Navvy. Then you can put in your lat and long coordinates and it will display as a map. You can also set the zoom level by choosing a number between 1 and 20.
Filter by Component in Tasks
Section titled “Filter by Component in Tasks”We have added a new filter for maintenance tasks: Component. This means you can now filter your tasks by component and can quickly see which tasks have been created or are outstanding for that specific component.
Labor rate is not obligatory to fill anymore
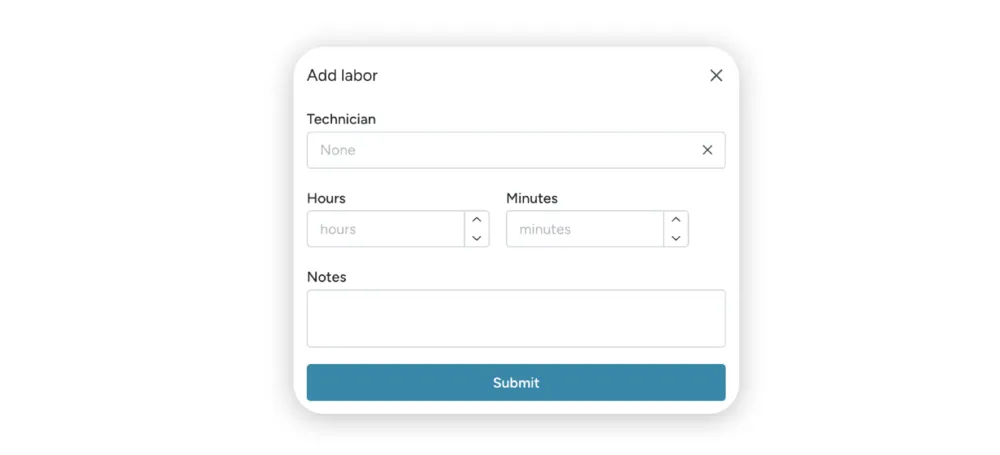
Section titled “Labor rate is not obligatory to fill anymore”Small change to the task interface: when adding labor hours, it is now not obligatory anymore to fill in the rate. This was causing for problems in cases that the person who was logging the hours did not know the rate. It is now removed from tasks.
March 22
Section titled “March 22”Base Description, Google Maps Location & Routes Support
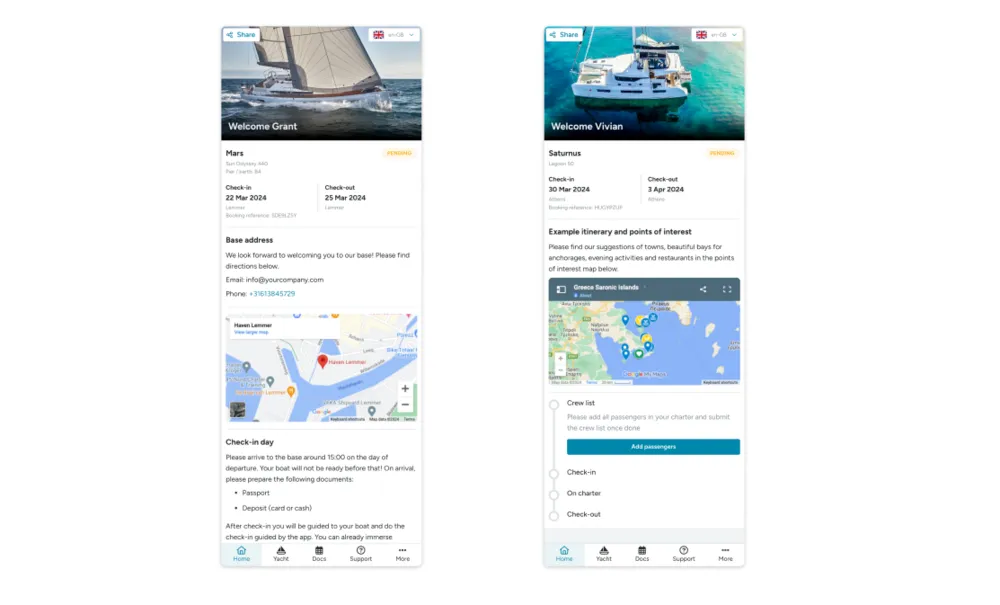
Section titled “Base Description, Google Maps Location & Routes Support”It is now possible to add a description of your base, which will then show up for the customer on the home page of the app. For example, you can add base information in there that you would usually send in a PDF, so the customer can in one glance see the most important details about your base. It is completely customizable to your liking, two examples are displayed below. If no Base Description is filled, only the timeline will be shown.
As part of the new Base Descriptions, it is now also possible to embed Google Maps locations and Google Maps Routes in our rich text editors. This means you can display the location of your office, or the pier in the map, and you can embed a custom created route in the app as well.
These features are available in all places we have rich text:
- Base descriptions: Will show up in the home page if defined
- Boat descriptions: Available from Boat > Edit
- Catalogue items: The items which show up in the Yacht page and the Checklists
Using the Google Maps Editors
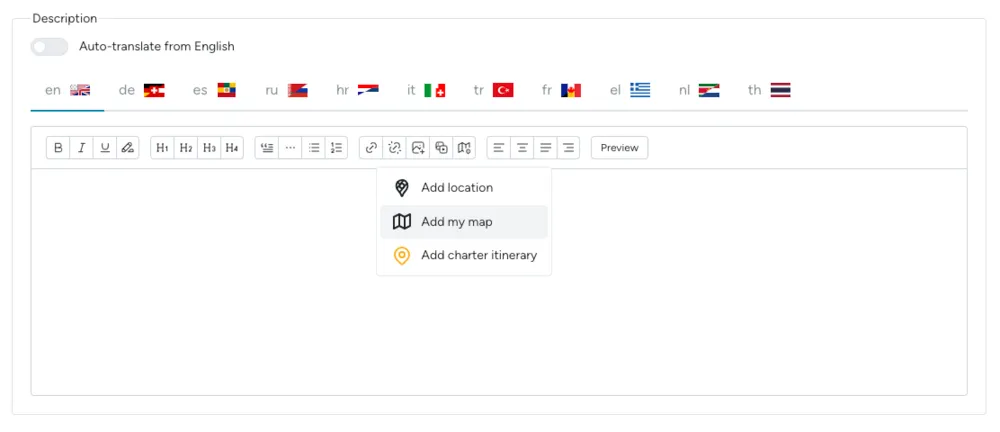
Section titled “Using the Google Maps Editors”Adding a Google Maps Location or a Google Maps Route to any rich text editor in Floatist is as simple as selecting the maps icon in the editor. Then select one of the three options:
- Add location: For a Google Maps Location
- Add my map: For a Google Maps Route
- Add charter itinerary: For adding a itinerary created using Charter Itinerary
Location
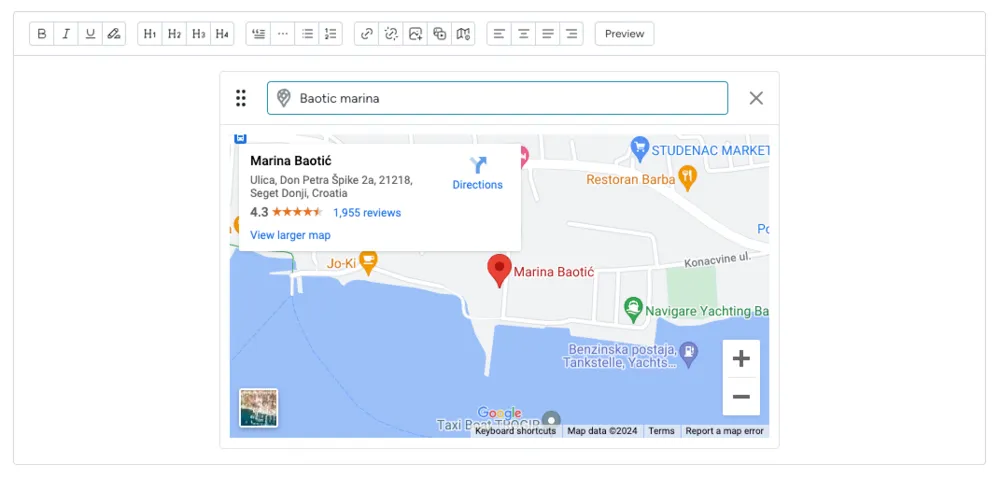
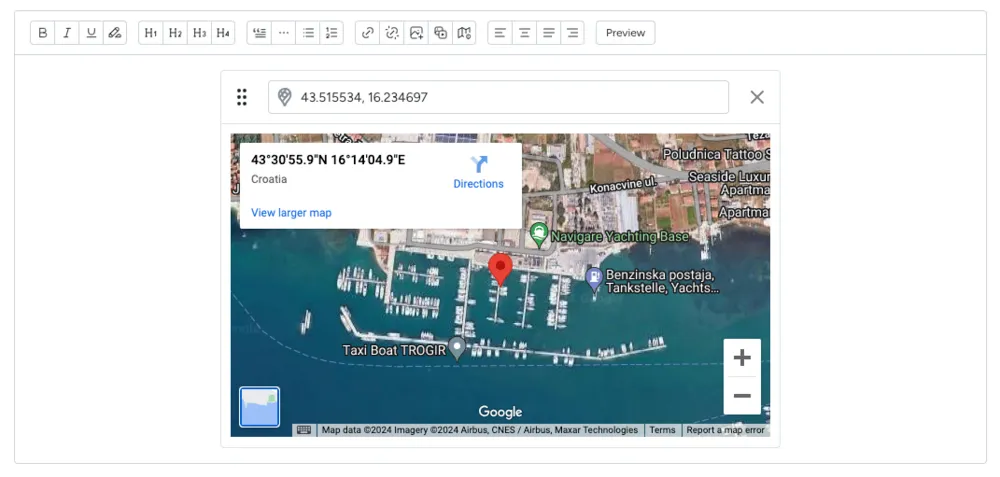
Section titled “Location”To add a location, simply type the location as you would in Google Maps. You can also use coordinates. You can choose the type of map you want to display: map or sattelite.
Route / Points of Interest Map
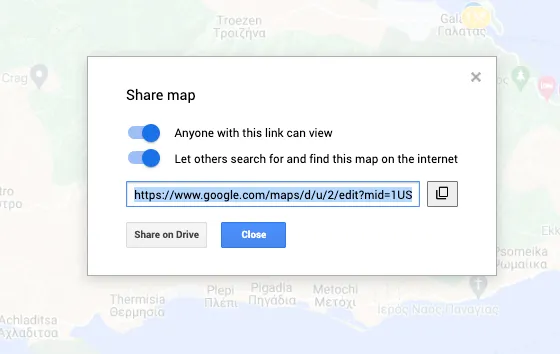
Section titled “Route / Points of Interest Map”- In order to add onw of your own maps from Google, you need to create a map first, which you can do on https://www.google.com/maps/d/u/0/.
- After creation, click share, and select Anyone with this link can view.
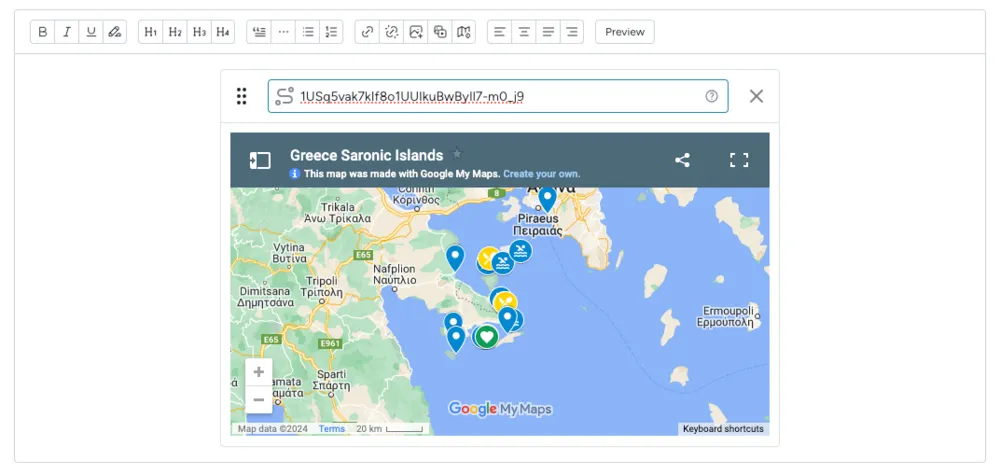
- You then need to copy the MID, which is the id for the map. You can find the MID either in
the browser bar (highlighted in below image) and in the copied link, it’s everything after
mid=and before&

- Then copy the MID in the map editor in Floatist, and voila!
Overriding a Boat Configuration for a Booking
Section titled “Overriding a Boat Configuration for a Booking”By default, each boat is assigned to one boat configuration. Boat configurations are defined in the
Settings > Bookings > Configurations. The boat configuration will determine what is shown to the client in Pre-check-in, Check-in, and check-out.
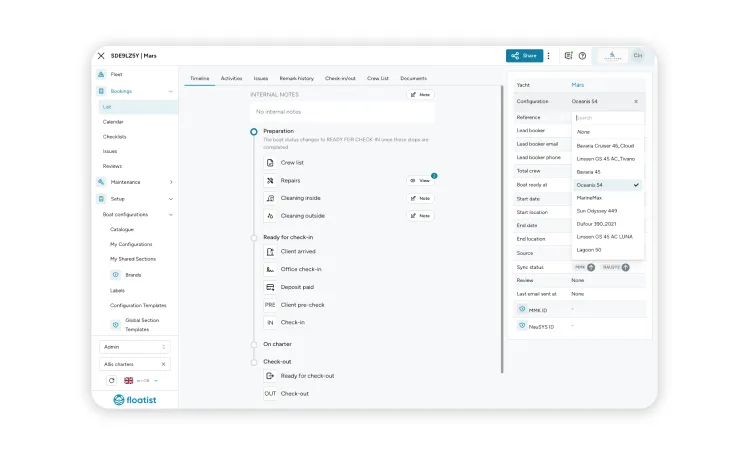
Sometimes it might happen that you have two different types of configurations for the same boat, for example if you have a regatta version of the configuration (which includes extra sails and doesn’t include a dinghy, for example). In this case, you can override the Boat configuration to use a different configuration for that specific booking.
You can manage the configuration in the booking overview by selecting it and choosing the different one.
February 28, 2024
Section titled “February 28, 2024”Charter Issue and Task Link
Section titled “Charter Issue and Task Link”This is an exciting change that will help your workflow regarding client reported issues!
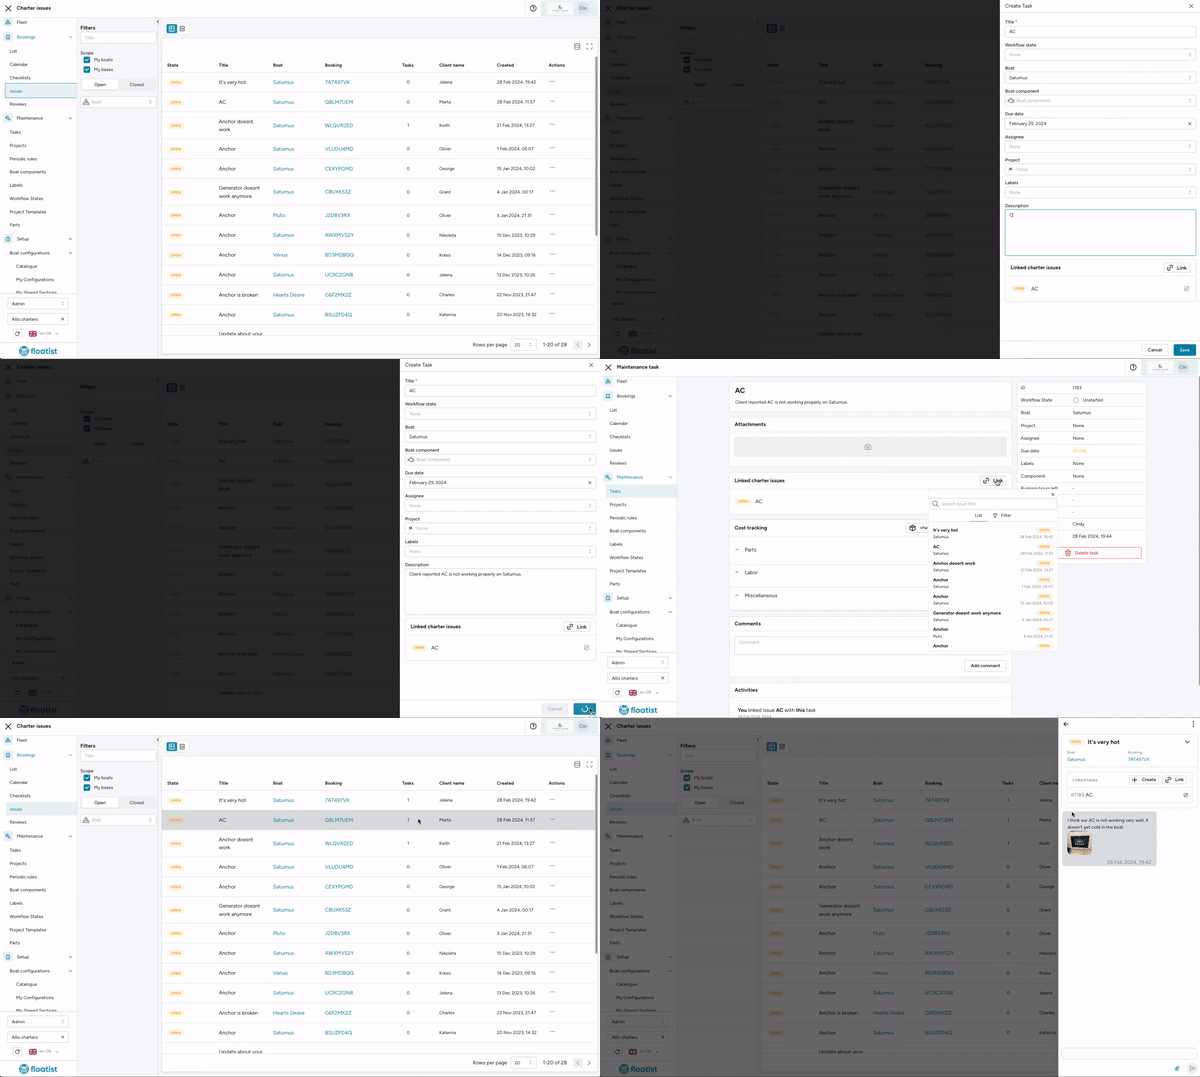
We have created the possibility to establish a link between Charter Issues and Tasks. This means that you will be able to associate them to each other, so you know more about the context of a certain task.
You can now create a task directly from a charter issue by clicking ‘Create’. It will then open a new task form which you can edit if desired, and once saved, the link with the charter issue is automatically established.
In the corresponding task you can see the link to the original charter issue as well. From the created task, you can then also link any other charter issues that reported the same problem, so you can keep track of the number of reported issues for that specific task. You can link as many tasks and issues to each other as you want.
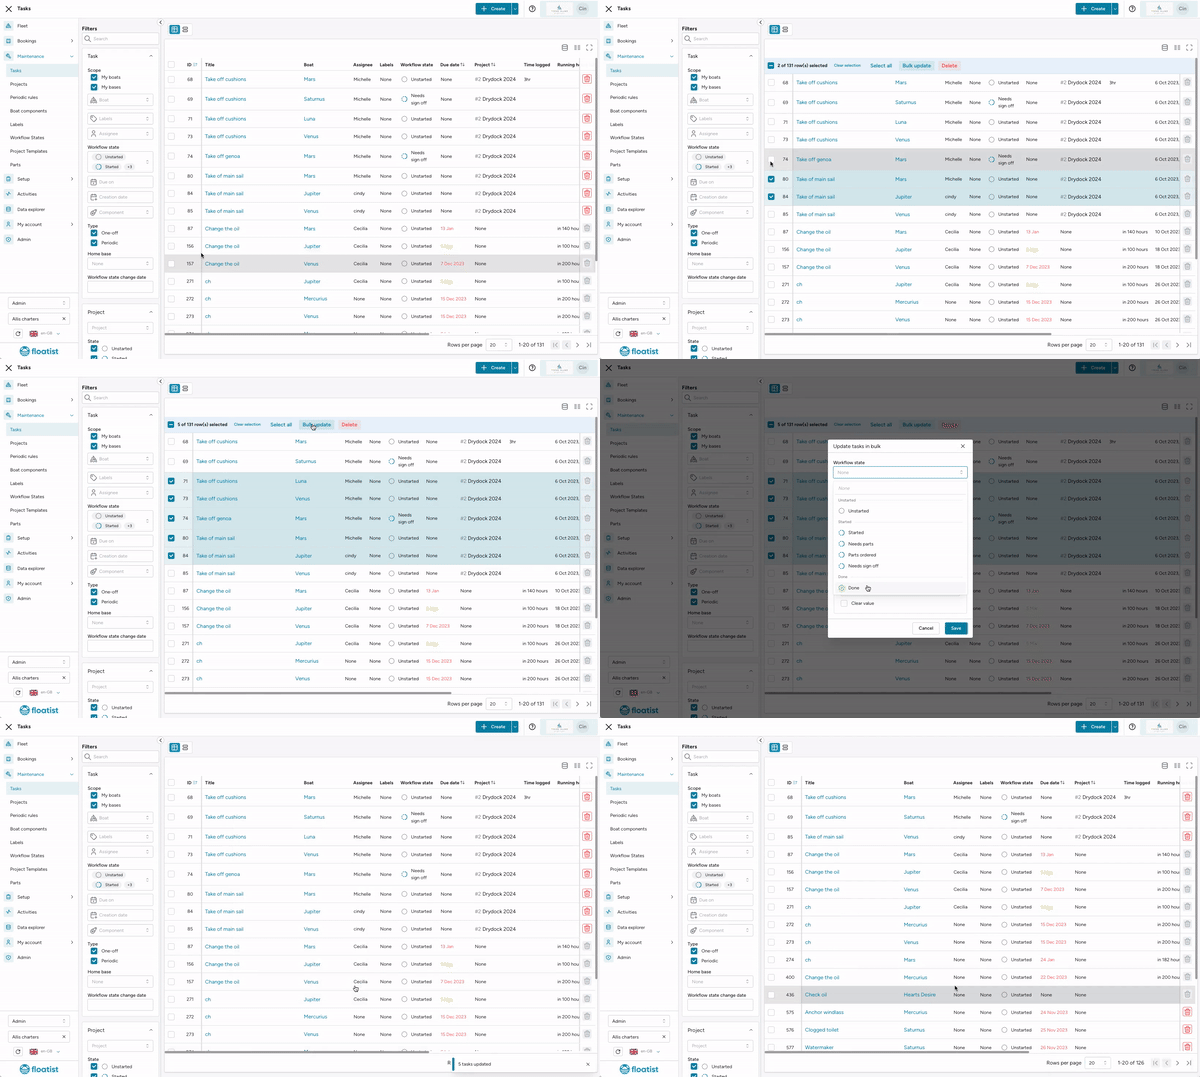
Update Task Workflow State in Bulk
Section titled “Update Task Workflow State in Bulk”It is now possible to update the workflow state of one or more tasks in bulk. To do so, select the tasks you want to update, click Bulk Update, and set the new Workflow State.
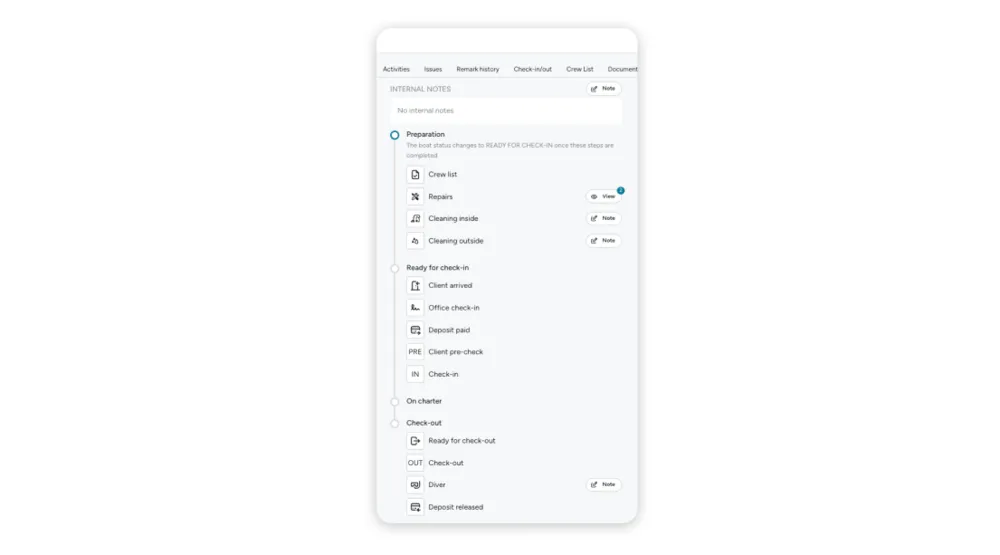
Added a new Booking Stage: Client Arrived
Section titled “Added a new Booking Stage: Client Arrived”By popular demand, we have added a new booking stage, to indicate if the client has arrived. That way your entire team knows whether or not the client is already in the base.
Change in Booking State Icons
Section titled “Change in Booking State Icons”We have made some additional changes to the booking stage icons, especially in order to make it more clear which ones are Pre check-in, Check-in and Check-out. These are the new icons:
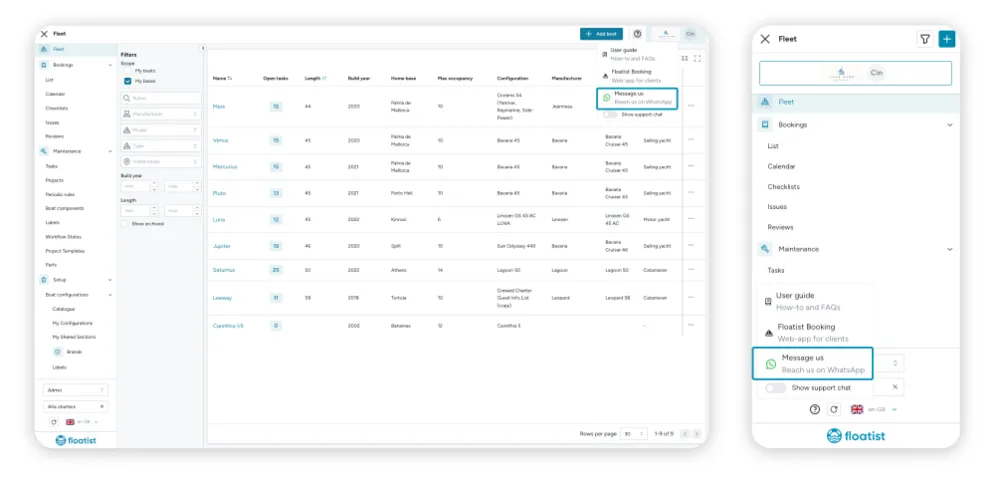
WhatsApp Support button
Section titled “WhatsApp Support button”We added a WhatsApp button to reach us directly on WhatsApp for any support. You can find it at the questionmark on the top right on desktop, or in the menu on the button while on mobile. Do not hesitate to reach out with any questions at any time.